Difference between revisions of "V9: Playtest Rules"
m |
m |
||
| Line 2: | Line 2: | ||
{{:V9: Version Info & Title Page}} | {{:V9: Version Info & Title Page}} | ||
{{:V9: Playtest Disclaimer}} | {{:V9: Playtest Disclaimer}} | ||
| − | [[File:V8_border_axe_hammer.png | center | | + | [[File:V8_border_axe_hammer.png | center | 800px]] |
{{:V9: Introduction}} | {{:V9: Introduction}} | ||
{{:V9: Getting Started}} | {{:V9: Getting Started}} | ||
Revision as of 23:41, 14 January 2023
- The Amtwiki is the official home and primary source for Amtgard V9 Rules as of February 25, 2023.
- These rules are currently in Open Alpha Playtest. See the Playtest Disclaimer for more details.
- To learn more about Amtgard V9 Development, please visit Amtgard.com.
- To view the current Amtgard V8 ruleset, please see the Amtgard V8 Rulebook.
Rules of Play
🆕 Version 9A.6.240209 (February 2024)
Open Alpha Playtest
Design Credits & Acknowledgements.
SELECT VIEW MODE
Category View | All-in-One View
Amtgard V9 Playtest Information
General Disclaimer
The Amtgard V9 Alpha Playtest Program is the official playtest program for the Amtgard V9 ruleset.
This is a standalone product. These rules is not designed or intended to be used alongside the existing Amtgard V8 rules. Doing so may yield results that are not reflective of Amtgard V9 or the goals of its developers.
Alpha-level rules are not final. They are not supposed to look or feel like a finished product at this time. They are a work in progress and therefore subject to change. Changes may occur frequently. Consult the version number and the change log to ensure you are following the most up-to-date rules.
Construction Disclaimer
We sincerely appreciate anyone who chooses to spend their time and resources constructing equipment for the playtest. That said, if you choose to craft equipment for this playtest, please do so with the knowledge that it may become illegal as the ruleset continues to develop. If you are worried about wasting resources, please check with a V9 Team member and they can let you know how likely it is your project will see changes down the line.
When and Where Can I Playtest V9?
All parks and their players are invited to participate at this time. Alpha Playtesting is completely voluntary and should be done at the leisure of each park and its members. Playtesting these rough, unrefined rules may not be enjoyable for everyone. It is encouraged that players be given the choice and ample time to familiarize themselves with the playtest ruleset before use. This is still a completely new edition, even if many aspects are similar.
If your players are looking to play a more refined and polished version, we highly recommend waiting until Beta-Playtesting begins in summer 2024.
To help with advertising, you can use the the V9 logo or seal on any event banners or posters so players know it will be using the V9 rules.
Where Can I Contribute Feedback?
Any Amtgard player can join the Amtgard V9 Discord server to submit feedback and participate in discussion.
Only feedback submitted on the Discord server is guaranteed to be seen by the development team.
Images and Artwork
Images used in this document are placeholders to demonstrate the intent of the final work. If you are the creator or subject of an image in this document and would like it to be removed, or if you would like to help provide images and artwork for the final version, please contact [email protected] or connect with us on Facebook or Discord.
Introduction
Commitment to Diversity & Inclusion
"It is the professed belief of the leadership of Amtgard that all people regardless of gender, nationality, race, ethnicity, age, sexual orientation, mental or physical ability, or religious affiliation should find Amtgard to be welcoming and inclusive. To that end, we encourage all members of Amtgard to embrace an appreciation of diversity and to take actions that help those who face systematic discrimination find a home within our community.
The leadership of Amtgard recognizes that we must hold our organization to a standard of inclusion. This standard is not merely a required minimum, but rather one that makes us actively appealing to those people who have historically been discriminated against. As such, it falls on us to strive not only for equality in our actions towards our vulnerable membership, but also for equity in order to raise them up to a level of security and acceptance that so many of us enjoy as a matter of course.
Therefore, the leadership of Amtgard resolves to dedicate itself as a matter of official policy and public record to ensuring that our publications, communications, governance, and behavior promote and further these stated beliefs so that all of our members can have the Amtgard they deserve."
- - Amtgard International Circle of Monarchs 2018
What is Amtgard?
Amtgard is a free-to-join, fantasy-themed, boffer-LARP community with options for both combat and non-combat participation.
Amtgard meetups are typically hosted each week by local parks, with large celebrations and Kingdom events every 3 months or so.
Amtgard's flagship activity is Class Battlegames: live-action, team-based, arena-battles that take full advantage of our fantasy class system, including bow-wielding archers, spell-flinging wizards, and armor-clad warriors. Other popular combat activities include 1-on-1 tournaments and story-based adventures.
Amtgard combat is full-speed and medium-contact. Medium contact means that players will often make physical contact with each other using approved equipment but grappling, head shots, and most other forms of non-padded contact are prohibited.
Amtgard encourages all players to dress and present themselves in line with the heroic fantasy genre, however Amtgard as a whole is not an immersive roleplay LARP. Instead we support a casual, relaxed roleplay environment that allows each member or even groups as a whole to roleplay as much or as little as they wish, akin to what you might find between different tabletop RPG groups.
Roleplay is only expected when participating in dedicated roleplay activities, such as Quests and Scenario battles. Amtgard roleplay activities are typically episodic in nature, with the settings and narratives for each one driven by local-level organizers with no oversight from Amtgard International.
Amtgard also offers a wide variety of non-combat activities to explore and participate in. Our community boasts a diverse base of crafters, cooks, writers, performers, and visual artists, as well as game designers, roleplay organizers, referees (called reeves), and a multitude of other leadership & logistics volunteers. Many of our members develop and hone lifelong skills through the support and motivation offered within the Amtgard community.
Lastly, Amtgard has a robust award system designed to recognize and celebrate the accomplishments of our players across our all facets of the game, both in and out of combat.
Interested?
Find your nearest Amtgard park and join us!
New to LARP and Boffer Combat?
For those who have never explored LARP or Boffer Combat before, welcome to your new favorite pastime!
What is LARP?
LARP stands for Live Action Role-Play and it encompasses a wide variety of games where the main connection is players assuming the role of a character and playing the game with their physical bodies and imagination (instead of digitally). If you've ever participated in an Escape Room, a Murder Mystery, or just 'played pretend' with a child, you've participated a form of LARP.
Different LARP activities have different levels of required roleplay. Whereas Escape Rooms typically require little or no roleplay on the part of the participants, conventional LARPs encourage players to create a character and embody them through their actions and appearance (costume).
Some LARPs, including Amtgard, allow participants to choose an occupation or "class" that grants access to equipment and special abilities. Abilities can be represented by physical objects, such as using yellow foam balls to represent Lightning Bolts, or they can be entirely imaginary, such as a spell of Healing that allows one player to aid another with only their voice.
More than anything else, Live Action Role-Play means using your body and imagination to have epic battles and adventures LIVE with other people who are just as excited about it as you are.
What is Boffer Combat?
Boffer combat refers to a specific style of safe combat where players engage each other with foam-padded weapons, often referred to as 'Boffers'.
Boffer Combat is a safe way to enact fast-paced fighting for large groups of players without the need for extensive safety gear such as helmets or pads. Most players can safely participate in Boffer combat wearing only their normal clothing!
What is a Boffer LARP?
Amtgard is a Boffer LARP. That means we combine the roleplay and imagination of LARP with the mechanics of Boffer Combat to form the basis of our rules. Participants can choose a class and use special abilities alongside full speed boffer combat to engage with other players and the game around them.
Join Us!
If all this sounds exciting to you, you're only pages away from joining one of the best fantasy Boffer LARPs in the world!
Getting Started
Getting started with Amtgard is quick and easy. Here's some essential information for any new player.
Minimum Age for Combat
You must be at least fourteen (14) years of age to participate in Amtgard combat activities. Some restrictions apply.
For full details please visit the ' Age of Combatants' section.
Characters, Progession, and the ORK
Setting Up Your Account
On your first day, you will be asked to choose a name for your player account on Amtgard's Online Record Keeper (ORK). This account will be used to store all the progress and milestones you achieve throughout your Amtgard career. Most people will use the name of their 'Main' character, however your ORK account name can be whatever you like and changed at any time without affecting your progress.
Your ORK account will be set up for you automatically after you sign in to your first Amtgard function. After that point you can reach out to the officer responsible for ORK Updates (usually called the Prime Minister or Chancellor) and they can provide you with your login information.
Character Creation
In Amtgard, progress is tied to the player, not the character. All levels and achievements listed on your ORK account are player-specific and can be immediately applied any to new characters you create. You do not need to level up each character individually. Because of this, creating a new character in Amtgard is as easy as picking a name.
Unlike immersive LARPs, having a developed character is not required to participate in most Amtgard activities. With that in mind, even though most activities can be played out-of-character, members are still encouraged to build their garb and aesthetics around a particular character concept or fantasy that excites them.
Can my character be permanently killed? / Can I lose my progress?
No. Only you can decide when your character is gone for good and since all your progression is tied to your ORK account, killing off or retiring a character is purely a roleplay decision with no effect on your levels or achievements.
Theme and Setting
Theme
The core theme of Amtgard is Heroic Fantasy.
Heroic fantasy is the name given to a subgenre of fantasy otherwise called "sword-and-sorcery". It is a story of action and adventure laid in a more or less imaginary world where magic works and modern science and technology have not yet been discovered. Such a story combines the color and dash of historical costume romance with the supernatural thrills of the weird, occult, or ghost story.
When done well, it provides the purest fun of fiction of any kind. It is escape fiction wherein one escapes clear out of the real world into one where all life is adventurous, all problems simple, and there's nothing that can't be solved with a good quest."
- - Paraphrased excerpts from Heroic Fantasy on Wikipedia
Setting
The shared fantasy setting of Amtgard is limited to just a few details, the rest of which are left up to local communities and roleplay organizers.
- All Kingdoms and Parks exist in the same plane, called "Amtgard" or "Amtgardia". Historically-inspired themes and garb are allowed, however this world is distinctly not Earth so players should act accordingly.
- All Kingdoms and Parks are geographically arranged similar to how their real-life locations are arranged on planet Earth, often with similar topography, landmarks, and/or water features (rivers, coastlines, etc.)
- There are 12 constellations that can be seen in the night sky no matter where you are in the plane. The orientation of the stars is always the same but the names, imagery, and mythology attached to them may vary from region to region.
- Phoenixes are sacred creatures, though like the constellations the nature of this sanctity may vary from region to region.
What to Expect From Amtgard Roleplay
Amtgard has a wide variety of game modes and ways to participate. Only activities specifically designated as "Roleplay Activites" will ask players to be in-character and roleplay. All other activities happen out-of-character but participants are more than welcome to roleplay just for the fun of it, so long as they don't expect others to play along.
Social spaces and non-game areas are also out-of-character, however some players will use these spaces for Sandbox Roleplay.
Since roleplay only happens during roleplay activities, your personal Amtgard experience may vary based on the activity preferences of your local Kingdom and Park. There are groups that roleplay every chance they get and some that rarely, if ever, roleplay. Check with your nearest park to see what kinds of activities they like to run so you can prepare and set your expectations accordingly.
When you finally enter a roleplay activity, you will notice that Amtgard roleplay is free-form, decentralized, and often episodic. Amtgard does not have a single unified story connecting all Kingdoms. Instead, local communities each craft their own stories, maps, and regional lore independent of one another, much like different tabletop RPG groups.
Last but not least, there are no penalties for accidentally breaking immersion or speaking out-of-character during a roleplay activity, although you are obviously encouraged to avoid impacting the experience of those around you whenever possible. Amtgard roleplay is generally easygoing and the rare high-immersion activities will come with proper notice so you know what you're walking into.
Check out the Roleplay section to learn more.
What to Bring On Your First Day
It is totally acceptable to show up to your first day with nothing but the clothes on your back. Amtgard parks will often have a small collection of basic loaner equipment and sometimes even garb (costumes) that new players can borrow during the day until they are able to craft or acquire their own. While there is no guarantee that these will be always be available, many of our members will often be more than happy to lend a new player some of their own equipment for the day.
That said, if you want to come prepared, connect with your park ahead of time to see what is available and/or check out the Garb and Equipment sections to learn more about building or buying your own costume, weapons, shields, and armor for Amtgard combat!
Who is Responsible for Helping New Players?
When you attend an Amtgard event or function for the first time, introduce yourself as a new player and ask to speak to one of the local Officers in charge of the group who's event you are attending. They will be best suited to help you learn the ropes or point you towards another capable member who can assist. Be honest about how much you know (or don't know) about LARP and Boffer Combat and you'll find yourself primed and ready for your first battle in no time!
Officers are also the best people to speak to if you have any other questions, issues, or complaints that you would like addressed.
Choose Your Own Adventure!
Amtgard is more than just a combat LARP. It's a vibrant community that offers a multiple of ways to participate whether your weapon of choice is a sword, a needle, a pen, or even a spreadsheet!
Now that you've finished with this section, follow these links to explore the various facets of Amtgard:
Core Combat Rules
From basic strikes to powerful magic, most Amtgard mechanics involve the core combat rules to some extent.
Age of Combatants
Combat in Amtgard is reserved for players of at least fourteen (14) years of age. Additional details and exceptions can be found here.
Acceptable / Unacceptable Contact
Amtgard combat is medium-contact activity. Medium contact means that players will often make physical contact with each other using approved equipment but certain forms contact are prohibited. Due to the nature of live combat, some amount of incidental contact should be expected, however repeated or egregious offenses can result in suspension for unsafe play.
Regardless of how it happens, if unacceptable contact is made you should avoid deriving a gamplay advantage from it. If an affected player is staggered and needs a moment to recover, stop fighting them. If necessary, rewind the interaction to the point of unacceptable contact and resume gameplay if/when they are able.
Acceptable Contact
- Weapon into Valid Hit Location: Weapons may be used to strike valid Hit Locations using their Strike-Legal portions.
- Weapon/Shield into Weapon: Weapons and Shields may be used to block, deflect, or pin an opponent’s weapon.
- Weapon/Shield into Shield: Weapons and Shields may be used to deflect, turn, or manipulate an opponent's Shield so long as it does not force the opponent to lose their balance or fall over.
- Body into Weapon: Players may block, deflect, or swipe an opponent’s weapons with their body or limbs so long as the weapon is not trapped or grabbed. Interacting with a Strike-Legal surface this way results in a valid hit to the location used for contact.
- Body/Shield obstructing Body: Players may use their Body or Shields to passively obstruct an opponent’s body, whether it be their physical movement or an attempt to reach something with their limbs. ‘Passively’ means placing yourself between the opponent and their destination.
Unacceptable Contact
- Weapon into Head/Neck: Weapons cannot be used to strike the head or neck.
- Non-Strike Legal Contact: Weapons cannot be used to strike with portions that are not Strike-Legal.
- Body into Body: Players cannot use their Body to directly impact another player’s Body. This includes: tripping, tackling, grappling, shoving, etc.
- Shield into Body: Players cannot use their Shield to intentionally manipulate another player’s Body. This includes shield checking, shoving, etc.
- Body into Shield: Players cannot use their Body to intentionally manipulate another player’s Shield. This includes: shield kicking, grabbing, shoving, etc.
- Garb into Anything: Players cannot use their garb to intentionally block, deflect, or restrict other players or their equipment.
- Forcing Instability: Players cannot intentionally use their body or equipment in any way that would force a static opponent to lose their balance or fall over. (Examples include: checking, shield bashing, hard strikes from excessively large/heavy weapons, reckless collisions, strong strikes to the back of the knees, etc.)
Hit Locations
Definitions and Diagram
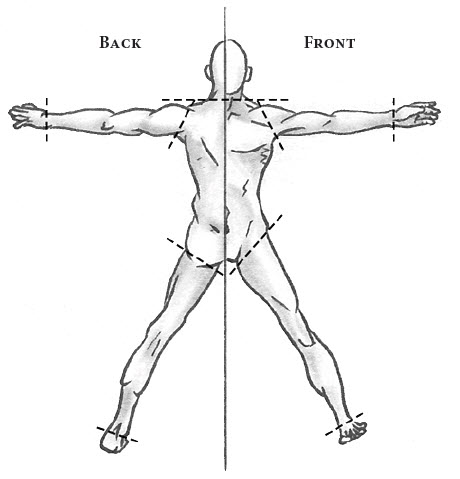
In Amtgard combat, a player's body is divided into five (5) ‘Hit Locations’ which may be struck to inflict damage or effects in combat: Left Arm, Right Arm, Left Leg, Right Leg, and Torso.
- Arms (left/right): From the tips of the fingers to the shoulder socket.
- Legs (left/right): From the tips of the toes to bottom of the buttocks in the back; the crease between the hip and each leg in the front; and just below the hip bone on either side.
- Torso: Everything that isn’t an arm or a leg, including the groin, up to the vertical rise of the neck.
- Illegal - Head and Neck: The head and neck are illegal targets for all Amtgard combat. Strikes to these areas will never count as a valid hit, nor will they be able to inflict any damage or effects. Players are not allowed to intentionally use their head or neck to block incoming attacks. If a player strikes an opponent in the head or neck and gains a gameplay advantage from it, they should stop fighting and allow their opponent to recover. If necessary, rewind to the point of the illegal strike and resume the fight if/when they are able.
Torso Priority
If a strike lands on the line between the torso and an arm or leg, the strike counts as only hitting the torso location. This supersedes Armor Priority whenever applicable.
Hand Protection (aka ‘Hand on Weapon’)
If a strike hits a hand below the wrist that is wielding a weapon or shield, the strike counts as hitting that piece of equipment instead of the hand. Equipment that cannot be used to block, such as bows and projectiles, will not protect the hand this way.
Foot on Ground
A foot touching the ground is unaffected by strikes below the ankle. All attempts to strike it are considered invalid. No effects can be imparted through this contact. A foot that is completely in the air is fair game and can be struck as normal.
Striking Your Opponent
Valid Strikes
Valid Strikes, also known as Legal Strikes, can only be delivered by the strike-legal portion of a weapon. A valid strike must make contact with enough forward momentum that an unaware opponent wearing basic garb could distinguish the strike as offensive rather than incidental contact. Players wearing thick or bulky armor/garments must still acknowledge a valid strike with sufficient momentum even if the blow is not felt.
Though firmer contact will occur from time to time, it is important to remember that our weapons are padded sticks, not actual swords, and we are not trying to cause any real injury. Special care should also be taken when striking with larger weapons such as greatswords, glaives, pikes, and rocks, as these weapons typically have more mass by their design and therefore require greater caution on the part of the wielder to ensure the safety of their opponents.
Valid Strikes are divided into four categories:
- Melee Slash: A melee slash is a strike with the side of a melee weapon. It must be percussive (contact with an audible pop) and be stopped by or noticeably deflect off the victim.
- Melee Stab: A melee stab is a strike with the tip of a melee weapon. It must strike with the tip and be stopped by or noticeably deflect off the victim.
- Projectile Stab: A strike from a Stabbing Projectile, such as an Arrow. It must strike with the tip and be stopped by or noticeably deflect off the victim.
- Projectile Contact: A strike from a Contact Projectile such as a Spellball. Contact Projectiles can strike with any part of their surface as long as it stops on or noticeably deflects off the victim.
Additional Rules
Invalid Obstructions
An Invalid Obstruction occurs whenever a strike is blocked by something that is not allowed block or otherwise affect gameplay in such a manner. This includes but is not limited to: hair (ponytails, beards, etc), loose garb, bulky or protruding armor & accessories, unwielded equipment, non-equipment items such as water bottles, and so on.
A strike that is prevented from making contact due to an Invalid Obstruction counts as a valid strike against whatever would have been hit if the obstruction was not there, as well as a strike against the obstructing object itself if it is able to be affected, such as a sheathed dagger being struck by a Weapon Destroying effect.
For ambiguous incidents where identifying what 'would have been' hit is not so easy, such as two projectiles colliding mid-air, the players involved should do their best to resolve the situation quickly and in good faith. In the example presented here, this is usually done by simply disregarding both projectiles; however, this is not a rule and each case should still be considered independently.
Friendly Fire
All strikes initiated with intent to affect a player will affect whomever they hit, regardless of the intended target. The only exception is that a player can never harm themselves with their own melee weapons unless they actually wish to do so.
Any contact that was not intended to be a strike may always be ignored if both parties agree.
- An Archer missing their target and accidentally striking an ally in the back.
- An Assassin sneaking up and backstabbing someone who they believed was an enemy but turns out to be an ally.
- A Barbarian's rock bouncing off an enemy's shield and rolling back to hit themselves.
- A Monk unknowingly striking an ally with the other end of their quarterstaff while making an attack.
Examples of strikes that can be ignored:
- A Warrior tapping an ally with their sword to get their attention.
- A Paladin resting their spear over their shoulder and accidentally hitting someone as they turn around.
- An Scout accidentally dropping their tomahawk onto their own leg.
- An Anti-Paladin with a double-ended weapon accidentally striking an ally behind them while pulling back from a big thrust.
Multiple Points of Contact
If an attack makes contact with multiple unique Hit Locations at the same time, it will inflict a strike against each Hit Location where contact met the requirements for a valid strike. Contact on the line between locations are affected as per Torso Priority. A single weapon cannot strike the same Hit Location more than once per attack, regardless of how many individual points of contact it makes.
Shot In Motion
If a player is wounded, killed, or otherwise prevented from attacking while they are in the middle of completing a striking motion, the attack is not interrupted and the motion can be completed before they suffer the negative effect. This should be a clear case of finishing an already-started attack, meaning that it requires no change of direction and the last motion required to finish the strike has already been started prior to being affected.
- Melee strikes must land within a half-second of the user being affected.
- Projectiles must be airborne within a half-second of the user being affected.
- Shot in Motion only applies if the attacker is affected. It does not apply if the defender becomes immune prior to contact, such as via an ability like Shadow Step.
Battlefield Etiquette
Everyone processes the game differently so it is important to communicate early and often with your opponents. Keep the Honor System in mind as you work with your opponent to execute the game rules as best as you can.
- If you have to think about it, take it. If you are unsure whether an opponent’s strike or ability against you was valid, give them the benefit of the doubt and take it. Only attacks which are clearly invalid should be treated as such, and in those cases it is common courtesy to announce to your opponent the reason you believe it to be so.
- It is the responsibility of the victim of an attack to determine the location of strikes against them. If the victim is unsure or didn't realize they were struck, the attacker may clarify and call out what they believe happened. If the attacker is unavailable, such as in the case of a run-by or long-range projectile, then the victim should take whatever they believe is most likely to have occurred.
- As long as you and your opponent(s) agree on the outcome, the exact details of any encounter are moot. It's okay to be slightly inaccurate if the alternative is wasting time in the middle of battle trying to sort out fine details.
- Do not call the results of other engagements unless the players involved are asking for your opinion.
- If you notice a player is repeatedly ignoring strikes or effects that you believe are connecting, ask them about it politely in the form of a question ("Did that connect?" "Where did that land?" "Was that hand or arm?"). If the behavior continues, bring the issue to the attention of a Reeve and they will seek to resolve it. Do not confront the player directly again after this point, even if you believe you have a good rapport with them. Allegations of misconduct are often better received when filtered through the proper channels and handled with care.
Wounds
Combat damage is inflicted to players in the form of Wounds. Wounds are inflicted by striking a Hit Location with the Strike-Legal portion of a Weapon. The effect of a Wound is different based on the location wounded. Hit Locations can be wounded multiple times. When asked, a player must promptly declare any wounds they have.
Lethal Wounds
A player dies if they receive any of the following:
- A wound to the Torso.
- A second wound.
- A wound to an already-wounded Limb.
Arm Wounds
A player with a Wounded Arm cannot use that Arm to wield, cast, or carry anything, and it must be kept out of combat as best as possible (typically placed behind the back). If a player is required or otherwise allowed to carry an object in their wounded arm for whatever reason (such as special rules, accommodations, or non-equipment items), they must keep that item out of combat and may not derive a gameplay advantage from it. In all cases, objects carried by wounded arms count as Invalid Obstructions.
Leg Wounds
A player with a Wounded Leg (aka 'legged') must either Kneel or Post. Regardless of their choice, the wounded Leg may not be Wounded again for two (2) seconds after being initially struck or during the initial placement on the ground if the victim chooses to kneel, whichever is longer.
-
Kneeling
If the Wounded player chooses to Kneel, they must physically kneel as soon as possible. They may move around on their knees but must keep at least one knee on the ground at all times. The wounded leg cannot receive further wounds while its knee is touching the ground. -
Posting
If the Wounded player chooses to Post, they can remain standing but can only pivot around the foot of the wounded leg. It must remain in contact with the ground at all times. While posting, the wounded leg is still vulnerable to further wounds.
- Hobbling: If there are no living enemies within 20ft of a posting player, or the posting player is forced to move by some effect, that player may move at a slow walking pace while pretending to drag the wounded foot on the ground behind them.
-
Forced Movement Accommodation
If a player with a Wounded Leg is forced to move or dragged by another player, they may choose to stand and move normally as though they were not wounded. If they choose to move this way, they may not aggress, cast, or take any other action aside from fulfilling the required movement at a reasonable pace. Players may still block and dodge so long as they continue to fulfill the forced movement as above. Once the movement is complete, the player must immediately return to either Kneeling or Posting. -
Leg Wound Stance Switching
Players may freely switch between Kneeling, Posting, and the Forced Movement Accommodation (when applicable) by declaring it loudly and taking the new stance. The Wounded Leg does not receive any special protection during these switches. Switching stances cannot be done to gain an immediate gameplay advantage, such as diving towards an opponent while changing from posting to kneeling, or suddenly standing to catch an opponent by surprise.
Death
Death is common in the game of Amtgard. While living players tend to have the most fun, dead players still have certain rules and responsibilities they must adhere to in order to keep the game running smoothly.
Declaring Death
Players may declare themselves dead at any time, not just when they are actively killed. Upon death, a dead player must loudly declare "DEAD!".
Death declarations are divided into two categories: Calling Dead and Taking a Death.
Calling Dead
Calling Dead is the act of declaring oneself dead due to natural gameplay causes, such as when it is caused by another player or effect, like a wound to the Torso. This is the typical form of death declaration.
- Players may also Call Dead before being engaged in melee if they wish to avoid being physically struck. The attacker who is most likely to have caused the death of the player will be considered to have dealt the killing blow, and allowed to activate any relevant abilities as though they had done so. This interaction should be conducted in good faith and cannot be done if the attacker isn't actually trying to kill the player.
- Players may call themselves dead when a strange interaction occurs and it is determined that the player should have died somewhere in the confusion but the specifics are muddy. If untangling the results of an engagement are too difficult, a player might simply call themselves dead to acknowledge the ‘worst case scenario’. Similar to the above, the attacker who is most likely to have caused the death of the player will be considered to have dealt the killing blow, and allowed to activate any relevant abilities as though they had done so.
- Lastly, players who are at risk of a real-life safety issue may call themselves dead to quickly leave combat without interrupting play.
Taking a Death
Taking a Death is the act of declaring oneself dead for any reason that does not fall under ‘Calling Dead’. This typically refers to deaths taken for tactical advantage in games where dying would be more beneficial than staying alive in certain circumstances.
- Players who ‘Take a Death’ are immediately severed and thus may only return to life by respawning. Further, this death does not count towards any prerequisites for the player or their allies.
- Any player who deliberately kills themselves in a self-inflicted manner will count as ‘Taking a Death’. This includes but is not limited to striking oneself or knowingly running into an non-player hazard (such as a lava zone) with the intent to die. Allowing a team-mate or other player to kill you does not count as 'Taking a Death'.
- Similar to Calling Dead, if a player 'Takes a Death' while another player is actively trying to kill them, the attacker who is most likely to have caused the death of the player will be considered to have dealt the killing blow, and allowed to activate any relevant abilities as though they had done so.
- For roleplay scenarios, a player is only considered to have ‘Taken a Death’ if the death would break immersion or is otherwise only happening to exploit gameplay mechanics. A player who willingly sacrifices themselves to a volcano god would not count as 'Taking a Death' because it is in line with the roleplay.
Being Dead
Death is a unique condition. It is not a state or effect. It can only be removed by Returning to Life.
- The universal symbol for death is placing your hand or weapon over your head, and presenting the rest of your body in an obviously non-aggressive manner.
- This symbol is also sometimes used to indicate "Out of Game" or "Out of Character". The context at the time is usually enough to figure out the intended meaning.
- Upon dying, the player must declare ‘Dead!’ loudly and clearly, after which point they are affected in the following ways:
- The player gains the ‘Dead’ condition and is no longer considered a living player.
- Any chants they were maintaining are ended.
- Any primed spellballs that are not already mid-air cease to be primed.
- Enchantments on the player become inactive and do not bestow any effects.
- Any status effects except Severed are removed.
- The player may ignore any Wounds as long as they are dead.
- The player must remove themselves from the immediate vicinity of combat in the least disruptive manner possible. A dead player's first consideration upon dying should be to avoid obstructing any on-going combat around them. If you dropped your weapons or equipment, you may need to leave them on the ground and return to grab them once combat has moved on.
It is important to declare ‘Dead!’ loudly and clearly. A player who does not indicate their Death promptly is likely to be struck again under the assumption that they are still alive.
- While dead, players must adhere to the following rules:
- May move about the battlefield as long as they avoid obstructing combat or interactions between living players and do not create confusion about their status as a Dead player.
- Cannot further affect or be affected by gameplay unless explicitly allowed by another rule.
- Cannot communicate with living players unless declaring necessary game information or otherwise allowed by a specific effect.
- May collect their own discarded equipment.
- Cannot spy, distract, or otherwise generate a gameplay advantage for their team by using their Dead condition to move through or linger in locations that they have no reason to be in, such as an enemy base on the other side of the field. Use common sense and act in good faith.
Returning To Life
When a dead player is returns to life by one of these means they must loudly declare ‘ALIVE!’, at which point they immediately lose their ‘Dead’ condition and become a living player once more.
There are two ways a dead player can return to life: Respawning and Revival.
Respawning
Each Amtgard activity will have rules for when, where, how, and even IF players are able to respawn after death. Consult the rules for your particular activity or check in with the Game Organizer or Reeve during setup. Most commonly, players will have to wait a certain amount of time (called a ‘Death Count’) and then automatically return to life at a specific respawn location.
When a player returns to life by respawning, they are restored in the following way:
- All wounds are restored.
- All armored locations are restored to full value.
- All weapons, shields, and other equipment are restored.
- All uses of per-life abilities are restored.
- All enchantments are removed.
- All remaining status effects are removed, including Severed.
Revival
Revival occurs when a player is returned to life through a means other than Respawning, such as the use of an ability like the Resurrect spell.
See the Revive keyword for further details.
Dragging
- Any player with a Free Hand may chant "Dragging" while within arms-reach of a legged or dead player to help that player move in-game (see below).
- Dragging a legged player allows them to move as per the Forced Movement Accommodation.
- Dragging a dead player allows them to move farther than 20ft from the location they died without becoming Severed. However if they move again from this point without being dragged, they will be Severed as normal.
- One free hand is required per player being dragged, however no actual physical contact is required.
- Dragging ends immediately if either player aggresses or uses an ability.
- Dragging does not supercede Stopped or other effects that may additionally restrict the movement of a legged player.
- Dragging is non-offensive and can always be refused.
Equipment
Equipment Basics
General Rules
In Amtgard, the term ‘equipment’ refers to any physical gear or functional items that are used to directly influence gameplay. This includes, but is not limited to, weapons, shields, armor, helms, magic items, and portable game objectives. It excludes garb, non-combat items, non-functional props (instruments, books, etc.) and containers (quivers, pouches, bags, etc.).
- All equipment is the personal property of the player that owns it.
- Players may never handle or fight with the equipment of another player without first having their permission. Players may assist with the recovery of expended equipment (often projectiles) without permission however this must be done with utmost respect and permission can be revoked by the owner at any time.
- Players should never knowingly behave in such a manner that would cause a reasonable player to fear for the safety of their equipment.
Universal Equipment Requirements
Every piece of equipment, regardless of type, must meet or exceed all of the following baseline requirements in order to be eligible for use in Amtgard combat. Equipment that does not meet or exceed all of these requirements cannot be used.
- All equipment must be physically safe for the user and other participants to engage with during the course of combat, including incidental contact, falls, and crashes.
- All equipment must be durable enough to survive the rigors of Amtgard combat.
- Equipment must not significantly degrade or fail during the course of combat, including incidental contact, falls, and crashes. Examples include: equipment so flexible as to risk failure; poor connection points; brittle materials; and so on.
- Equipment must be easily recognizable as the type of equipment it is trying to be and not easily confused for something else. It must also be visually appropriate for the Heroic Fantasy theme of Amtgard.
- Each piece of equipment must meet any construction standards relevant to its type.
- Each piece of equipment must be regularly inspected for all of the above, especially potential hazards and conditions that could risk injury, malfunction, or catastrophic disassembly.
- All weapons must also pass a Hit Test before their first use, and periodically thereafter.
Equipment Inspection
Each piece of equipment must pass an inspection before its use each day to ensure the Universal Equipment Requirements of safety, durability, recognizability, and any other type-specific construction standards are met.
Guidance for Equipment Inspectors can be found in the Equipment Inspection Guide. The following information is the essential knowledge that all players should have:
- Equipment is inspected by an Equipment Inspector. Since equipment inspection is mandatory, this task is often a listed responsibility of one or more Officer positions, traditionally the Champion and/or Guildmaster of Reeves.
- All inspectors are highly encouraged to follow the Equipment Inspection Guide.
- All weapon inspections must include volunteer-assisted Hit Testing.
- Equipment that does not pass inspection cannot be used in combat. Using uninspected or unapproved equipment on the battlefield is grounds for immediate suspension from play.
- Equipment may be reinspected throughout the day as necessary.
- New or inexperienced players wishing to use a weapon type they have never used before must also demonstrate Weapon Competency to ensure safe use on the battlefield. Players who demonstrate unsafe weapon use during this demonstration or at any point thereafter may have those weapon privileges revoked by a Rules Authority.
Equipment Use Terms
The following terminology applies to all forms of equipment.
Carried
All equipment on a player is considered Carried. If something cannot be carried, it cannot be lifted by the player in any way.
Held
Anything carried using one or more hands is considered Held.
Free Hand
Also known as an 'Open Hand', a Free Hand is the hand of an unwounded arm, which is not holding any equipment other than material components required by the action.
Free Hands are most often required to cast abilities and interact with game objectives.
- Bucklers, Small Shields, and Magic Staves will not count against a Free Hand, even while holding the handle.
- Medium, Large, and Tower Shields that are held in hand or worn on an arm will always take up the respective Free Hand, even if they are not actively being wielded or held in hand. The same is true for all sizes of Madu.
- Abilities marked with ⬗ in class customization do not require a free hand for that class to use.
Worn
Equipment attached to or otherwise dressing the body in its intended manner is considered Worn. Physical Armor must be Worn to bestow protection.
Wielded
Equipment is considered Wielded when it is being held in a manner appropriate for its use in the game of Amtgard.
- Equipment must be wielded in order to attack, defend, or otherwise be used for its intended purpose. Certain game types, classes, and special rules will limit the equipment a player is allowed to wield.
- If something cannot be wielded, it can still be held or carried, but cannot be used to perform any function and should not be presented in a way that would suggest it is wielded.
- Players can only wield one piece of equipment per hand. Shields are an exception (see below).
- Players may only ever wield a single Shield at a time, however shields can be wielded simultaneously in the same hand as any another piece of equipment except Bows and Crossbows.
- Medium, Large, and Tower Shields must be held by their handle to be wielded.
- Bucklers and Small Shields must be either worn on the arm or held by their handle to be wielded.
- Shields cannot be wielded while worn like a backpack or strapped to other parts of the body such as the torso, legs, hip, or head.
- Bows and Crossbows cannot be wielded with any other equipment in the same hand (besides arrows). Likewise, other equipment cannot be wielded while in the same hand as a bow or crossbow. A buckler or small shield may still be wielded on the arm so long as there is no risk of it interfering with the safe use of the bow.
- For gameplay purposes, reloading a crossbow does not count as wielding it.
- Thrown projectiles are only considered wielded during the throwing motion. They are considered unwielded equipment at all other times.
- Players may hold Unwielded equipment in the same hand as wielded equipment in situations where it is blatantly and visually obvious which piece of equipment is in use and which one is not. If a player ever visually appears to have more equipment wielded than they are allowed, all the equipment in question is considered unwielded.
- Bows and Crossbows are the only exception to this rule (see above).
Example 1: A player may wield a polearm two-handed while also holding an unwielded flail in one of their supporting hands. The pole can be used as long as the flail is obviously not in action. In order to use the flail the player would need to release the polearm from the flail hand.
Example 2: If a player holds two short swords in the same hand then both would be considered unwielded because it would be too ambiguous which one the wielder is intending to use and which one is just being held, regardless of their orientation. - Bows and Crossbows are the only exception to this rule (see above).
Unwielded
All equipment is considered unwielded unless it meets the conditions for being worn or wielded. In addition, the following rules apply:
- Unwielded Equipment will count as an Invalid Obstruction when struck.
- Unwielded Equipment cannot be used to block line of sight or impede the physical movement of other players or their equipment.
Unattended
Unwielded Equipment that has been at rest on the ground or against terrain for at least 5 seconds is also considered ‘Unattended’ until it is reclaimed by an intended user. Unattended Equipment cannot be destroyed or otherwise affected by gameplay. This has no effect on conditions the equipment had before it became Unattended (ie. a destroyed weapon will stay destroyed even while it is unattended).
Destroyed
Some effects may cause equipment to become Destroyed.
- Destroyed equipment cannot be wielded, used to perform an in-game function, or otherwise generate a gameplay advantage until it is restored.
- Destroyed equipment may still be carried or worn so long as the player notifies their opponents about the state of the equipment as necessary and avoids presenting it in a way that would suggest otherwise.
- Destroyed Armor is reduced to zero (0) armor points in the affected location.
Weapons
Striking your opponent with a wielded weapon is the primary way to interact with them in combat.
General Rules
- Only weapons that meet the Universal Equipment Requirements can be used in combat.
- All Amtgard weapons are classified as either a ‘Melee Weapon’ or a ‘Projectile Weapon’, as well as a specific classification or typing such as ‘Short’ or ‘Long’. Weapons of the same classification have the same gameplay rules.
For example, a ‘ Short’ melee weapon made to resemble a fish will have the same gameplay rules as a ‘Short’ melee weapon made to resemble a Sword or Club. - Unsupported Weapons: In-Game representations of explosives, firearms, and chemical weapons (such as Alchemist’s Fire or Toxic Gas) are not supported by the Amtgard Rules of Play. If something of this nature is desired for a special scenario, a Game Organizer may design and implement custom rules on a game-by-game basis.
- Prohibited Weapons: For the safety and comfort of our players, Amtgard outright prohibits the following weapon styles and their variations. If you are unsure if a weapon design falls under these categories, consult a Reeve or other relevant Rules Authority.
- Entangling Weapons such as Whips, Lasso, Nets, and Bolas.
- Atlatls, Slings, Slingshots, and all other handheld projectile launchers that are not bows or crossbows.
- Punching weapons such as Foam Fists, Punching Daggers, and Tonfas. The experience of being punched is psychologically at odds with the safe, inclusive, fantasy-sword-fight atmosphere that Amtgard wishes to evoke.
Construction Terms
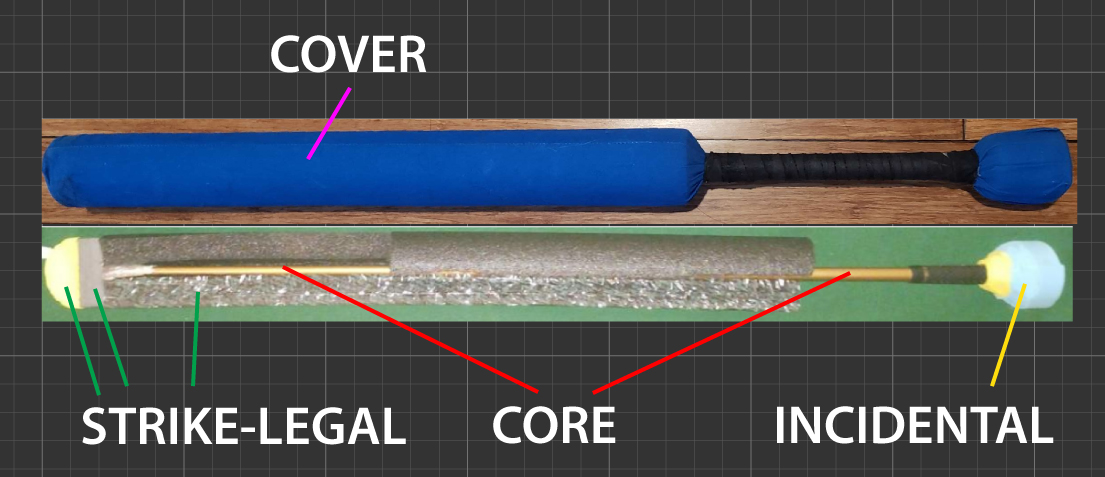
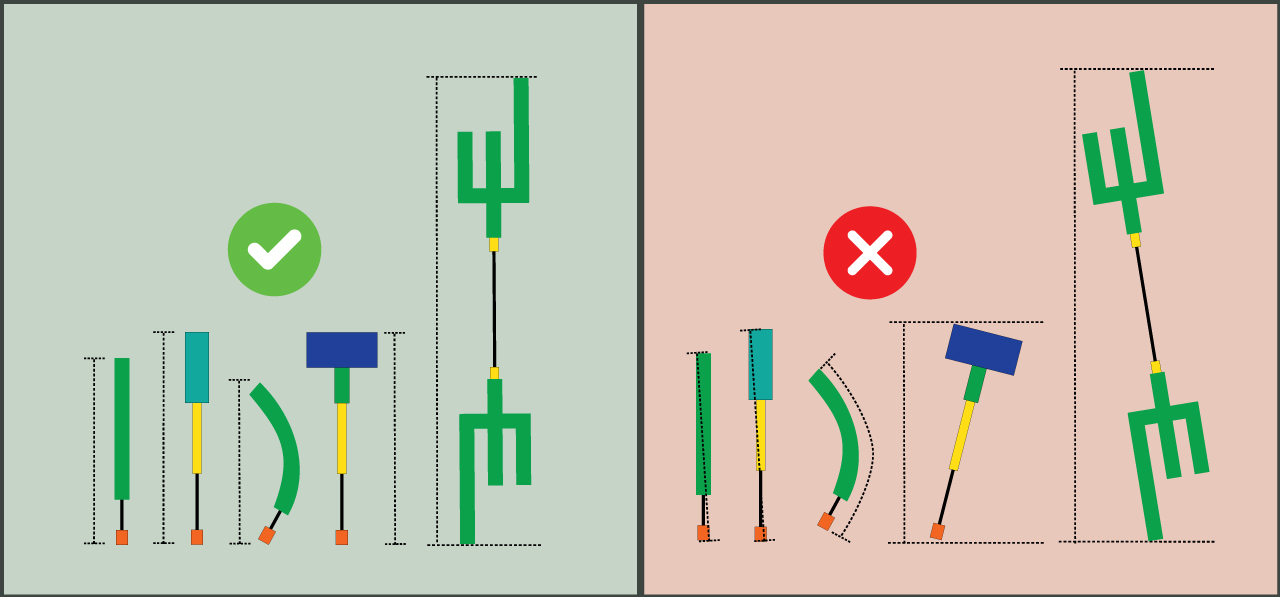
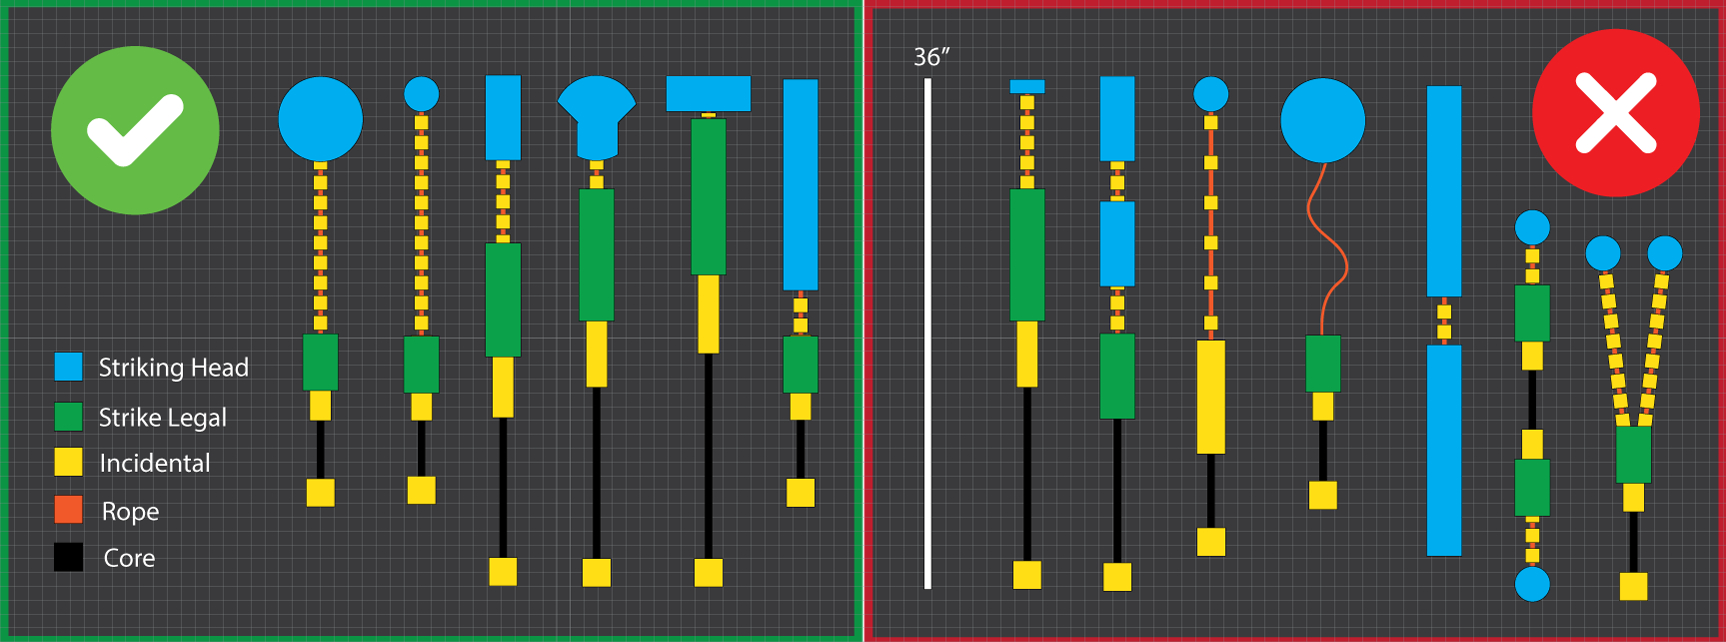
Amtgard weapons are typically made from a structural core padded with foam and a cloth cover. Below is a diagram of a few typical weapons with their component parts labelled. You can read the descriptions for each component below, which are listed in alphabetical order for ease of reference.
2.5 Inch and 2 Inch Rule
- No part of a weapon's striking surface, whether the tip, the edge, the face or any other part, may protrude more than 1.5" through a two-and-a-half inch (2.5") ring when uncompressed.
- No part of a weapon or shield's non-striking surface such as the ends of crossguards or pommels may protrude more than 1.5" through a two-inch (2") ring when uncompressed.
Core
This refers to the structural base of the weapon to which padding is affixed.
- Rigid Cores
Melee Weapons require a rigid core to provide structural stability. Short weapon segments and small protrusions from a central core that are stable on their own do not require a rigid core within them. These segments and protrusions must not deform or fold over excessively during combat and must always return to their original position.- The best materials to use are carbon/graphite rods (such as from non-metallic golf clubs), kite spar, bamboo, PVC tubing, or fiberglass. Other materials will be assessed for safety on a case-by-case basis.
- Metal and wooden cores are prohibited. Metal may be used to counter-weight weapons provided it is permanently attached and not in a place that may inadvertently strike another player.
- The ends of any rigid cores should have a flat face and be securely capped with a layer of foam and tape at minimum to prevent the core from pushing through.
- Hollow cores should be sealed at the ends.
- Sharp edges should be blunted so as to not dig into the padding.
- Non-Rigid Cores
Contact Projectiles require a non-rigid, non-granunlar core.- The best materials to use are foam (any), denim, sweatshirt material, loose rubber bands, etc.
- Unacceptable cores include: Solid rubber, tightly-wrapped rubber bands, tennis balls, beanbags, seed packets, etc.
Covers
All striking surfaces must be covered in a durable, opaque cloth and be visually distinct from any non-striking surfaces. Incidental padding within 0.5" of a striking surface must also be covered in this manner. Non-abrasive cloth tape (not duct tape) may be used for Contact Projectiles but it is not an acceptable cover material for melee weapons or arrows.
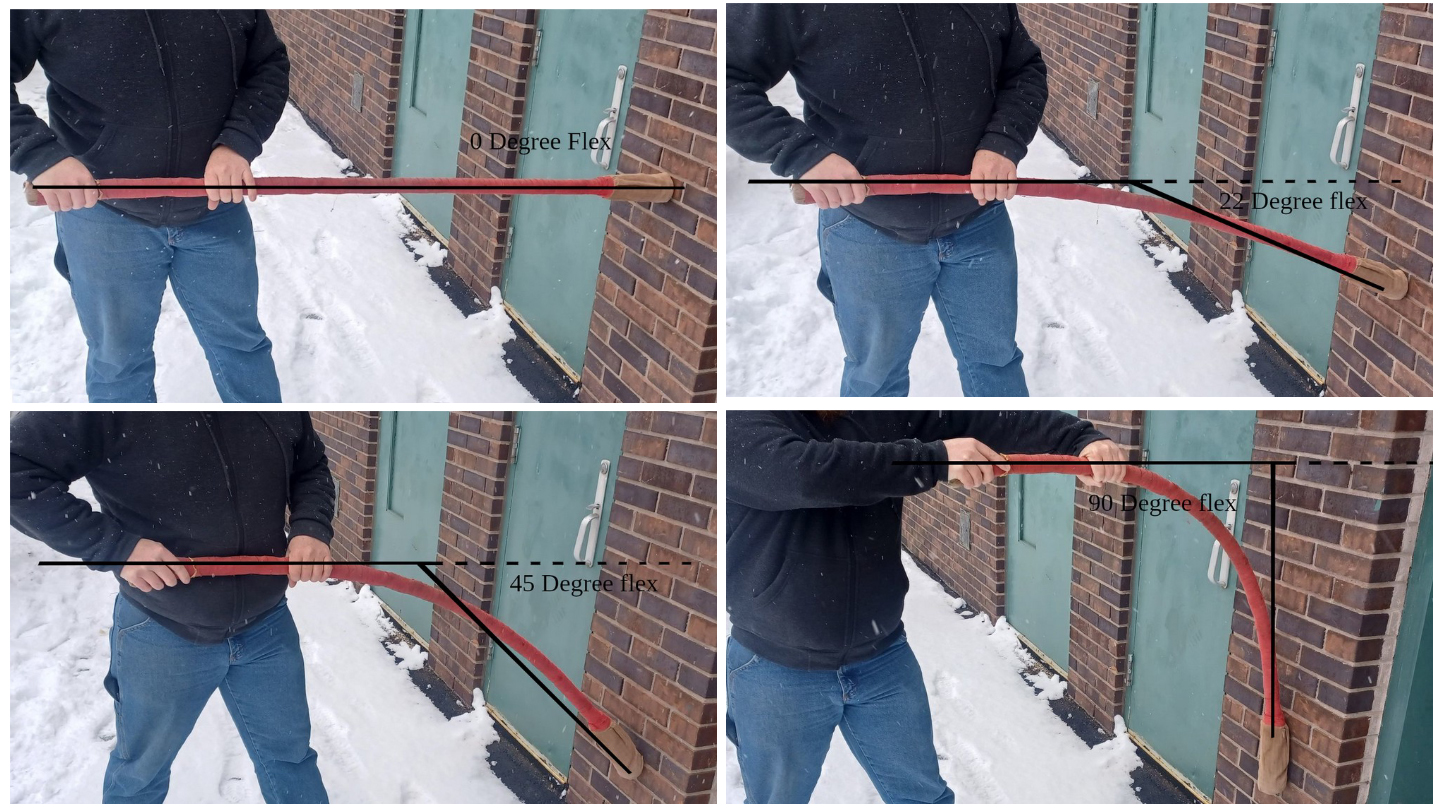
Flex
This refers to how much a melee weapon can bend safely during normal use. Flex is measured by holding the weapon low on the handle for maximum length and striking a shield or padded surface. A second person can then estimate the flex.
- The maximum allowed flex for any weapon is 45 degrees.
Handle / Unpadded Segment
Refers to any completely unpadded part of a weapon.
- Unpadded segments cannot total more than 50% of the weapon.
- Surfaces that are likely to come into contact with other players during regular use cannot be left unpadded.
Incidental Padding
Incidental Padding, also known as 'Courtesy Padding', is a padded non-striking surface intended to limit injuries from incidental contact with parts that are not strike-legal.
- Must have at least 0.5" of safety-grade foam and provide enough cushioning to prevent any core from being felt during a typical strike, but it does not need to be as comfortable as strike-legal padding.
- Any portions of Incidental Padding that lies within 0.5" of a striking surface must be covered in the same manner as the adjacent strike-legal surface.
- Incidental Padding that is not within 0.5" of a striking surface may have a non-abrasive rubber coating (or non-vinyl equivalent) applied so long as it does not compromise the purpose of the padding by making it too firm.
Multi-Ended Weapons
Any melee weapon may have multiple segments and striking tips.
- Each segment that is intended to slash and stab must be Strike-Legal for at least 1/3 of the weapon's total length or 18", whichever is less, starting from the striking tip and moving continuously inwards. If the segment merges before the required amount is reached, the merged section that continues toward the handle counts for this total.
- Madu segments intended to stab and slash only require Strike-Legal padding for 1/3 of the weapon's total length or 12", whichever is less.
- Segments intended to be Stab-Only only require 6" of Strike-Legal padding.
- Segments must not be arranged in such a way that could create a high risk of a non-striking surface contacting a player when the weapon is used to strike normally. Any non-striking segments that are out of the way but could still reasonably come into contact with another player, such as crossguards, must be covered with Incidental Padding.
- If a weapon has both regular and stab-only segments, they must not be arranged in such a way that could risk a player being struck with the side of a stab-only segment when the weapon is used to slash.
- Multi-ended weapons must meet all other requirements for its weapon type.
Non-Striking Tip
This refers to the end of a non-striking weapon segment, such as a pommel or the end of crossguard. Weapon Segments with any amount of Strike-Legal padding cannot have a Non-Striking Tip.
- Must be securely capped with Incidental Padding.
- No part may protrude more than 1.5" through a 2" ring when uncompressed.
Ownership Label
All projectiles must be clearly labelled with their owner’s name. It does not need to be large or visible during combat but should be easy to find and reference when necessary, such as when a Reeve is trying to return a projectile that flew into a bush, or in the instance where that projectile causes injury to another player.
- Projectiles without ownership labels may not be used in combat.
- Weapons designed explicitly to be shared, such as park loaner weapons, should be labelled with the park’s name.
Padding and Foam
All Amtgard weapons and shields require some amount of padding to prevent player injuries. In this context, padding refers to either Strike-Legal Padding or Incidental Padding. The type required will determine which materials are acceptable to use for this purpose. If a piece of equipment simply requires "padding", "foam" or "cushioning" with no other description, then you can meet that padding requirement with either Strike-Legal or Incidental Padding.
Foam Grades
Foams can vary widely in terms of how they will act when used as padding so it is important to choose one that helps ensure your equipment will meet the universal equipment requirements - notably safety and durability. When in doubt, take the time to learn from an experienced player or study an online construction tutorial.
This rulebook may refer to two amtgard-defined categories of foam: Safety-grade and Comfort-grade.
Safety-Grade Foam
Safety-Grade Foams are sturdy and provide firm resistance to compression when tested with the pads of fingers, but are not rigid. The goal of Safety-Grade Foams is to provide the primary padding for weapons. Safety-Grade Foams should, when used in the specified thicknesses, prevent injuries and limit discomfort experienced by other players when they are struck with weapons during combat.
- Typical foams in this category include "blue camp pad", "pool noodle", and microcell foam.
Note: Safety-Grade foams sometimes come in multiple densities or stiffnesses and not all of them are safe for use on their own. Higher stiffness or density Safety-Grade Foams may not be suitable for use as the sole padding on a weapon but may improve the durability and striking comfort of a weapon when used as a base layer of foam closest to the core, with less stiff or dense Safety-Grade foam on top. Padding a weapon using multiple Safety-Grade Foams with different properties is referred to as building with "progressive resistance" or "progressive density".
Comfort-Grade Foam
Comfort-Grade Foams are squishy and less firm than Safety-Grade Foams while still being dense enough to provide some resistance to typical Amtgard weapon impacts. The goal of Comfort-Grade Foams is to provide greater shock absorption and further reduce discomfort from weapon impacts which may not be sufficiently mitigated by Safety-Grade Foams alone.
- Typical uses for Comfort-Grade Foams include additional padding on stabbing tips, arrows, and javelins.
- Comfort-Grade Foams should not be used on their own to pad a core.
- Typical foams in this category include "marine foam" and "high-density charcoal foam".
Extra Notes
- Very dense or rigid foam can be used as part of a structural core but it will not count towards any mandatory padding requirements. Polystyrene (hard TV packaging) is an example of a foam that is too rigid.
- Very soft and light foam can be used to add shape or extra comfort but will not count towards any mandatory padding requirements.
Stab-Only
Any segment of a weapon may be built to be Stab-Only.
- As the name implies, weapon segments built to be Stab-only can only be used to stab.
- A Stab-Only segment requires 6" of Strike-Legal Padding. This padding must begin at the Striking Tip and extend down the length of the weapon on all sides of the core (A stab-only segment must be Omni.)
- This padding cannot be reduced by Heavy Padding or Super Heavy Padding.
- A weapon that is composed entirely of Stab-Only segments can replace all other Strike-Legal Padding required by its type with Incidental Padding.
- A weapon with both regular and stab-only segments must still meet the full padding requirements for its type.
- If a weapon has both regular and stab-only segments, they must not be arranged in such a way that could risk a player being struck with the side of a stab-only segment when the weapon is used to slash.
Strike-Legal Padding
Strike-Legal Padding is padding that is used to create striking surfaces that are safe to strike another player with.
- Weapons that require Strike-Legal Padding must be sufficiently padded to prevent injury if used to strike an opponent with the most force that could reasonably be expected in Amtgard combat. Combat contact with the strike-legal portions of a weapon must not be unreasonably painful, nor should it leave bruises or have the potential to break bones and teeth when used by an average player as well as its intended user.
- Regardless of the requirements listed below, Hit Testing will always be required to assess the more subjective aspects of Strike-Legal padding, such as impact force and player comfort.
- Since combat is chaotic and every participant has different pain tolerances and sensitive areas, occasional instances of uncomfortable contact should be expected, however repeated or egregious offenses from the same weapon should result in the weapon and/or the user being removed from play.
- No part of the weapon’s striking surface, whether the tip, the edge, the face or any other part, may protrude more than 1.5" through a two-and-a-half inch (2.5") ring when uncompressed.
- All Strike-Legal surfaces must have an opaque cover and be visually distinct from Non-Striking Surfaces on the same weapon.
Melee Strike Legal
In addition to the above, Strike-Legal padding on melee weapons must follow these additional rules:
- Strike-Legal Padding must begin at each Striking Tip and move inward along the core toward the handle. It must be continuous for the entire required length. Any forked segments that split from a Strike-Legal point must also be entirely Strike-Legal.
- Must have at least 1" of safety-grade foam over the weapon core.
- Must have a continuous cross-section of at least 2.5" from edge to edge.
- The entire circumference of the core does not need to be strike-legal, however any part of this circumference that is not strike-legal must be covered with Incidental Padding and cannot be used to strike.
- Striking Tips must be sufficiently capped to resist stab impact and prevent the core from pushing through. The foam should not deflect or fold over excessively when stabbing and always return to its original position.
- It is strongly recommended that weapons intended to regularly strike with a thrusting motion also include comfort-grade foam on the tip to further cushion the blow. Weapons designed for two-handed stabs, such as large pikes, may need even more padding than smaller, single-handed weapons. Hit Testing will help determine what is the ideal amount of extra padding for player safety and comfort.
Heavy Padding
A segment of a melee weapon is considered to have Heavy Padding if it meets the requirements for Strike-Legal padding and also has an edge-to-edge, cross-section of 4" or greater (instead of 2.5"). This extra padding must begin within 3" of the Striking Tip and proceed continuously towards the handle.
- Heavy Padding can apply to flat-blade weapons. The 4" cross-section does not need to be around the entire core.
Heavy Padding Substitution
For each inch of Heavy Padding added along the core, you may replace one (1) inch of required Strike-Legal Padding with Incidental Padding.
- Incidental Padding added in this manner must begin by replacing the padding closest to the handle and then proceed continuously towards the Striking Tip.
- A weapon cannot substitute more than 50% of its required Strike-Legal padding this way.
Super Heavy Padding
Super Heavy Padding follows the same rules as Heavy Padding except it requires a cross-section of 8" or greater. If both Heavy and Super Heavy padding are used together, the Super Heavy Padding must be closest to the tip.
Super Heavy Padding Substitution
This follows the same rules as Heavy Padding Substitution except for each inch of Super Heavy Padding added along the core, you may replace two (2) inches of required Strike-Legal Padding with Incidental Padding.
Striking Tip
The tip of any weapon segment that will be used to strike other players. All Striking Tips must have Strike-Legal padding.
- Must not protrude more than 1.5" through a two-and-a-half inch (2.5") ring when uncompressed.
- Must not end in an angle less than 90 degrees.
Total Length
The measurement used to determine weapon type.
- Straight weapons are measured in a straight line parallel to the core, from the furthest edge on one end to the furthest edge on the other end.
- All other weapons are measured by the largest straight distance between any two ends or edges.
Weapon Segments
A weapon segment is a portion of a melee weapon. Segments begin at the handle (or the shield, for Madus) and end at a striking or non-striking tip.
- Striking segments are segments that end with a Striking Tip.
- Non-Striking segments are segments that ends with a Non-Striking Tip.
- Segments may also branch or split to create new segments (like a trident or crossguard). These branching segments must meet or exceed the padding requirements of the point they branched out from. For example, if a segment branches out from a point that requires Strike-Legal padding then the entirety of that branched segment must also be Strike-Legal.
Identifying weapons segments is most relevant when dealing with Madus, Multi-Ended Weapons, and Stab-Only weapons.
Melee Weapons
General Rules
Melee weapons represent swords, axes, spears, flails, pole-arms and anything else that can be used to directly slash or stab an opponent in close combat.
- All melee weapons require a rigid core.
- Approved melee weapons may be used to strike with their Strike-Legal surfaces and block or parry with any portion of the weapon.
- Melee weapons can never be launched or thrown as a form of attack. Javelins are the only exception to this rule due to their ability to act as both as melee weapon and a projectile.
Dagger
- Must meet the Universal Equipment Requirements.
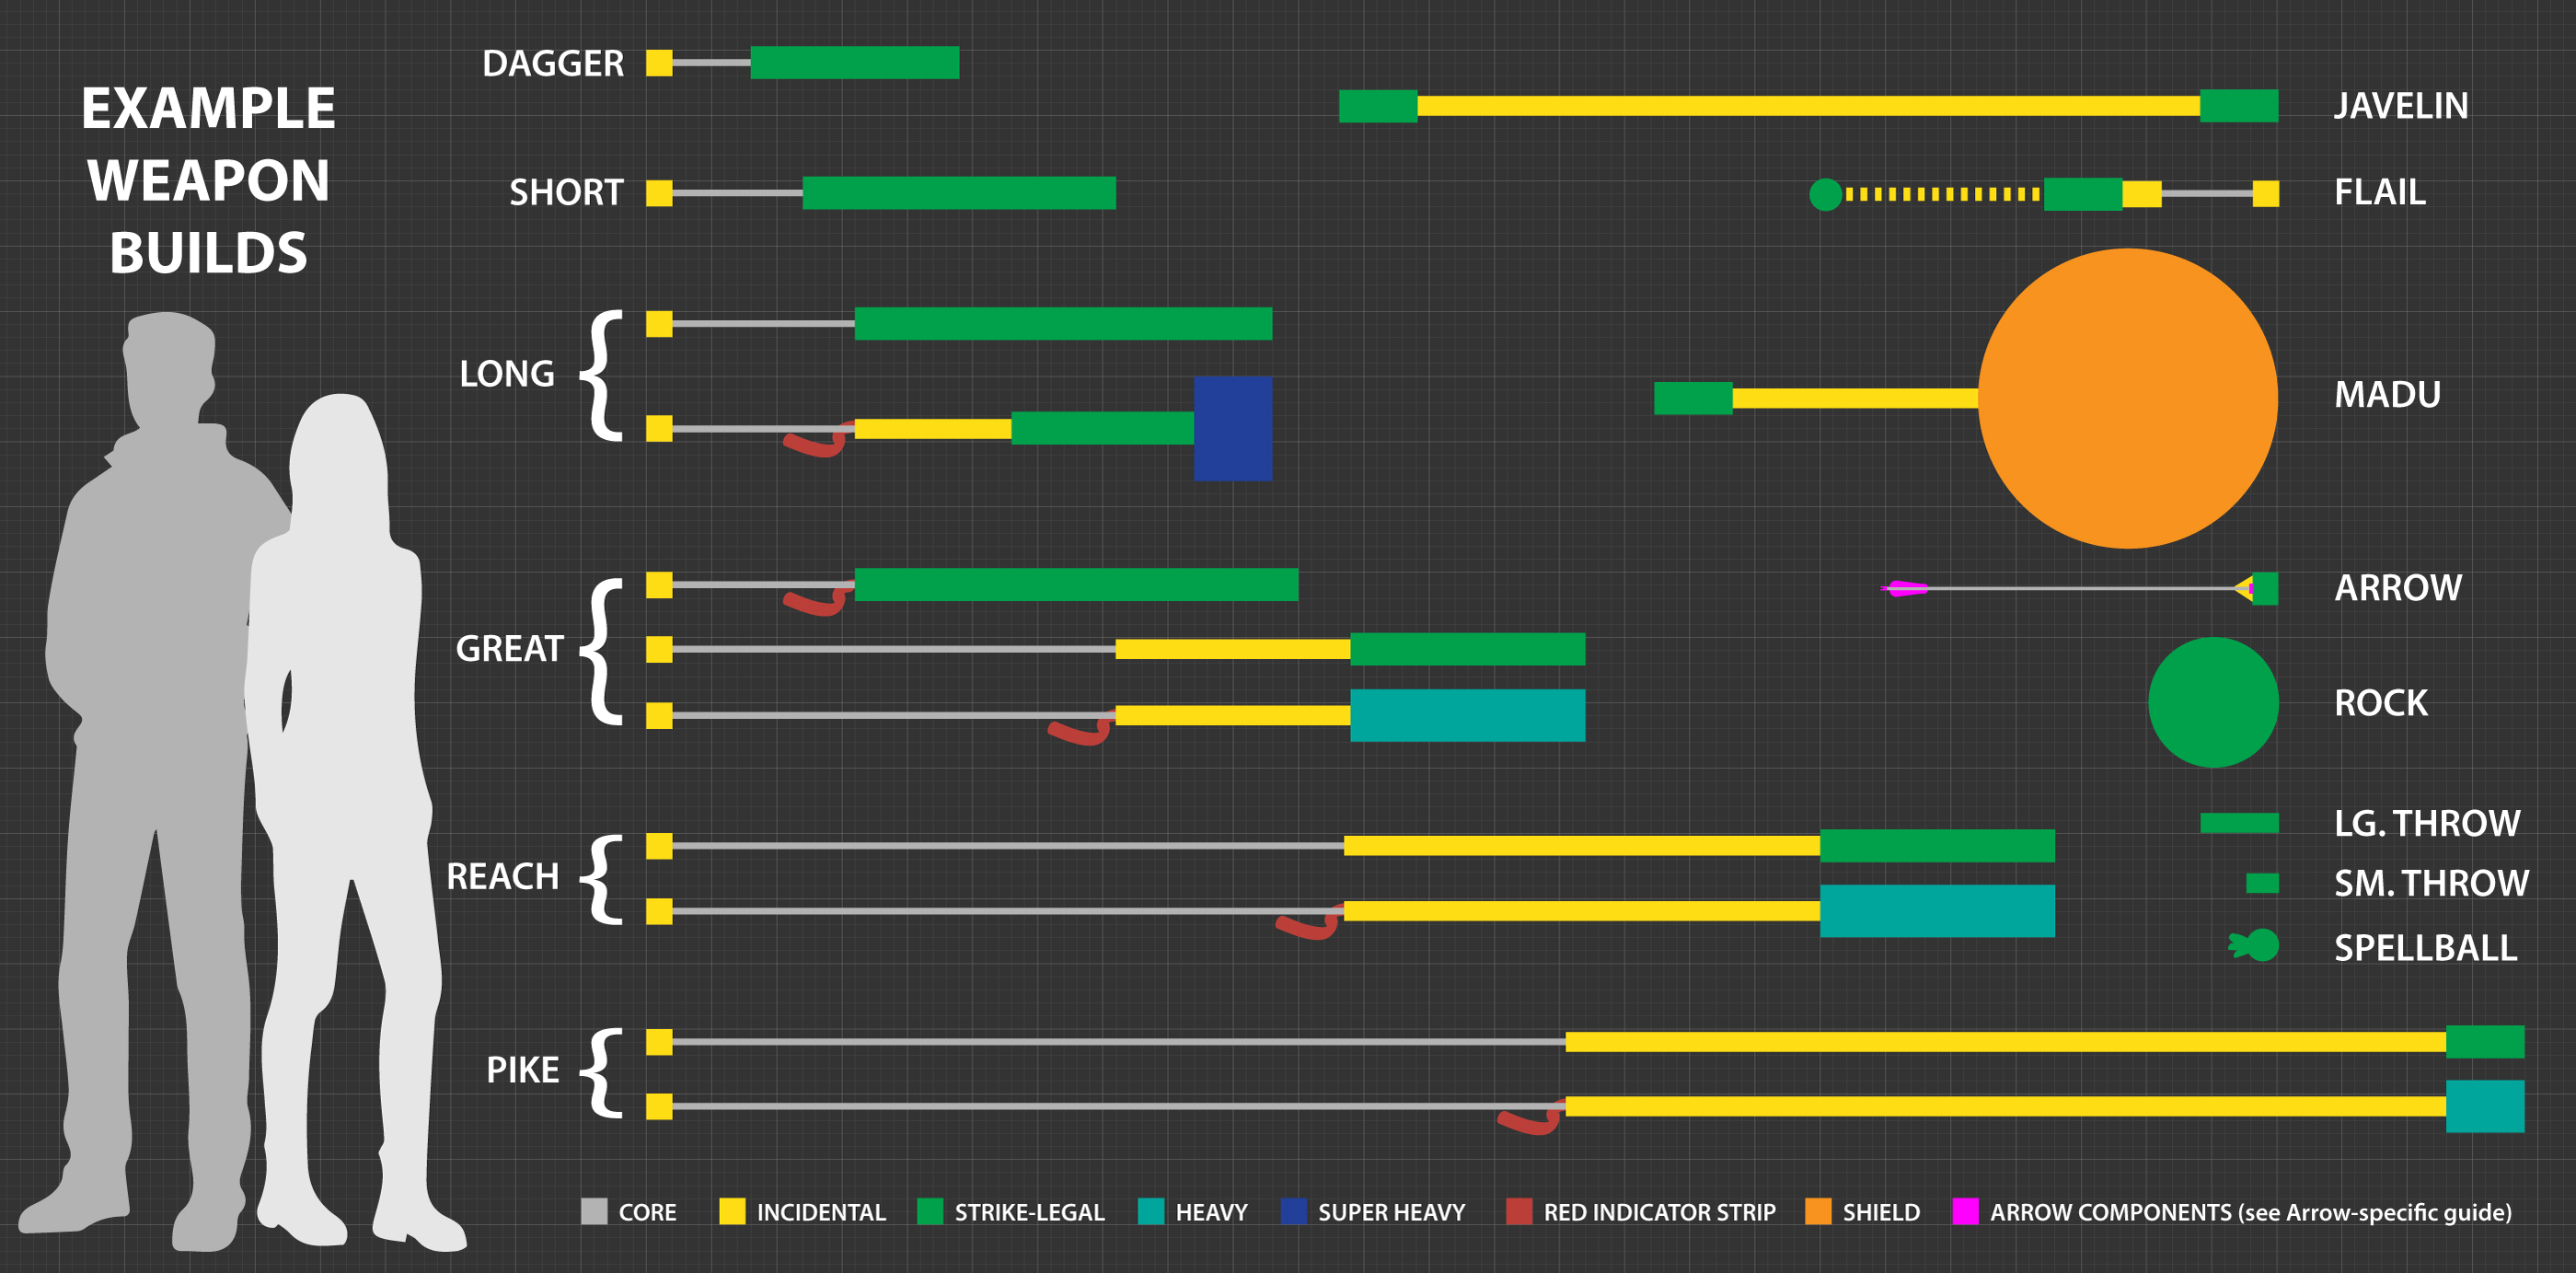
- Total length must be at least 12" (1ft), up to 24" (2ft).
- At least 2/3 of the weapon must be Strike-Legal.
Short
- Must meet the Universal Equipment Requirements.
- Total length must be greater than 24" (2ft), up to 36" (3ft).
- At least 2/3 of the weapon must be Strike-Legal.
Long
- Must meet the Universal Equipment Requirements.
- Total length must be greater than 36" (3ft), up to 48" (4ft).
- At least 2/3 of the weapon must be Strike-Legal.
Two-Hand Armor-Breaking Variant
- Any weapon segment that has at least 6" of Super Heavy Padding gains Armor Breaking when the weapon is wielded with two hands.
Great
- Must meet the Universal Equipment Requirements.
- Total length must be greater than 48" (4ft), up to 72" (6ft).
- Must be 50% padded and have at least 18" Strike-Legal.
Two-Hand Shield-Crushing Armor-Breaking (SCAB) Variant
- Any weapon segment that is Strike-Legal for at least 2/3 of the weapon's full length; or has at least 18" of Heavy Padding gains Armor Breaking and Shield Crushing when the weapon is wielded with two hands.
- Stab-Only segments require just 6" of Heavy Padding to gain this benefit. (Reminder: You cannot Shield Crush with a stab.)
Reach
- Must meet the Universal Equipment Requirements.
- Total length must be greater than 72" (6ft), up to 108" (9ft).
- Must be 50% padded and have at least 18" Strike-Legal.
Two-Hand Armor-Breaking Variant
- Any weapon segment that has at least 18" of Heavy Padding gains Armor Breaking when the weapon is wielded with two hands.
- Stab-Only segments require just 6" of Heavy Padding to gain this benefit.
Pike
- Must meet the Universal Equipment Requirements.
- Pikes are Stab-Only. They cannot be used to slash.
- Total length must be greater than 108" (9ft), up to 144" (12ft).
- Must be 50% padded and have at least 6" Strike-Legal as per Stab-Only.
Two-Hand Armor-Breaking Variant
- Any weapon segment that has at least 6" of Heavy Padding gains Armor Breaking when the weapon is wielded with two hands.
Flail
- Must meet the Universal Equipment Requirements.
- Is composed of a handle with a single chain and articulating head. It cannot be multi-ended.
- The total length of all three components cannot exceed 36" when gently pulled taut.
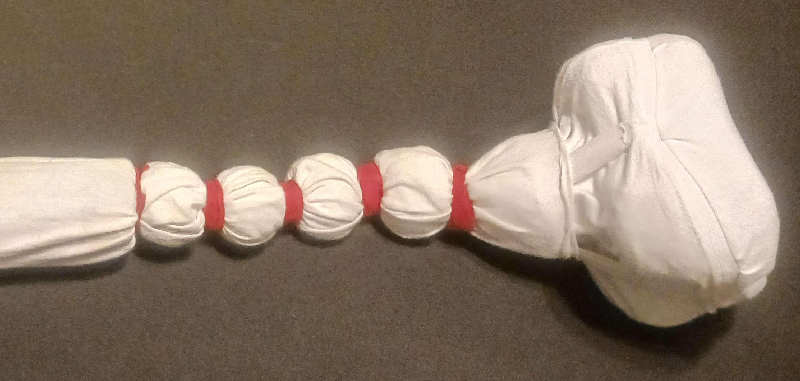
Flail Head
- Must be equal or larger than a 2.5" sphere.
- Must be entirely Strike-Legal.
- Cannot contain a rigid core.
- The combined chain-and-head portion may not exceed 18" in length when gently pulled taut.
- Must be constructed using soft, durable, non-abrasive materials, such as a cotton rope. Actual chains are prohibited. A rope-like core is not required as long as this section behaves like a chain and is not at risk of tearing apart under the stress of the flailing motion.
- If the chain portion is longer than 0.5", it must include small foam rings (or equivalent design) spaced no further than 0.5" apart along the entire length.
Flail Handle
- Must be at least 12".
- 50% of the flail handle must be padded.
- The top 1/3 closest to the chain must also be Strike-Legal.
- This padding must begin at point where the chain connects to the handle and extend down the length of the weapon on all sides of the core (i.e. it must be Omni).
- The amount of Strike Legal required cannot be reduced by Heavy Padding or Super Heavy Padding.
Flail Combat Rules
Only the head of a flail can inflict valid strikes, even though the handle segment also has strike-legal padding. This extra padding is intended to allow a player to strike the handle safely against other equipment so the flail can wrap around without damaging the struck equipment.
Madu
- Must meet the Universal Equipment Requirements.
- Total length must be between 18" up to 108" (9ft).
- Is a hybrid Melee Weapon and Shield.
- Any shield with weapons permanently affixed to it will be considered a Madu and must conform to these rules.
- Any weapon segments must be easily recognizable as weapons, and the shield portion must be easily recognizable as a shield.
- The division between weapon and shield segments must be visually distinct.
Madu Shield Portion
The shield portion must be a legal shield.
Madu Weapon Segments
Madu weapon segments are measured from the point where they extend beyond the shield.
- Must not extend outward from the face of the shield.
- Must not articulate or have a chain like a Flail.
- Must not mimic or offer similar protective coverage to that of a shield. If this is a case, the offending segments will count as part of the shield, not a weapon, and be forced to adhere to shield construction rules.
- Segments intended to be Stab-Only must be at least 6" long.
- Segments intended to both slash and stab must be at least 12" long.
- Segments that measure 18" or less must be entirely Strike-Legal.
- Segments that measure greater than 18" must have at least 18" of Strike-Legal Padding and have Incidental Padding for the remainder.
- Padding Substitution can only be used on segments greater than 18" and cannot reduce the amount of Strike-Legal to less than 18".
Two-Hand 'Great' Madu Variant
If the total length of the Madu is 72" (6ft) or less, the following variation can be used:
- Any weapon segment that is greater than 48" (4ft) and is at least 2/3 Strike-Legal or has at least 18" of Heavy Padding gains Armor Breaking and Shield Crushing when the weapon is wielded with two hands.
- Stab-Only segments require just 6" of Heavy Padding to gain this benefit.
Two-Hand 'Reach' Madu Variant
- Any weapon segment that is greater than 72" (6ft) and has at least 18" of Heavy Padding gains Armor Breaking when the weapon is wielded with two hands.
- Stab-Only segments require just 6" of Heavy Padding to gain this benefit.
Madu-Specific Combat Rules
- Madus do not have access to the variant options or gameplay rules of other weapon or shield categories, even if parts of the Madu are constructed to mimic those weapons or shields.
- Example 1: A Madu constructed with a small-size shield will still take up a free hand and cannot be strapped to the arm without a handle.
- Example 2: A super-heavy padded Madu that is between 36" and 48" will not gain Armor Breaking when wielded 2-handed because that variant is only available to Long weapons.
- A Madu can only be wielded if the player can wield both a non-staff weapon of the Madu’s total length (weapon portions + shield portions) and a shield equal to or greater than the Madu’s shield's size.
- The weapon segments can be struck and affected by weapon-specific effects such as Weapon Destroying, and the Shield portion can be struck and affected by shield-specific effects such as Shield Crushing and Shield Destroying. Once affected this way, the entire Madu is affected, for better or worse. If the weapon or shield portion is destroyed, the entire Madu is destroyed. If one part of the Madu is restored, the entire Madu is restored.
Javelin
- Is a hybrid Stab-Only Melee Weapon and Stabbing Projectile.
- Must meet the Universal Equipment Requirements.
- Total length must be between 36" (3ft), up to 72" (6ft).
- Must have a straight core with at most one Striking Tip per end.
- Each striking tip must have at least 6" Strike-Legal as per Stab-Only.
- All other Non-Striking Surfaces must be covered with Incidental Padding.
- Must have an ownership label as per projectiles.
Javelin Hybrid Combat Rules
- By default, a Javelin is a Stab-Only Melee Weapon. It cannot be used to slash.
- When thrown, it becomes a Stabbing Projectile and does not count as a melee weapon again until it becomes Unattended or Carried.
- Javelins become Armor Breaking and Shield Crushing once they have travelled their length through the air.
- Destroyed Javelins cannot be thrown.
Magic Staff
- Is a non-striking Melee Weapon (see combat rules below).
- Must meet the Universal Equipment Requirements.
- Total length must be at least 48" (4ft), up to 72" (6ft).
- Must have a straight core with exactly two non-striking ends.
- All core must be covered with Incidental Padding.
Magic Staff Combat Rules
- Cannot be used to strike. It can only block.
- Is a weapon. Can be destroyed like any other weapon.
- Does not take up a Free Hand when casting abilities.
- Players can only wield a single magic staff at a time.
Projectile Weapons
General Rules
Projectile Weapons represent anything that is launched or thrown to inflict damage or effects, such as arrows, kunai, chakrams, and tomahawks as well as magical blasts like fireballs and lightning. The following general rules apply to all forms of projectile weapons:
- May not be used to strike in melee.
- May not be used to parry or block.
- Cannot become destroyed by any means.
- May be carried in any number unless otherwise restricted, such as by class customization.
- All projectiles except Arrows and Bolts must be thrown by hand, one at a time, per hand.
- A player may hold a throwing weapon in each hand and throw both of them simultaneously, but cannot throw them together from the same hand.
- Arrows and Bolts must be fired from a bow or crossbow as appropriate.
- Each projectile can affect multiple targets in a single flight as long as each contact meets the criteria for a valid strike. Projectiles become harmless after their movement is completely halted.
- Batting, kicking, or otherwise applying significant force to a projectile in motion is prohibited.
- Arrows in flight must be blocked passively by placing an object in their flight path.
- Other non-arrow projectiles may be blocked, parried, or lightly struck out of the air.
- Players may not catch or grab projectile weapons in flight.
- Projectiles may be shared among players that are given explicit permission from the owner of said projectiles.
- The owner may retract their permission at any time for any reason.
- The owner is responsible for ensuring the safe use of their projectiles when shared with or used by another player.
- Players using shared projectiles should be respectful and treat the borrowed equipment with care.
- When sharing Spellballs, Specialty Arrows, or any other similarly restricted projectile, players must still adhere to the associated frequency rules and carrying limits.
- Players using shared projectiles must not hoard them or otherwise try to gain a gameplay advantage by deliberately obstructing the amount of projectiles that other sharing player(s) have access to. This is especially relevant when sharing Spellballs and Specialty Arrows.
- There are two sub-types of projectile weapon: Contact Projectiles and Stabbing Projectiles.
- Contact Projectiles can strike with any part of their surface.
- Stabbing Projectiles can only strike with their tip.
Contact Projectiles
Small Thrown
- Must meet the Universal Equipment Requirements.
- Must have a non-rigid core.
- Must be between 2.5" and 6" in total length.
- Must be entirely Strike-Legal. There is no minimum thickness, however extremely thin projectiles may struggle to make valid contact so craft accordingly.
- Must not be constructed in a way that could be reasonably confused with a Spellball.
Large Thrown
- Must meet the Universal Equipment Requirements.
- Must have a non-rigid core.
- Must be greater than 6", up to 18" in total length.
- Must be entirely Strike-Legal. There is no minimum thickness, however extremely thin projectiles may struggle to make valid contact so craft accordingly.
- Must not be constructed in a way that could be reasonably confused with a Spellball or Rock.
Spellball
- Must meet the Universal Equipment Requirements.
- Must have a non-rigid core.
- Must be spherical, between 2.5" and 6" in diameter.
- Must be entirely Strike-Legal.
- Must have a visible tail or streamer between 1" and 6" in length.
- Every Spellball is associated with an ability and must be covered with the appropriate Color Code.
Ability-Linked
- Players can only use a Spellball projectile if they have a Spellball ability that allows it.
Rocks
- Must meet the Universal Equipment Requirements.
- Must have a non-rigid core.
- Must be equal or larger than a 10" diameter sphere.
- Must be entirely Strike-Legal.
Rock Gameplay Rules
- Rocks are Shield Crushing, Armor Breaking, and Weapon Destroying.
Stabbing Projectiles
Javelins
See Javelins under Melee Weapons.
Bows & Crossbows
Bows and Crossbows are used to fire arrows or bolts respectively. Only actual bows and crossbows may be used for this purpose. Other forms of projectile launchers cannot be used to represent a bow or crossbow.
- Compound bows are prohibited.
- Regular Bows must have a draw weight of 35lbs or less at a 28" draw.
- Crossbows are limited to no more than 450 inch-pounds.
Bow & Crossbow Gameplay Rules
- Bows and Crossbows cannot be destroyed.
- The physical bow or crossbow cannot be used to strike another player. They must be exclusively used to launch Arrows & Bolts.
- Cannot be intentionally struck nor used to block, deflect or otherwise defend against incoming strikes. A certain amount of incidental contact during the chaos of live combat should be expected, however repeated or egregious disregard for this rule can result in suspension from play or loss of archery privileges.
- If accidentally struck, it is treated as an Invalid Obstruction.
- Bows and Crossbows cannot be wielded with any other equipment in the same hand (besides arrows). Likewise, other equipment cannot be wielded while in the same hand as a bow or crossbow. A buckler or small shield may still be wielded on the arm so long as there is no risk of it interfering with the safe use of the bow.
- For gameplay purposes, reloading a crossbow does not count as wielding it.
- Bows may not be drawn beyond 28" at any time and must be half-drawn at ranges closer than 20ft. Crossbows are not required to half draw.
Arrows & Bolts
All forms of arrows and bolts follow the same rules.
- Must meet the Universal Equipment Requirements.
- Must be built to be fired from a bow or crossbow, as appropriate.
- Must be safe to strike other players with the tip (see construction guide below).
Developer Note: For accessibility purposes, playtesters may continue to use Amtgard V8-Legal arrows during V9 playtest games until such a time that we can guarantee the investment in reconstruction will not be wasted effort. That said, we are deeply thankful and appreciative of everyone who chooses to invest their time and resources to build and playtest the construction rules below.
Arrow Gameplay Rules
- All Arrows and Bolts are Armor Breaking and Weapon Destroying.
- Specialty Arrows (or Bolts) will impart additional effects based on their Color-Code.
- Players can only use a Specialty Arrow if they have an ability that allows it.
- Players may fire multiple regular arrows at once however Specialty Arrows must be fired alone.
- Multiple arrows fired simultaneously will count as separate strikes, even if they hit the same Hit Location.
Arrow Construction Guide
Before building your first arrows or bolts, take the time to learn from an experienced player or study an online construction tutorial. Poorly constructed, poorly repaired, or outright broken arrows/bolts can pose a serious safety hazard and may never be used for Amtgard combat.
Arrow Shaft Construction Rules
The shaft of the arrow or bolt is the stick portion to which the head is affixed.
- Must be carbon, aluminum, or fiberglass.
- Any real arrowheads or hunting tips must be removed.
- Shafts longer than 28" must have a drawstop around the shaft to physically prevent drawing the arrow past 28".
- The nock and any vanes/fletching present must be in good repair.
- The orientation of vanes/fletchings (or the lack thereof) must not cause chaotic or unpredictable flight.
Arrow Blunt Construction Rules
The blunt is the reinforced tip of the shaft upon which the striking portion, the arrow head, will be constructed.
- All blunts must be solidly built, stiff enough to carry anticipated loads without excessive deformation, and able to support typical Amtgard archery impacts repeatedly without failure or degradation.
- The end of the shaft must be securely capped with a circular, impact-resistant disc at least 1" in diameter.
- The disc must be centered over the end of the shaft.
- If a metal disc is used, it must be at least 1/16" steel or equivalent.
- Discs of any other material must be durable, impact-resistant, and at least 1/4" thick.
- The blunt must then be further built up to at least 1.5" in diameter.
- The non-disc portion of the blunt can be constructed from any material, including foam, so long as it ensures that the foam arrowhead built upon it is not able to move easily in relation to the shaft. This includes but is not limited to: plunging up and down, wobbling from side to side, twisting-without-return, etc.
- The entire blunt can be a single unit (such as a 3D-printed piece) as long as the resulting structure is equivalent or safer than the above requirements.
Arrow Head Construction Rules
The arrow head is the Strike-Legal portion at the end of an arrow or bolt, after the blunt.
- Must be Strike-Legal on all sides with a foam depth of at least 2" in front of the blunt.
- Must have a circular cross-section of 2" or greater throughout the entire head.
- Must have at least 0.5" of impact-resistant safety-grade foam immediately after the blunt. This foam must not deform around the arrow shaft or blunt on impact.
- The physical striking surface of the arrowhead must include at least 1" comfort-grade foam with a circular diameter of 2.5".
- Domed arrowheads are allowed but must be no sharper than a 2.75" hemisphere. The narrow tip of the dome does not need to meet the 2.5" cross-section as long as the head meets the 2" depth rule (see diagram).
- Any additional foam used to meet the 2" depth requirement should be chosen with the goal of making the arrow as safe and comfortable to be struck by as possible, specifically in regards to accidental strikes to the face and eyes. When in doubt, use safety-grade foam.
Arrow Head Cover
- Arrow heads must be covered in a durable, opaque cloth. Cloth tape may not be used.
- Specialty Arrows must be covered with the appropriate Color Code.
- Properly colored fabric strips may affixed to the shaft in lieu of colored head covers. These strips must be clearly visible from at least 20ft away and not impact the safe use of the arrow.
- Covers for regular arrows must be a color or combination of colors that cannot be reasonably mistaken for a specialty arrow.
Eye damage from accidental face strikes is the most common form on arrow-based injury in LARP. A safe arrow design must not damage the orbital bones or be able to put pressure directly on the eyeball. As a rule of thumb, arrows should be built to the point that their owners are willing to receive a straight shot to the face under test conditions without fear of serious injury.
Siege Weapons
Siege Weapons are extremely powerful tools of destruction. Examples of this type of weapon include historical siege engines like ballistas, catapults, and trebuchets as well as the teeth, claws, and clubs of massive monsters like dragons and titans.
- Siege weapons are designed to be incredibly strong and can quickly break a game if their inclusion is not planned and executed ahead of time. As such, they are reserved exclusively for use by Game Organizers during special occasions and planned scenarios.
- The physical representation of a Siege weapon along with its method of use and distribution is determined by the Game Organizer on a case-by-case basis for the activity where it is being used. Regardless of implementation method, it must still meet the Universal Equipment Requirements.
- The actual Strike-Legal part of a Siege Weapon’s attack must always be represented by a normal Amtgard melee or projectile weapon, as appropriate, such as a catapult launching rocks or a Dragon using daggers as claws.
- Strikes from Siege Weapons will inflict the 'Siege' hits instead of their normal combat effects unless instructed otherwise by the Game Organizer.
Developer Note: See the Game Organizer Guide for more details and guidance about running an activity that includes Siege Weapons.
Shields
General Rules
- Shields are used to block strikes from weapons.
- They can only be affected by strikes and effects that specifically affect shields, such as Shield Crushing and Shield Destroying.
- Players may only ever wield a single shield at a time, however they can wield a shield simultaneously in the same hand as any another piece of equipment except for a Bow or Crossbow.
- Shields with straps are only wielded when worn on a single arm or held in hand. They cannot be wielded while worn like a backpack or strapped to other parts of the body such as the torso, legs, hip, or head.
- If a player cannot easily remove or discard their shield when necessary, such as due to it being strapped to their arm, then they must do their best to keep it out of combat and must not derive an gameplay advantage from it. A shield strapped to a wounded arm counts as an Invalid Obstruction.
V8 Transition Note:The V8 ‘Shield Drop Trick’ does not exist in V9. A shield in mid-air is an invalid obstruction and cannot be used to block attacks.
Construction Rules
- Shields must meet the Universal Equipment Requirements.
- A shield’s size is determined by the surface area of its largest silhouette, measured on a flat plane. It's height and width, when necessary, are based on the same silhouette.
- May be constructed in any style or shape but cannot be made in such a way as to mimic the function of physical armor (such as shields that excessively wrap around a limb or shields that are precisely shaped to a body part).
- Must have a sturdy structural core that will not break or bend significantly during the course of combat.
- Some acceptable materials are: plywood, high-impact plastics, aluminum, and sturdy, high-density, closed-cell foam.
- Easily breakable or low-density foams are inappropriate for use as the structural core.
- The rim and face of the shield must be padded with at least 1" of safety-grade foam.
- Padding should wrap around the rigid edges of the core.
- Shields made entirely of foam do not require additional padding but must be composed of closed-cell foam that is at least 1" thick.
- No part of a shield may protrude more than 1.5" through a two-inch (2") ring when uncompressed.
- All rigid or sharp-edged hardware must be rounded off or padded in such a way that there are no burs or snags which could damage objects or players.
- Hard edges may not be exposed on any surface which can reasonably come into contact with another player or their equipment.
- Curved/Domed shields (and similarly recessed shapes) may not curve or recess inwards more than half its width, measured on a flat plane.
- The rim and face must have an opaque, durable covering. This may be a non-abrasive rubber coating (or non-vinyl equivalent) so long as it does not compromise the purpose of the padding, such as by making it too firm.
- The face of the shield may not have holes that exist entirely within a silhouette of the shield.
- If the shield has a handle, it must be clearly identifiable as a handle.
- If the shield has straps, they must be sturdy, secure and not at risk of coming loose during combat.
Shields sizes are determined by surface area. Due to the sometimes tedious area math required for certain shield shapes, like a heater or kite shield, these measurements may be difficult to reconfirm during equipment inspection in a timely manner. You can help your equipment inspectors by keeping proof of your math handy in a notebook or cue card in case they need it. Most inspectors will trust you at your word but it is not unfair for them to want to check your math every now and then. Help them help you!.
Bucklers
- Must meet the Universal Equipment Requirements.
- Shield Size must be at least 1/4 square foot (6.8 inch diameter), and no larger than one square foot (13.5 inch diameter).
- Must have either a handle, an arm strap, or both.
- Does not take up a Free Hand when casting abilities.
Strap-Only Variant
Bucklers may be constructed without a handle. If worn on the arm, they can be wielded without holding a handle.
Small Shields
- Must meet the Universal Equipment Requirements.
- Shield Size is no larger than three square feet (23.45 inch diameter).
- Must have either a handle, an arm strap, or both.
- Does not take up a Free Hand when casting abilities.
Strap-Only Variant
Small Shields may be constructed without a handle. If worn on the arm, they can be wielded without holding a handle.
Medium Shields
- Must meet the Universal Equipment Requirements.
- Shield Size is no larger than five square feet (30.28 inch diameter).
- Must have a handle.
Strap Variant
Medium Shields may be constructed with straps. If worn on the arm, they must still be held by their handle to be wielded.
Large Shields
- Must meet the Universal Equipment Requirements.
- Shield Size is no larger than eight square feet (38.3 inch diameter).
- Must have a handle.
Strap Variant
Large Shields may be constructed with straps. If worn on the arm, they must still be held by their handle to be wielded.
Tower Shields
- This is an 🌶️ Experimental size category.
- Must meet the Universal Equipment Requirements.
- Shield Size is no larger than fifteen square feet (52.44 inch diameter).
- Must have a handle.
Strap Variant
Tower Shields may be constructed with straps. If worn on the arm, they must still be held by their handle to be wielded.
Armor
General Rules
Armor grants an advantage in combat by protecting the wearer from physical strikes.
- Armor grants protection in the form of Armor Points.
- When armor in a Hit Location is struck, the victim loses one Armor Point in that location instead of suffering a Wound. If the location struck has no points to lose, the victim will suffer a wound as normal.
- Armor pieces do not track their damage individually. Instead, each Hit Location has an armor point total that is determined by averaging of all armor covering that area.
- Armor only protects what it physically covers. If your elbow is exposed and you are struck in that gap, you will suffer a wound but do not lose any Armor Points.
- Straps and other such material that hold the armor pieces on do not count as part of the armor unless they are specifically built to be as such. (A leather strap across your back holding on your breastplate will not protect you from strikes.)
- Armor Priority: If a strike hits the line between an armored area and an exposed area, the strike will count as only hitting the armor. In other words, if a player wants to strike a gap in your armor, their attack must cleanly hit inside the gap without touching any armor. Armor Priority is superseded by Torso Priority when applicable.
- Armor present on a wounded Hit Location will continue to function and protect against further blows as long as it has armor points to do so.
- There are two types of armor in Amtgard: Natural Armor and Physical Armor.
- A player can only benefit from a single armor type at a time.
- Rules that reference "Armor" in general apply to both types.
- Rules that reference a specific armor type will only affect that type.
Natural Armor
Natural Armor grants an armor rating to the bearer’s skin. A player with natural armor will always have full armor coverage no matter where they are struck. For example: A player with 2 points of Natural Armor will have 2 armor points protecting every inch of every hit location, even while wearing no physical armor pieces.
V8 Transition Note: Natural armor functions exactly like physical armor except that it does not require any actual armor pieces. It cannot have points restored with Heal and it does not have any other special rules that may have been present in previous editions of Amtgard.
Physical Armor
Gameplay Rules
- Physical Armor is represented on a player by actual pieces armor worn by the player.
- Each physical piece is inspected and given an individual Armor Rating which is used to calculate the armor point total for each Hit Location.
- The maximum amount of armor points a Hit Location can ever receive from Physical Armor is six (6). Some Classes will limit this amount further.
- Limits are only applied after armor point totals are fully calculated. Armor Ratings higher than 6 may be used to benefit averaging calculations before the limit is applied.
Example: Ariq is playing a class which has a maximum armor point total of 4pts. He is wearing armor pieces that average to 6 points on his torso, 2 points on his arms, and 1 point on his legs. Since his class has an armor limit of 4 points, Ariq's torso armor is reduced to 4 points for the duration of that game and his arm and leg values remain unchanged. - When worn, armor pieces must be at least partially visible in a way that does not misrepresent the wearer’s potential armor point totals and/or coverage.
- If it is necessary to add or remove pieces of physical armor after a game has started, new armor point totals should be recalculated and adjusted as soon as reasonably possible.
- If armor point values must be adjusted while the player is still alive (possibly with damaged armor), the damage to that location will persist through the equipment change. If the location had suffered 2 damage, the new total will also suffer 2 damage. If the location had zero points remaining, it will always stay at zero even if the new armor pieces increases the maximum point value. If the entire hit location is replaced with new armor that has not been worn during that life, then the current armor value may be restored to maximum value.
Example 1: Delilah is wearing a bracer and gambeson that grants her a total of 4 points on her arm. She suffers 1 damage which reduces her remaining armor points to 3. For whatever reason, she discovers she needs to get rid of the bracer. Her new armor averages to only 2 points so she sets her new maximum to 2 and then applies the 1 damage she has already received, leaving her with 1 point remaining on her arm. Example 2: Robin is wearing a 2pt leather chestpiece on their torso. They suffer damage and are reduced to 0pts remaining. They are then given a 5pt breastplate mid-combat. They remove the leather and put on the breastplate. Since they completely replaced the armor on their torso with new pieces, the don't have to carry over the damage and they can benefit from the full 5pts immediately. If they had some other piece on their torso that didn't get changed out, their maximum would still increase to 5pts but their current value would remain at zero.
Construction Rules
- Must adhere to the Universal Equipment Requirements.
- Must not be easily mistaken as regular garb, nor be obviously synthetic in appearance, even if obscured or otherwise covered.
- Easily damaged materials (such as paper, cardboard, and tinfoil) and obviously modern materials (such as shin pads and chest pads) may never be considered armor on their own. Such materials and items may be used as components of armor but the final product must still meet all other requirements and construction standards in order to receive an Armor Point Rating.
- Armor that does not deform locally when struck must ensure all exposed corners are at least penny round (3/8" radius).
- Loose scales and similar components that move individually as part of piece that deforms locally do not need to be penny round.
- Rigid scales and similar components that are firmly affixed onto a shell must only be rounded if they protrude from the armor.
To Build or to Buy?
Armor construction is a lot more complex than weapon construction. This rulebook simply cannot provide all the information required to teach a novice how to build their own armor. We recommend taking the time to learn from experienced players or studying online tutorials and guides.
Alternatively, you can simply purchase pre-made armor from other players or online vendors. If you wish to take this route, make sure to do your research and ensure it will meet all the requirements necessary for Amtgard armor. Once again, we recommend taking the time to speak with experienced players or studying online discussions.
Rating Armor & Calculating Armor Point Totals
Rating Armor Pieces
Each piece of Physical Armor must be inspected and given an Armor Rating in order to be used for Amtgard combat.
- Physical Armor pieces must be examined and rated by an Equipment Inspector.
- Each piece of physical armor will be assigned to an Armor Tier based on its style that will outline its Base Armor Rating and Maximum Armor Rating. Armor that cannot be assigned to a tier does not count as armor and cannot be used as such.
- Pieces can be granted bonuses or penalties based on the quality of construction or appearance.
- The sum total of all modifiers cannot increase a piece's armor rating beyond the maxiumum allowable for its tier. Surplus bonuses confer no additional benefit.
- Armor with a final rating of zero or less (due to penalties) does not count as Armor and cannot be used as such.
- Armor Pieces are rated individually but will be averaged together when worn to produce an Armor Point Total for each Hit Location.
Armor rating can be subjective at times. To help mitigate this, it is recommended that players keep a reference sheet with a list of details for their physical armor pieces including descriptions, construction details, and previously assigned ratings to help Inspectors make quick and confident assessments. Keeping signatures and inspection dates from other Inspectors will add further credibility to your notes.
Reference Sheets are not necessary but they will greatly improve your odds of getting consistent armor ratings at every event you attend!
Armor Tiers
Armor tiers provide a base and maximum rating for physical armor pieces. Each tier includes a list of common styles that fall under that tier. Ambiguous armor pieces should be placed wherever they would be most appropriate.
| ARMOR TIERS | |||
|---|---|---|---|
| TIER | BASE RATING |
MAX RATING |
INCLUDES |
| T1 | 1 | 2 | |
| T2 | 2 | 3 | |
| T3 | 3 | 4 | |
| T4 | 4 | 5 | |
| T5 | 5 | 6 | |
| T6 | 6 | 7 | |
| Special | - | - | |
Armor Modifiers
Armor pieces can be granted bonuses or penalties to their Armor Rating based on the quality of construction or appearance. Multiple points can be awarded and penalized simultaneously as long as they each correspond to each unique feature or collection of features that would warrant the bonus or penalty if viewed on its own.
Superior Appearance
Bonus points may be awarded to armor that displays an exceptional appearance above and beyond the typical appearance of similar pieces in its style. This includes but is not limited to: tooling, etching, gilding, and fluting, as well as notable use of colors, shapes, weaves, etc. These examples do not represent an exhaustive list and consideration should be given to any piece that obviously goes above and beyond the base construction requirements to create an aesthetically pleasing piece.
Inferior Appearance
Points may be deducted from armor that displays an appearance well below the typical standard expected for similar pieces in that style. Examples include tarnished/poorly-maintained armor as well as visibly inauthentic or degraded materials. This penalty does not apply when the piece is worn as a part of a complete outfit that is intentionally designed to look shoddy or battle-worn.
Superior Construction
Bonus points may be awarded to armor constructed with exceptional techniques that provide a meaningful increase in durability over the standard for the material being used. This includes but is not limited to: solid/riveted rings, hardened material, noticeably tighter spacing than required, etc. These examples do not represent an exhaustive list and consideration should be given to any piece that obviously goes above and beyond the base requirements to create a more durable piece. This bonus may also be granted to pieces that are at least 75% constructed from metal materials that are significantly more dense and/or durable than aluminum.
Inferior Construction
Points may be deducted from armor for inferior construction techniques or a meaningful reduction in expected durability when compared to the standard for the material being used. Examples include but are not limited to: obviously unfinished armor, brittle/cracked material, loose connection points, and shoddy workmanship.
Layered Armor Bonus
If multiple unique pieces of Physical Armor are layered on top of each other as part of a complete outfit, the rating of any overlapping area will be rating of the highest-tier armor piece plus 1, up to that armor’s maximum.
- A piece of armor already at max rating will not receive any additional value from layering.
- Each layered piece should be able to act as armor on its own if it were not layered. The layers may be affixed while being worn, such as metal armor attached to an arming doublet.
- Any part of layered armor that extends beyond the layering is calculated at its normal rating.
- All layered armor pieces must be at least partially visible in a way that does not misrepresent the wearer’s armor point total or armor coverage when observed by another player from 20ft away. This especially true in the cases where a lower-tier armor is layered on top of a higher-tier piece.
- There is no additional bonus for layering more than two pieces.
Material Thickness
Certain armor styles may require materials that meet a specific thickness. Multiple layers of material may permanently affixed to each other to increase thickness however extra thickness caused by adhesives or empty space should not be factored into the new measurements.
- One bonus point may be awarded or deducted for Superior or Inferior thickness according to the chart below.
- Armor pieces that do not meet these minimum requirements may be judged as Ambiguous Armor as long as they still meet the universal equipment requirements.
| MATERIAL THICKNESS REFERENCE CHART | |||||||
|---|---|---|---|---|---|---|---|
| Inferior (Minimum) |
Standard | Superior | Notes | ||||
| Cloth | Cannot be less than standard |
1/16" 1.60mm |
1/8" 3.18mm | ||||
| Light Leather | 4oz 1/16" 1.60mm |
6oz 3/32" 2.39mm |
8oz 1/8" 3.18mm | ||||
| Heavy Leather | Cannot be less than standard |
10oz 5/32" 3.96mm |
12oz 3/16" 4.78mm |
Less than standard is Light Leather | |||
| Rigid, Non-Metal | 1/8" 3.18mm |
3/16" 4.78mm |
1/4" 6.36mm |
Material Density at least 0.9g/cm3 (equivalent to HDPE) | |||
| Aluminum | Steel | Aluminum | Steel | Aluminum | Steel | ||
| Round Rings | 18ga swg 16ga awg 0.048" 1.219mm |
20ga swg 18ga awg 0.036" 0.914mm |
16ga swg 14ga awg 0.064" 1.626mm |
18ga swg 16ga awg 0.048" 1.219mm |
14ga swg 12ga awg 0.080" 2.032mm |
16ga swg 14ga awg 0.064" 1.626mm | |
| Flat Rings | 20ga swg 18ga awg 0.036" 0.914mm |
22ga swg 20ga awg 0.028" 0.711mm |
18ga swg 16ga awg 0.048" 1.219mm |
20ga swg 18ga awg 0.036" 0.914mm |
16ga swg 14ga awg 0.064" 1.626mm |
18ga swg 16ga awg 0.048" 1.219mm |
Measure along thinnest axis. Punched rings should be comparable thickness. |
| Sheet Metal | 18ga 0.040" 1.024mm |
20ga 0.036" 0.911mm |
16ga 0.051" 1.291mm |
18ga 0.048" 1.214mm |
14ga 0.064" 1.628mm |
16ga 0.060 1.518mm | |
| Scales | 20ga 0.032" 0.812mm |
22ga 0.030" 0.759mm |
18ga 0.040" 1.024mm |
20ga 0.036" 0.911mm |
16ga 0.051" 1.291mm |
18ga 0.048" 1.214mm | |
Supplemental Armor Bonus
When calculating a player's Armor Point Total, armor worn on the head (above the neck), hands (above the wrist), or feet (below the ankle) do not contribute a normal rating towards calculations. Instead, pieces that meet the construction criteria below grant an additional +1 bonus to their respective location (torso, right arm, left arm, right leg, left leg) after all Armor Point Totals have been calculated.
- Supplemental armor pieces must cover at least 50% of the surface area of the head, hand, or foot, not including space between fingers and toes.
- They meet the Universal Equipment Requirements, as well as be constructed in a way that would place them in Tier 3 or greater.
- To ensure safety in the cases of accidental hand contact, hand armor cannot include metal or similarly rigid materials on the tops of knuckles or fingers, including fingertips. To offset this, Hand Armor can also be constructed as a Tier 2 armor so long as the final piece still looks like armor.
- This bonus can cause the armor point total to exceed tier maximums, however it will still be affected by armor point limits imposed by class or game modes.
- If hand or foot armor is the only armor piece worn on that location, then it should be compared to the normal armor tiers and assigned a normal rating as best as possible.
Calculating Armor Point Totals
Once the pieces are rated, Armor Point Totals are calculated for each Hit Location based on those ratings and the approximate physical coverage that each piece bestows.
To calculate this total, average the ratings of all physical armor pieces in the hit location based on the percentage of coverage they provide, rounding the result to the nearest whole number.
- Areas not covered by any armor whatsoever, such as gaps or garb, are not factored into this averaging.
- You do not need to be precise when determining the coverage. "Eyeballing" it is perfectly fine and is even encouraged as long as it is done in good faith.
Once the point total has been calculated, any extra points from Supplemental Armor should be added.
Lorathana is wearing a cloth bracer (rated 2pts) on her right forearm, a chainmail tunic (rated 4pts) with sleeves covering some of her arms, and a leather gauntlet. The two pieces together cover about 70% of her arms, leaving a gap at the elbow.
To make their calculations, the Equipment Inspector only has to focus on the area covered by armor. Looking at her arm, they determine that the bracer takes up about 40% of the armored area and the chainmail sleeve takes up about 60% of the armored area. The Gauntlets are Supplemental Armor so they are ignored until later.
[Bracer] 2pts x 40% = 2 x 0.40 = 0.8
[Sleeve] 4pts x 60% = 4 x 0.60 = 2.4
0.8 + 2.4 = 3.2 rounds down to 3.
Now that the total has been calculated, Lorathana can add the Supplemental Armor bonus for her Gauntlets, granting an additional +1.
Therefore, Lorathana’s right arm has an Armor Point Total of 4pts in the areas covered by armor (the bracer, the sleeve, and the gauntlets) and an exposed gap between them.
Still confused? More examples can be found here.
Armor Styles
Each Armor Tier includes a list of common Armor Styles that fall under that tier. Those styles are presented here in greater detail to help players and inspectors more accurately assess their armor. Ambiguous armor pieces should be assessed on a case-by-case basis.
| ARMOR TIERS | |||
|---|---|---|---|
| TIER | BASE RATING |
MAX RATING |
INCLUDES |
| T1 | 1 | 2 | |
| T2 | 2 | 3 | |
| T3 | 3 | 4 | |
| T4 | 4 | 5 | |
| T5 | 5 | 6 | |
| T6 | 6 | 7 | |
| Special | - | - | |
Cloth/Padded Armor
This style includes armor made of fabric, padding, and/or synthetic equivalents.
- Is a Tier 1 armor style.
- Must meet the Universal Equipment Requirements.
- Minimum Material Thickness of 1/16" (1.60mm)
Light Leather
This style includes armor made of thin leather, hides, furs and their synthetic equivalents.
- Is a Tier 2 armor style.
- Must meet the Universal Equipment Requirements.
- The standard Material Thickness is 6oz (3/32") (2.39mm).
Butcher's Mail, Sharkmail, etc
This style includes armor composed of machine-made weaves of very small rings.
- Is a Tier 2 armor style.
- Must meet the Universal Equipment Requirements.
- Only welded Butcher's Mail, Sharkmail, Ringmesh, or similar chain mesh may be used. Because of this, there are no specific Material Thickness requirements or modifiers.
- Any weave is permitted but it must not allow a 1/8" dowel to pass through
- Does not gain a bonus for being made from Steel or similar metal.
Heavy Leather
This style includes armor made of thick leather, hides, furs and their synthetic equivalents.
- Is a Tier 3 armor style.
- Must meet the Universal Equipment Requirements.
- The standard Material Thickness is 10oz (5/32") (3.96mm).
Rigid Non-Metal Armor
This style includes all predominantly rigid non-metal armor that would fall under Tiers 4/5/6 if they were made from metal.
- Is a Tier 3 armor style.
- Must meet the Universal Equipment Requirements.
- Must meet the requirements for the tier/style it is mimicking, other than material thickness.
- Material density must be at least 0.9g/cm3 (equivalent to HDPE).
- The standard Material Thickness is 3/16" (4.78mm).
Chainmail
This style includes flexible armor consisting of a weave of interlocked metal rings.
- Is a Tier 3 armor style.
- Must meet the Universal Equipment Requirements.
- Any weave is permitted but it must not allow a 1/2" dowel to pass through.
- Rings must have Aspect Ratio (AR) of 8 or less.
- Metal must be at least equivalent to Aluminum in density and durability. (2.7g/cm3)
- The standard Material Thickness for rings is based on the metal used:
- Aluminum Round Rings: 16ga swg (0.064") (1.626mm)
- Aluminum Flat Rings: 18ga swg (0.048") (1.219mm)
- Steel Round Rings: 18ga swg (0.048") (1.219mm)
- Steel Flat Rings: 20ga swg (0.036") (0.914mm)
Light Scale
This style includes armor created with overlapping scales secured to each other along one edge using rings or a flexible backing. Scales are individually mobile and are not held into firm contact with the others. Scale armor with rigid or immobile scales is classified as Heavy Scale.
- Is a Tier 4 armor style.
- Must meet the Universal Equipment Requirements.
- Scales must overlap by at least 10%.
- Any backing material must not be visible through the scales.
- Scales must be a metal at least equivalent to Aluminum in density and durability. (2.7g/cm3)
- The standard for Material Thickness is based on the metal used:
- Aluminum Scales: 18ga (0.040") (1.024mm)
- Steel Scales: 20ga (0.036") (0.911mm)
- For rings and backing materials, consult the Material Thickness chart.
Heavy Scale
This style includes armor created with overlapping scales secured to each other along one edge against a backing to create a rigid shell rather than individually mobile scales. Scale armor with loose scales is classified as Light Scale.
- Is a Tier 5 armor style.
- Must meet the Universal Equipment Requirements.
- Scales must overlap by at least 10%.
- The backing material must not be visible through the scales.
- Metal must at least equivalent to Aluminum in density and durability. (2.7g/cm3)
- The standard for Material Thickness is based on the metal used:
- Aluminum Scales: 18ga (0.040") (1.024mm)
- Steel Scales: 20ga (0.036") (0.911mm)
- For rings and backing materials, consult the Material Thickness chart.
Butted Plate (Splint, Kikko, etc.)
This style includes armor that consists of numerous metal plates attached to a backing or linked by cord, chain, or by some other method. This armor is often flexible with numerous seams and joints between plates. This armor will deform locally when struck rather than spreading out impact over a large area
- Is a Tier 5 armor style.
- Must meet the Universal Equipment Requirements.
- Plates spaced no more than 0.5" apart.
- Plates must cover at least 75% of the armor.
- Metal must at least equivalent to Aluminum in density and durability. (2.7g/cm3)
- The standard for Material Thickness is based on the metal used:
- Aluminum Plates: 16ga (0.051") (1.291mm)
- Steel Plates: 18ga (0.048") (1.214mm)
- For rings and backing materials, consult the Material Thickness chart.
Lamellar and Laminar
This style includes armor that is constructed from numerous metal plates, connected to each other in an overlapping fashion by cord, chain link, or similar methods. Examples may include lorica segmentata, manica, okegawa-dō, anima, and other styles. Unlike Heavy Scale, the plates of this type of armor are firmly connected to each other. Mobility is provided by the small amount of flex and slack in the attachment between the individual plates.
- Is a Tier 6 armor style.
- Must meet the Universal Equipment Requirements.
- Plates must overlap by at least 10%.
- Plates connect directly to each other without any backing for support.
- Metal must at least equivalent to Aluminum in density and durability. (2.7g/cm3)
- The standard for Material Thickness is based on the metal used:
- Aluminum Plates: 16ga (0.051") (1.291mm)
- Steel Plates: 18ga (0.048") (1.214mm)
Brigandine
This style includes armor that is constructed from numerous shaped and fitted metal plates solidly connected along a supporting shell of heavy cloth (such as canvas, denim, or velvet) in such a way that when worn all plates are held together firmly and follow the general contours of the body. The plates are typically placed on the inside of the shell, presenting only fabric and rivets to the observer for a very clean and customizable appearance.
- Is a Tier 6 armor style.
- Must meet the Universal Equipment Requirements.
- 75% of plates must overlap by at least 10% of their surface.
- Plates need only be attached along one edge but must be held firmly against each other when the armor is worn.
- Metal must at least equivalent to Aluminum in density and durability. (2.7g/cm3)
- The standard for Material Thickness is based on the metal used:
- Aluminum Plates: 16ga (0.051") (1.291mm)
- Steel Plates: 18ga (0.048") (1.214mm)
Plate
This style includes armor is constructed from large pieces of metal connected together to form a solid shell that spreads impact over a large surface area. Plate armor will not deform locally when struck, and will instead behave as a single contiguous whole. The individual metal pieces are shaped and fitted to articulate together and follow the contours of the body.
- Is a Tier 6 armor style.
- Must meet the Universal Equipment Requirements.
- 75% of the plates used must be large enough to cover at least 10% of the full Hit Location. Joint articulations are exempt from this requirement.
- Metal must at least equivalent to Aluminum in density and durability. (2.7g/cm3)
- The standard for Material Thickness is based on the metal used:
- Aluminum Plates: 16ga (0.051") (1.291mm)
- Steel Plates: 18ga (0.048") (1.214mm)
Ambiguous Armor
For armor pieces that are ambiguous, the equipment inspector should compare it to each tier as a whole and do their best assign to the tier they feel is most appropriate based on factors such as materials, weight, flexibility, and visuals (see guide below).
- Inspectors should reference similar styles and materials to help gauge what bonuses or penalties may be appropriate.
- Ambiguous Armor must still meet the Universal Equipment Requirements.
Below is a simple guide that inspectors may use to gauge the best tier for an ambiguous piece of armor. Use this knowledge alongside existing styles to help place the armor in a tier that is fair for everyone.
- Non-Metal Tier Cap: Non-metal armors should not be placed higher than Tier 3, regardless of the factors below.
- Weight: Heavier armor should be placed higher, but only to a limit. The lowest tier armors are quilted cloth (0.03 lbs/sqft) and the highest tier armors are 14ga aluminum plate (approx. 1 lbs/sqft). Extra weight beyond these bounds should receive no additional consideration, however steel-like materials may receive a separate construction bonus afterwards. Weight added for no reason other than to add weight should likewise be disregarded.
- Flexibility: The more rigid the armor is, the higher it should be placed. The lowest tier armors are fabric and the highest tier armors are reinforced metal plates.
- Tiebreaker - Visuals: If there is difficulty deciding between two tiers, visual appearance can act as a tiebreaker to nudge the decision one way or the other.
- Helpful Benchmarks: Consider using these benchmarks to help peg an initial placement and then fine tune it using the other criteria above.
- Ambiguous armor that meets the universal equipment requirements is always eligible for Tier 1 at minimum.
- Ambiguous armor that is primarily rigid and non-metal should be placed roughly around Tier 2 or Tier 3.
- Ambiguous armor that is primarily metal and primarily rigid should be placed roughly around Tier 4 or Tier 5.
Color Code
We encourage playtesters to attempt to adhere to the Color Code and Color Blind Aids if possible, however we understand that this might not be reasonable for all players at this time. Since we don't want to see people left out of playtesting, organizers may allow participants to forego the Color Blind Aids (the extra color stripe) for now.
That said, if your park has members with color blindness or other visual impairments, we encourage you to try to create a proper set of Color Coded equipment so that we can get feedback about whether or not it helps their experience in the way we are anticipating.
Thanks for your understanding. Happy Playtesting!
- The V9 TeamSometimes a certain color will be required in order to convey additional information about an effect on the battlefield. This is commonly required for sashes, spellballs, and specialty arrows.
In an effort to improve visual recognition and provide better accessibility for our players with visual impairments, Amtgard V9 uses a Color Code system to regulate these mandatory colors.
All equipment that requires a specific color must adhere to the following Color Code rules:
- Color Swatch: The color used must be visually similar to the corresponding swatch shown above. It is not required to match the color exactly so long as it does not create confusion during gameplay. Occasional confusion in the chaos of battle should be expected however repeated incidents will require the color to be replaced with something more appropriate.
- If there is ever confusion, a color belongs to whichever swatch it most closely resembles. If a color appears to be equally similar to multiple swatches then it should not be used at all.
- Color Blind Aids: All Color Coded equipment must also include a secondary color to assist with identification for those with a vision impairment. This color must be included in a way that is clearly understood to be the secondary color, be easily identifiable from 20ft away, and be placed in a conspicuous location on that piece of equipment. We recommend the following:
- For Arrows and Spellballs: a thick line across the front face.
- For Sashes, place a thick line across the narrow portion of the sash, roughly at heart-level. Adjust the placement as needed to avoid obstruction by shield or garb.
- Use double-lines if the sash has other designs that might pull focus.
- Use double-lines if the sash has other designs that might pull focus.
Developer Note: Color Blind Aids do not need to be permanently integrated into the object. They can be affixed separately by tying a strip of the appropriate color via any safe means. This is especially relevant during playtesting where the colors themselves may change frequently.
Visual Indicators
Visual Indicators are a functional piece of garb that serves to provide at-a-glance information to other players on the field. While Amtgard uses a number of standardized Visual Indicators, custom indicators can also be created for specific events, such as Team Headbands.
Sashes
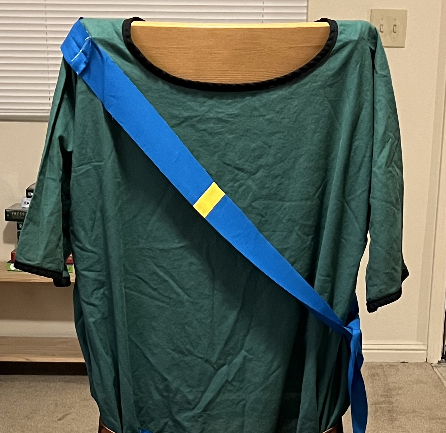
Sashes are primarily used to denote a player's Class. They must be worn from the shoulder to the opposite hip across the body in a manner that not obscured by garb or other equipment.
Construction Rules
- Must be at least 2" wide.
- Every sash is associated with an class or custom rule and must match the appropriate Color Code.
- Color blind aids should run across the sash short-ways (see image). We recommend placing the lines on either side of the player, roughly at heart-level; however you can adjust the placement to suit your kit and avoid obstruction by shield or garb. Use double-lines for better visibility or if the sash has other designs that might pull focus.
Effect
Effects are caused by strikes, abilities, and other gameplay mechanics.
- A player can be affected by multiple effects simultaneously.
- A source can impart more than one effect at a time.
- When a source imparts multiple effects at the same time, they are all applied simultaneously.
Effect Categories
All effects are divided into categories based on similar properties.
- Immediate Effects are completely resolved in the moment they occur with no additional actions or timers required.
- Examples include: damage, armor breaking, healing wounds, repairing equipment, etc.
- Immediate effects are always independent from one another, even though they are typically listed under a single header. They must be resisted or protected against individually.
- Status Effects last until an amount of time has elapsed, the player dies, or some other requirement is met.
- Players must declare the name or a brief summary of the effect if asked.
- If a status effect expires due to a timed duration ending, the player it affected must declare, "No longer [Effect or State that Ended]". This must be audible out to 20 feet.
- All the text under a status effect header is part of the same status effect. If one part of the status effect is removed, resisted, or otherwise ignored, the entire status effect is removed or ignored. A status effect cannot be broken into pieces of itself.
- Chant Effects last as long as the caster remains chanting. See ‘Chants’ for more info.
- All the text under a chant effect header is part of the same chant effect. If one part of the chant effect is removed, resisted, or otherwise ignored, the entire chant effect is removed or ignored. A chant effect cannot be broken into pieces of itself.
- Enchantment Effects last until it is willingly discarded or the player dies. See ‘ Enchantments’ for more info.
- All the text under an enchantment effect header is part of the same enchantment effect. If one part of the enchantment effect is removed, resisted, or otherwise ignored, the entire enchantment effect is removed or ignored. An enchantment effect cannot be broken into pieces of itself.
- Trait Effects are active for the entire game and cannot be removed, disabled, or discarded. See ‘ Traits’ for more info.
- Secondary Effects are follow-up effects that are applied sometime after an initial effect, usually once some sort of condition or requirement is met.
- A player cannot willingly choose to be immune to, resist, or refuse secondary effects once the primary effects have been applied to them. Other effects that would prevent a player from being affected by something, such as Tracking or being Frozen, can still prevent secondary effects.
- Since secondary effects are still effects, they will also include a primary effect category listed in brackets, such as "Secondary Effect (Immediate)".
Combat Activities
Combat Activities are games or scenarios where players are allowed to use combat to pursue their objective. Amtgard combat does not have a single primary game mode. Much like tabletop RPGs, this rulebook defines the mechanics by which players can engage with each other, but the specific games and scenarios wherein those mechanics are used is up to a Game Organizer to decide.
Since the variety of possible games is limited only by your imagination, this section describes the core mechanics and components of all combat activities, as well as providing some common example games.
After reading this section, you can learn more about designing, building, and balancing your own combat activities in the Game Organizer Guide.
Core Game Mechanics
Every combat activity must have the following core mechanics to ensure it can coexist with the rest of the Amtgard ruleset. These mechanics can be tweaked and adjusted to create an infinite number of different games.
Objectives
The win condition(s) for the activity. This can be any identifiable moment.
Game Items
Game Items are physical objects that are often directly relevant to the game objective, although the Game Organizer can designate any object as a Game Item for their activity if they deem it necessary.
Game Items must be dropped immediately if the bearer becomes Dead, Frozen, Insubstantial, Invulnerable or otherwise unable to be interacted with.
Some activities may also require the Game Item to be held in a free hand, or for its location to always be public information, meaning it cannot be intentionally hidden and any players who know its location must declare it when asked.
Your Game Organizer will explain any specific rules for their Game Item(s) before the activity begins.
- The flags in a game of Capture the Flag
- The physical 'Heavy Object' for a game of Heavy Object
- The ball in Phoenix Ball
- The dog skull for Jugging
- Key storyline items in a quest
Teams
This will indicate how many teams the players must be split into, as well as any special instructions for they should be divided. Teams can also be a rotating feature where membership changes as the game progresses.
- Two Teams with an equal amount of players.
- Two Teams, and a neutral team that can help or hinder either team as they see fit.
- Two teams split evenly at the start but the first-dead player from the last round switches to the other team.
- The two most recent dead players respawn together as a new 2-player team.
- Free-for-All (every player for themselves)
- 1-on-1 duels
Life Limits
This indicates how many times players are allowed to return to life by respawning, if at all.
- A fixed number of lives per player
- A fixed number of lives per team (often called a Life Pool)
- Unlimited lives
Death Count / Respawn Condition
This is often referred to as the 'Death Count' whether or not there's an actual countdown. It will outline the conditions by which a dead player may return to life by respawning.
- X Seconds On-Death: Players must wait X seconds after dying before respawning. The exact timer is often adjusted in 15s increments to suit the number of players and overall flow of the game.
- Wave Respawn: Players in a designated Dead Zone respawn on pre-set cycles every X seconds on a shared clock.
- Rally Respawn: Players may only respawn together when X other teammates are dead and gathered in a designated Dead Zone. The exact number of players required to respawn is determined by the Game Organizer based on the needs of the game.
- Instant Respawn: Players may respawn immediately upon reaching a certain location or meeting a certain condition, such as touching a tree or moving 50' away from living enemies.
Respawn Points and the Dead Zone
The Respawn Point and Dead Zone are two integral parts of the cycle of life and death in Amtgard.
Respawn Point
This is the designated in-bounds location that dead players must go when they are able to return to life by respawning. When a player’s death count or respawn condition is met, they simply move to their team's designated respawn point and loudly declare "Alive!" to respawn and return to life.
The Dead Zone
This is a designated out-of-bounds location where gameplay cannot occur. It is an out-of-the-way zone for dead players to hang out in while they wait to respawn. Some death counts or respawn conditions may require dead players to be in the Dead Zone before they can start counting or otherwise be eligible to return to life.
Even if the Dead Zone is not being used for respawn conditions, it will always be valuable as a place for dead players to wait so keep them away from active combat and allow both teams to easily see who is dead at a glance. For these reasons, it important to make sure Dead Zones are placed away from in-bounds areas such as bases and Respawn Points.
Base
- Bases are a designated in-bounds location that some or all players may use as their starting area and rallying point.
- Some abilities will reference bases in their rules text, such as by requiring a player to return to their base, or only being usable while within their base.
V8 Transition Note: The ability to repair equipment at base has been rolled into the new Rest ability. - It is not recommended to have bases in close proximity to Dead Zones or respawn locations as bases can often be become cluttered with players when used as strongholds, resting points, or the last line of defense during a combat activity.
- Respawn Points in or around bases should be placed in such a way that respawning players are not able to come to life in the middle of active combat or in a position that would be seen as unfair or cheap.
- Dead Zones should always be placed in a distinctly separate location from bases or else it can become difficult to determine which players are alive defending the base and which players are dead.
- Respawn Points in or around bases should be placed in such a way that respawning players are not able to come to life in the middle of active combat or in a position that would be seen as unfair or cheap.
Refreshes
For game modes that allow players to use abilities, this will indicate the time or condition that allows players to restores the uses of their Per-Refresh abilities.
Refreshes are not required. Refreshes may be withheld entirely or offered more frequently to shape the dynamic of the game by increasing or decreasing the frequency of stronger abilities. More Refreshes equals more explosive, high-power games.
- As a rule of thumb, Amtgard classes have been designed around 0-1 refreshes per activity.
Game Modes
The Amtgard combat rules are designed to build upon each other in layers. Each layer of rules increases the complexity of the game while also increasing the breadth and depth of play.
The four (4) basic layers are:
- Ditch: Only uses the core combat rules.
- Militia: Core combat rules plus armor and projectiles.
- Full Class: Everything from militia plus classes and class abilities.
- Roleplay: Everything from full class plus roleplay abilities.
The Game Modes presented below represent some of the most common configurations of rules layers along with examples for each.
Contents
- 1 Amtgard V9 Playtest Information
- 2 Introduction
- 3 Getting Started
- 4 Core Combat Rules
- 5 Equipment
- 5.1 Equipment Basics
- 5.2 Equipment Use Terms
- 5.3 Weapons
- 5.3.1 General Rules
- 5.3.2 Construction Terms
- 5.3.2.1 2.5 Inch and 2 Inch Rule
- 5.3.2.2 Core
- 5.3.2.3 Covers
- 5.3.2.4 Flex
- 5.3.2.5 Handle / Unpadded Segment
- 5.3.2.6 Incidental Padding
- 5.3.2.7 Multi-Ended Weapons
- 5.3.2.8 Non-Striking Tip
- 5.3.2.9 Ownership Label
- 5.3.2.10 Padding and Foam
- 5.3.2.11 Stab-Only
- 5.3.2.12 Strike-Legal Padding
- 5.3.2.13 Striking Tip
- 5.3.2.14 Total Length
- 5.3.2.15 Weapon Segments
- 5.3.3 Melee Weapons
- 5.3.4 Projectile Weapons
- 5.3.5 Siege Weapons
- 5.4 Shields
- 5.5 Armor
- 5.5.1 General Rules
- 5.5.2 Natural Armor
- 5.5.3 Physical Armor
- 5.5.3.1 Gameplay Rules
- 5.5.3.2 Construction Rules
- 5.5.3.3 Rating Armor & Calculating Armor Point Totals
- 5.5.3.4 Armor Styles
- 5.5.3.4.1 Cloth/Padded Armor
- 5.5.3.4.2 Light Leather
- 5.5.3.4.3 Butcher's Mail, Sharkmail, etc
- 5.5.3.4.4 Heavy Leather
- 5.5.3.4.5 Rigid Non-Metal Armor
- 5.5.3.4.6 Chainmail
- 5.5.3.4.7 Light Scale
- 5.5.3.4.8 Heavy Scale
- 5.5.3.4.9 Butted Plate (Splint, Kikko, etc.)
- 5.5.3.4.10 Lamellar and Laminar
- 5.5.3.4.11 Brigandine
- 5.5.3.4.12 Plate
- 5.5.3.4.13 Ambiguous Armor
- 5.6 Color Code
- 5.7 Visual Indicators
- 6 Combat Activities
- 7 Rules Authorities
Duels & Tournaments
Duels
Duels are the most basic form of Amtgard combat. In this game mode, two players with battle each other in 1-on-1 combat. This mode typically uses only the Ditch rule layer. That means only the core combat rules. No armor, no projectiles, no siege weapons, no classes, and no roleplay abilities. Duels are often used to practice fundamental fighting skills such as strike placement, body positioning, and footwork; among others.
Tournaments
Kingdoms will often organize Fighting Tournaments where players can test their dueling prowess in a competitive setting for a chance to earn special accolades and achievements. Tournament fighting is one of two combat-focused paths to Knighthood.
Is Roleplay expected? Roleplay is rarely, if ever, expected in Duels and Tournaments.
Ditch
The Ditch game mode, as the name implies, only uses Ditch layer rules. That means only the core combat rules. No armor, no projectiles, no siege weapons, no classes, and no roleplay abilities. Unlike Duels and Tournaments, Ditch games are fought with teams of players. Ditch games are a great way to ease new players into the game, as well as an excellent warm up or cool down activity.
Is Roleplay expected? Roleplay is rarely, if ever, expected in Ditch games.
Militia
The Militia game mode is one layer of complexity up from Ditch. It allows Armor, Armor Breaking, Shield Crushing and basic projectiles, but not classes or roleplay rules.
Militia games are a great way to enjoy the physical combat rules, including armor and bows, without going too far into the intangible mechanics such as verbals, enchantments, and other special abilities.
Is Roleplay expected? Roleplay is rarely expected in Militia games.
Full-Class Battlegame
This game mode is the classic Amtgard experience. All combat-focused mechanics are used, including classes. Only the roleplay rules, which are non-combat oriented, are left out.
Full-Class games are the flagship activity for the Amtgard LARP and the most popular game mode by far. It offers the greatest combat depth and variety of participation styles, however this comes with the price of having a lot more rules for each player to track and process in real time. Since this game mode also includes intangible effects such as magic and enchantments, the honor of each player becomes crucial to ensuring everyone gets the fantasy combat experience they are expecting.
The Game Organizer Guide offers tips and guidance for easing new players into these more complex rules.
Is Roleplay expected? Roleplay is rarely expected in activities described as Full Class Battlegames. Scenario Battlegame is the term used when a Full-Class Battlegame intends to include roleplay.
Scenario Battlegame
This game mode sits on the cusp of using the full Amtgard ruleset. It represents activities that are still team-based and PVP in nature but want to include some roleplay elements without incorporating a complex storyline or social options. They use all the combat and class mechanics and may even dip into the non-combat roleplay abilities as well depending on how it might impact the activity.
Scenario battles often include NPCs, players who are not assigned to a team but representing some sort of monster or character that both teams can interact with.
Is Roleplay expected? Roleplay in scenario battles is encouraged but since this mode often combat-centric with little or no way to achieve victory without fighting, roleplay among PCs tends to be minimal. Typically, the NPCs will be the ones doing the majority of the roleplaying and other players will only roleplay when dealing with those specific NPCs, or by throwing in the occasional in-character quip when it won't affect their odds of victory.
Team Quest
This game mode is the first true use of all the gameplay rules. From core combat all the way to roleplay mechanics.
This mode involves teams of players, often called PCs, competing against each other to complete objectives that may include combat, social roleplay, puzzles, and other enjoyable activities alongside an overarching storyline. This game mode will often included more fleshed out NPCs for all groups to interact with.
Contrary to Adventure Quests, in Team Quests, each team is encouraged to thwart each other’s efforts and PVP combat should still be expected.
Is Roleplay expected? Roleplay is expected in Team Quests. These activities will often require the completion of social encounters and other non-combat objectives; there is usually some form of storyline; and it may even be possible to participate without engaging in combat whatsoever.
Adventure Quest
This game mode uses all the gameplay mechanics and is similar to a Team Quest except that it expects all players (PCs) to be on the same team and generally work together to thwart the NPCs and complete a storyline objective.
This mode is closest to a classic tabletop RPG experience where the Game Organizer (also known as the Questmaster) has the most freedom to script NPCs and control the flow of the encounters so PCs get a high-quality, streamlined story experience.
Is Roleplay expected? Roleplay is expected in Adventure Quests. These activities will often require the completion of social encounters and other non-combat objectives; there is usually some form of storyline; and it may even be possible to participate without engaging in combat whatsoever.
Sandbox Roleplay
The Sandbox Roleplay game mode, also known as "Open Roleplay", puts a spin on the traditional gameplay mechanics by foregoing teams, storylines, and specific objectives to instead encourage players to roleplay freely among themselves, engaging in combat only if and when the need arises.
This mode allows all game rules including combat and classes but is typically used for feasts, courts, and other low-combat environments where the focus is primarily on social roleplay. This means Sandbox Roleplay is great for non-fighting participants as well as traditional combat-ready players.
Most importantly, it is uncommon for Sandbox Roleplay to have a dedicated Game Organizer, so players who wish to roleplay this way will simply congregate together and drop in/drop out at their leisure.
Is Roleplay expected? As the name implies, roleplay is expected in Sandbox Roleplay activities. With that in mind, the disorganized nature of sandbox roleplay means that not everyone in your immediate area will always be participating so you may find yourself occasionally interrupted by out-of-character matters or otherwise be forced to move your roleplay to an area that is less likely to be interupted.
Custom Rules and Accommodations
In order to encourage fun and enjoyable experiences, Game Organizers are allowed to modify the way the game is played or create new rules that are only in effect for their particular game or activity.
To give a better understanding of how custom rules and mechanics can be useful, consider the following:
- Game-Specific Balance: With the infinite variety of potential game modes and objectives, it is possible that some rules or abilities can end up being too dominant or impactful in a given activity. In these cases, it can be beneficial to modify or prohibit them altogether to preserve fairness, fun, and/or competitive integrity.
- Enhancing Flavor or Immersion: Custom mechanics can be used to present more immersive experiences beyond what is normally allowed, such as lava pits, breath attacks, weather effects, and more!
- Accessibility & Accommodation: Game Organizers and Rules Authorities are empowered and encouraged to create custom rules to help include those who may need accommodation in order to participate, whether due to an injury, disability, weather conditions, or any another reason.
With Great Power Comes Great Responsibility
Custom rules can quickly turn a game into something that doesn't feel like Amtgard anymore. All modifications should strive to be in line with the actual Amtgard V9 Rules of Play whenever possible and work to support the source rules rather than completely change the way the game is played. In all instances, custom rules and mechanics must be clearly explained to all participants before the game begins.
Accommodations
Amtgard seeks to be an inclusive, welcoming, and empowering experience for all players. Game Organizers and Rules Authorities are encouraged to make exceptions or special accommodations as necessary to foster this inclusive environment whenever possible.
Accommodations are intended to enable fair participation and should never been seen as something to be optimized or sought out for gameplay advantage. Rather, they are intended to cut through the red tape of the written rules and help our members participate more easily, comfortably, and sometimes even at all.
- Players with disabilities or injuries could be granted special rules to help offset their condition and make it easier to participate. A player with a speech impediment might be allowed to use pre-recorded lines to cast magic; a players with mobility issues could be allowed to respawn further up field instead of walking back to base after each death; a fragile bow-user might be stationed as an immobile turret with a cardboard target nearby that players can attack instead of them.
- Players fighting in the heat, cold, or other weather conditions could be allowed accommodations so they can properly dress for the climate. Players in extreme heat might be granted their armor points without wearing the physical pieces. Players in extreme cold might receive 'Look the Part' without wearing full garb so everyone can bundle up for winter.
Developer Note: Accommodations are not a substitute to ensuring one's own personal safety.
Such a responsibility always rests with the player themselves.
Non-Melee Participation (Light Pink Sash Rules)

Players may have reasons to want to avoid becoming involved in melee combat. These players are referred to as Non-Melee Participants.
- Light Pink Sashes are reserved to denote Non-Melee participants. If worn with another sash, they must cross in the opposite direction.
- Non-Melee participation is an accommodation, not a strategic option. Like any other accommodation, a player who wishes to participate in this manner must first speak to and receive permission from the Game Organizer.
- Before a game begins, the Game Organizer should introduce any non-melee participants and explain how the accommodation works so everyone is on the same page.
- Interactions between Regular and Non-Melee participants must be handled in good faith, first and foremost. The goal is to allow a player to participate without being struck in melee, in a way that does not warp gameplay around them. Regular players should be able to participate largely as normal aside from pulling their strikes against these individuals.
Gameplay Rules for Non-Melee Participants
- If you wish to participate as a Non-Melee participant, you must speak with the Game Organizer before entering the battle.
- You should not just throw on a Light Pink Sash and jump into the game without alerting anyone. The sash alone does not prevent you from being struck. The Game Organizer, Rules Authorities, and other players must be aware of your presence and the accommodation itself in order to conduct themselves accordingly.
- You should not just throw on a Light Pink Sash and jump into the game without alerting anyone. The sash alone does not prevent you from being struck. The Game Organizer, Rules Authorities, and other players must be aware of your presence and the accommodation itself in order to conduct themselves accordingly.
- Once in game, if you are approached by someone clearly intending to strike you in melee combat, you must immediately call yourself dead.
- If you are unaware of their presence, they may gently tap you with their weapon to get your attention.
- If you are unaware of their presence, they may gently tap you with their weapon to get your attention.
- You cannot engage in melee combat yourself.
- You cannot use use melee weapons, armor, or shields to attack or defend yourself, nor can you benefit from enchantment effects that grant protection from melee strikes.
- Once engaged at melee range, you cannot attempt to dodge, evade, or escape. If you want to run away, you must do so long before your opponent reaches you. If you are being chased by a melee attacker, you should act in good faith and call dead when they get decently close because the only other way to 'catch' you is going to be by striking you, which is what your sash says they cannot do.
- You can engage and be engaged by projectiles and verbal abilities.
- You may use weapons, armor, shields, and enchantments to defend against these attacks as normal.
- You may use projectile weapons and verbal abilities as normal.
- Players who wish to avoid projectile contact as well should speak with the Game Organizer for further accommodation.
- You cannot derive a gameplay advantage from this accommodation.
- You should never place yourself into situations or interact with others in such a way that would leverage your accommodation to gain an advantage that was not directly intended by the Game Organizer.
- You should never place yourself into situations or interact with others in such a way that would leverage your accommodation to gain an advantage that was not directly intended by the Game Organizer.
- Wearing the sash does not guarantee that you will not be struck in melee.
- Amtgard is a contact activity and participation is always at your own risk. Combat is chaotic and you should expect to be struck accidentally every now and then. In these situations, you must still follow the rules and take the effects of any accidental hits that may occur. That said, repeated or egregious offenses should be reported to a Reeve for investigation.
- Amtgard is a contact activity and participation is always at your own risk. Combat is chaotic and you should expect to be struck accidentally every now and then. In these situations, you must still follow the rules and take the effects of any accidental hits that may occur. That said, repeated or egregious offenses should be reported to a Reeve for investigation.
Tips for fighting AGAINST Non-Melee Players
- When entering the battlefield, take note of any Non-Melee participants so you can be aware of their accommodation if/when it becomes necessary to interact with them. The Game Organizer should point out these players and/or explain the accommodation to you whenever it is being used.
- Avoid striking them in melee, even in jest. If you want to attack them, simply enter melee range and present yourself so that you could strike them and they should call themselves dead. If they are unaware of your presence or intent, a gentle tap from your weapon should be all that is necessary.
- Non-Melee participants can be engaged with projectiles and verbal abilities as normal unless otherwise instructed by the Game Organizer.
Developer Note: Ultimately, the goal of the game is to have fun. While certain accommodations can alter "the meta" or disrupt competitive strategies, that aspect should not be considered more important than the overall enjoyment of all participants.
Since Accommodations will often be created on a case-by-case basis, they will not be perfect on first conception. Accommodations should be tweaked and adjusted to avoid disruptively powerful effects, and communities should be supportive, respectful and compassionate towards the Organizers, Rules Authorities, and affected players that are trying to make these accommodations work.
The Game Organizer Guide (GOG)
The Game Organizer Guide is a supplementary document for the Amtgard V9 ruleset that provides support and guidance for Game Organizers, Reeves, and players looking to design and run their own games and activities. There are no rules in this guide, only useful information, tips, and examples.
Once released, you will be able find it on the Amtgard website.
GOG STATUS UPDATE (January 2024)
Development of the Game Organizer Guide is on stand-by until after the July 2024 AICOM vote.
If you would like to support development of this document in the future, please reach out on Discord or send a messsage to [email protected].
Rules Authorities
Rules Authorities are responsible for overseeing activities and help enforce rules and safety. Rules Authorities can be chosen individuals, volunteers, or even elected officers depending on the situation. For example, the Game Organizer will often act as an authority for their own game, and other players may volunteer to help reeve (referee) as well.
- At least one Rules Authority is required at each Amtgard function to administer Equipment Inspections.
- It is encouraged to have at least one active Rules Authority monitoring each combat activity, although it is not required unless the Game Organizer deems them necessary. That said, it is always beneficial to have a Reeve or two hanging around to help keep the games running smoothly, to answer questions, and help resolve conflicts.
The following entries detail some of the most common forms of Rules Authorities in Amtgard:
Reeve
The most common rules authority is the Reeve. They are Amtgard's version of the modern Referee. You can identify a reeve by their vertical, black-and-white stripes (ala modern Referees), or straight, black-and-white checkerboard patterns. This will be displayed on a sash, a tabard, a banner, or a staff.
The responsibility of a Reeve is to oversee the execution of game rules and facilitate a safe and honorable space to maximize the enjoyment of the game’s participants. This may require the Reeve to make calls that are unpopular with some individuals in order to allow the game to proceed smoothly. Reeves must remain fair and impartial in all of their calls, and apply the rules objectively, regardless of individual feelings on the subject.
Reeves have the power to resolve rules-related issues in the activities they are overseeing. If a snap decision is required, Reeves will do their best in the moment to make the call they believe is correct and consult the rulebook afterwards to confirm the ruling if necessary. Like any sporting activity, Reeves will occasionally make incorrect calls. These should be played as called in the moment out of respect for the position. Do not argue with the Reeve. If a Reeve demonstrates repeated or egregious mistakes, you can report it to a higher-ranked Authority and it may result in that Reeve losing their authority and status as a Reeve.
Reeves also have the power to alter the state of the game as needed to enforce the rules and resolve issues. For example, they can inflict or remove effects, states, wounds, ability uses, and even death; they can increase or reduce a death count or effect timer; they can add or remove players from the game, change the teams, and so on. Reeves abusing this power should be reported to the authority in charge of all Reeves, typically this is an officer position known as the Guildmaster of Reeves.
As a rule of thumb, whenever there is a rule or safety issue, on-field Reeves should be notified first as they will be best equipped to resolve the situation promptly in the moment.
How are Reeves Appointed?
Anyone can volunteer to help reeve Amtgard activities in the same way that anyone can volunteer to help referee a pick-up game of soccer. Similarly, the quality of Reeve will largely depend on the personal knowledge and experience of the player assuming that role.
For this reason, Kingdoms will often produce Reeve Tests which serve to assess the skill of potential Reeves. Due to the variety of mechanics and game modes, it is encouraged to assess the following skills independently as some aspiring Reeves may excel in one area over another.
- Basic Game Knowledge: Tests essential game knowledge which may include core concepts from the entire rulebook.
- Equipment Inspection Knowledge: Tests key concepts and required knowledge for Equipment Inspection.
- Tournament Knowledge: Tests Dueling and Tournament knowledge; the ability to reeve fast-paced 1-on-1 combat as well as the necessary traits required to officiate competitive, high-stakes bouts.
- Battlegame Knowledge: Tests the wide breadth of full-class battlegame knowledge as well as the ability to oversee team-based activities and the many different personalities, player types, and skill levels involved.
- Roleplay Knowledge: Tests roleplay knowledge and the unique skills required to moderate and support the more open and often improvised nature of these activities.
Head Reeve
The Head Reeve is a single person, often the Game Organizer, who has authority above the other reeves for a specific activity. The Head Reeve is a game-by-game position intended to help support the other reeves, resolve conflicts, and act as final arbitration for tougher decisions. Not all activities require someone specifically empowered as a Head Reeve, but in larger games with many novice reeves it can help to have the Game Organizer or a more experienced reeve around to oversee their conduct and ensure everything is running smoothly.
Game Organizer
The person responsible for organizing and overseeing a combat activity is called the Game Organizer. They decide the game mode, the objectives, and any other activity-specific rules for their game. They may also implement Custom Rules and Accommodations as they see fit.
More often than not, the Game Organizer will also be the Head Reeve.
Equipment Inspector
Equipment Inspectors are individuals who have been given authority to administer Equipment Inspections, which includes assessing weapons for safety, rating armor, and overseeing weapon competency assessments for first-time equipment use. These individuals are typically Reeves who have demonstrated the knowledge necessary to administer and adjudicate these tasks fairly.
Kingdom-Appointed Authorities
It is the responsibility of each independent Kingdom to ensure safety and integrity of play for all members participating in Amtgard activities within their jurisdiction. Kingdoms must include in their Corpora or community by-laws a method by which to appoint and empower individuals to oversee and enforce safety and rules-adherence during Amtgard functions. The exact duties, powers, and hierarchy of these players must be outlined within the aforementioned Kingdom document(s) and are independent from the Amtgard V9 Rules of Play.
Positions traditionally given rules-authority include:
- Monarch (by virtue of being responsible for the group as whole)
- Champion
- Guildmaster of Reeves
Best Practices for Resolving Issues
In a free-form game like Amtgard there are bound to be interactions and situations that come up that were not imagined or considered by the developers. It is understandably impossible for them to have accounted for every potential interpretation of the rules that may arise.
With that in mind, please consider the following as you apply the rules in this book during live gameplay. This section is especially useful for our Rules Authorities and Game Organizers who will often be required to make judgment calls on these matters.
- Amtgard requires cooperation, honor, and fair play from all participants. Keeping the tenets of the Honor System in mind is a solid first step towards untangling any situation you may come across.
- Imperfection and honest mistakes will inevitably occur. Human error should be expected and played through in good faith to the best of everyone’s ability. Don't punish the occasional honest mistake, especially if everyone involved is going along with it.
- For Reeves: If an error involves a lack of knowledge, show compassion and offer the correct information. If not, offer a warning and encourage the player to self-regulate. Do your best to acknowledge and recognize them when they succeed at correcting themselves. If an issue becomes a recurring or egregious then further action should be taken to prevent it from spoiling the experience for others.
- Read the rules thoroughly and consider the bigger picture. The more familiar you are with the rules, the better equipped you will be to handle situations and interactions that are not explicitly covered. Rules may give one impression when read in a vacuum, but make sense when viewed within the larger context of the game. When possible, use the spirit of the rule to guide your interpretation of the letter of the rule.
- If a specific rule contradicts a general rule, the specific rule should be favored. Abilities, magic items, and custom rules may allow players to do things that the general rules say they cannot. When this occurs, these more specific rules should always be seen as exceptions regardless of whether or not it is explicitly addressed in the general rule.
- Use common sense and follow the guide of Safety, Fairness, Flow, and Fun when determining how to navigate an ambiguous situation.
- Safety of all members should always be the top priority.
- Fairness is about ensuring a decision in line with common sense and the spirit of the rule.
- Flow is about ensuring a decision is easy to execute and doesn’t needlessly encumber gameplay.
- Fun is about considering a decision's effect on the overall enjoyment of all participants.
- Discourage confusion when possible, especially anything that could misrepresent one game mechanic for another, such as a sword that looks like a shield; a player casting a helpful spell at an enemy in an aggressive way to scare them; or someone pretending to be affected by a state to gain the element of surprise. Amtgard gameplay can often be very difficult to track even when everything is represented accurately, so deliberate deceit and misrepresentation of the mechanics of play should never be encouraged or supported by Rules Authorities
- The rules only do what they say they do. Even though the game mechanics are presented with engaging and thematic names, they do not have additional powers beyond what is explicitly stated within the rules. For example, the ability called Fireball cannot light up a room or set someone on fire. With that in mind, inside the bounds of a Roleplay activity this type of thematic extrapolation may be encouraged, but only with permission from the Roleplay Organizer.
- If a term is not defined anywhere in this rulebook, the most commonly accepted definition of the term should be applied. If multiple definitions exist, use the one that makes the most sense.
- Keep Calm. Be Kind. It is important to be self-aware and personally accountable. Both players and reeves must work to resolve issues calmly and kindly without becoming over-reactive, dismissive, or condescending. If you feel yourself getting frustrated, take a step back or excuse yourself until you can address the matter with a cool head.
Discussing Rules During Live Gameplay
Participants are never immune to combat or effects while discussing or clarifying rules with other players and/or Rules Authorities during live gameplay. It is important for Reeves and players to work cooperatively to resolve mid-game issues quickly and fairly without impacting the experience of others (such as by suddenly becoming immune to interaction).
In addition, even if a Reeve witnesses the complicated encounter, they won't always be able or available to help resolve it. Players are encouraged to keep this in mind and set their expectations accordingly. Mid-game adjudication is a privilege, not a right. It is best to engage Reeves while you are dead or between game rounds to help prevent issues from repeating rather than relying on them to make moment-to-moment calls. Our player-run system simply cannot guarantee that kind of instant, play-by-play, support.
You can help your local Reeves by reviewing the Best Practices and keeping them in mind when issues arise.
