Difference between revisions of "V9: Sandbox (Wiki Testing)"
| Line 1: | Line 1: | ||
| − | <div style="background : # | + | <div style="background : #fffefc; padding: 0.75em 0.75em;"> |
| − | This is a coloured background test. | + | This is a coloured background test. Maybe use #f5f4ef |
{{:V9: Weapons}} | {{:V9: Weapons}} | ||
</div> | </div> | ||
Revision as of 00:41, 3 December 2022
This is a coloured background test. Maybe use #f5f4ef
Contents
- 1 Weapons
- 1.1 General Rules
- 1.2 Construction Terms
- 1.2.1 2.5 Inch and 2 Inch Rule
- 1.2.2 Core
- 1.2.3 Covers
- 1.2.4 Flex
- 1.2.5 Handle / Unpadded Segment
- 1.2.6 Incidental Padding
- 1.2.7 Multi-Ended Weapons
- 1.2.8 Non-Striking Tip
- 1.2.9 Ownership Label
- 1.2.10 Padding and Foam
- 1.2.11 Stab-Only
- 1.2.12 Strike-Legal Padding
- 1.2.13 Striking Tip
- 1.2.14 Total Length
- 1.2.15 Weapon Segments
- 1.3 Melee Weapons
- 1.4 Projectile Weapons
- 1.5 Siege Weapons
Weapons
Striking your opponent with a wielded weapon is the primary way to interact with them in combat.
General Rules
- Only weapons that meet the Universal Equipment Requirements can be used in combat.
- All Amtgard weapons are classified as either a ‘Melee Weapon’ or a ‘Projectile Weapon’, as well as a specific classification or typing such as ‘Short’ or ‘Long’. Weapons of the same classification have the same gameplay rules.
For example, a ‘ Short’ melee weapon made to resemble a fish will have the same gameplay rules as a ‘Short’ melee weapon made to resemble a Sword or Club. - Unsupported Weapons: In-Game representations of explosives, firearms, and chemical weapons (such as Alchemist’s Fire or Toxic Gas) are not supported by the Amtgard Rules of Play. If something of this nature is desired for a special scenario, a Game Organizer may design and implement custom rules on a game-by-game basis.
- Prohibited Weapons: For the safety and comfort of our players, Amtgard outright prohibits the following weapon styles and their variations. If you are unsure if a weapon design falls under these categories, consult a Reeve or other relevant Rules Authority.
- Entangling Weapons such as Whips, Lasso, Nets, and Bolas.
- Atlatls, Slings, Slingshots, and all other handheld projectile launchers that are not bows or crossbows.
- Punching weapons such as Foam Fists, Punching Daggers, and Tonfas. The experience of being punched is psychologically at odds with the safe, inclusive, fantasy-sword-fight atmosphere that Amtgard wishes to evoke.
Construction Terms
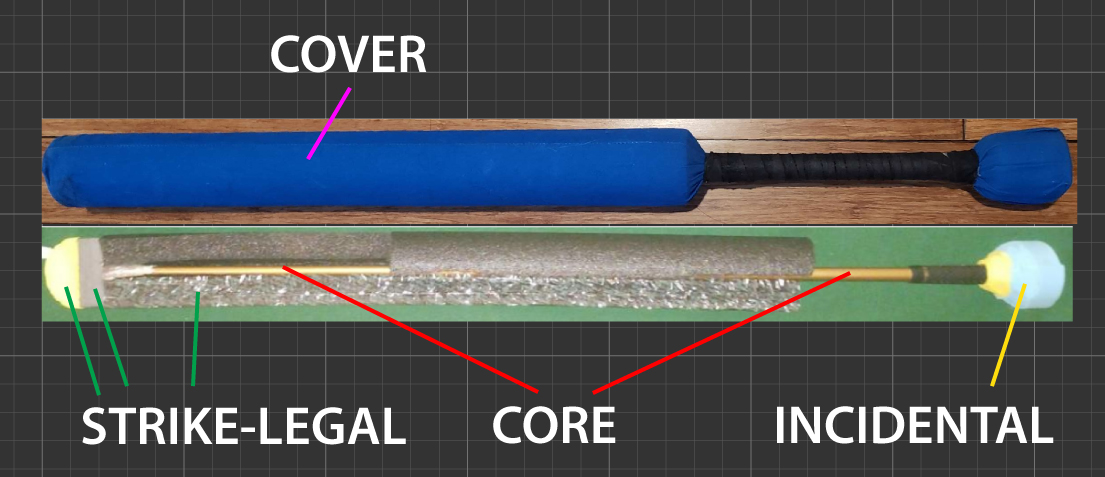
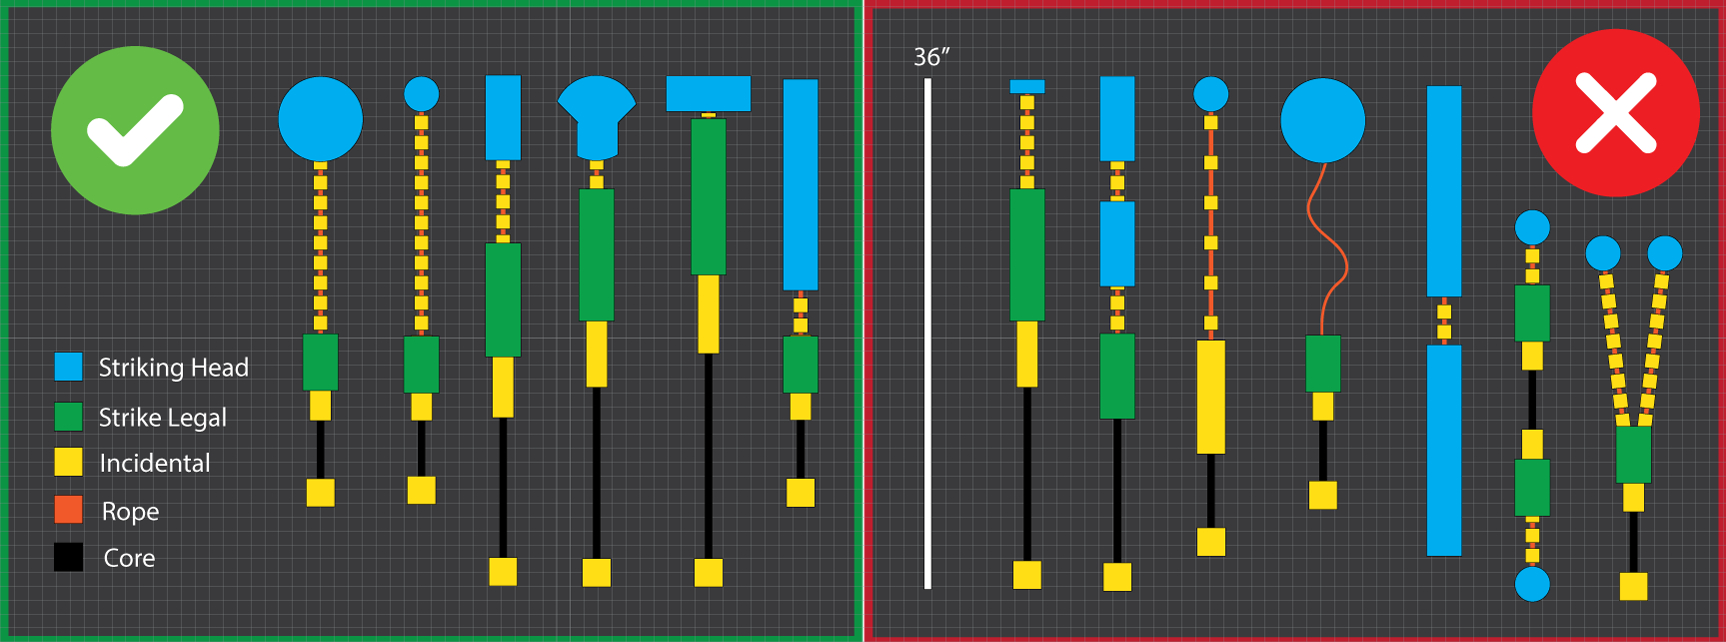
Amtgard weapons are typically made from a structural core padded with foam and a cloth cover. Below is a diagram of a few typical weapons with their component parts labelled. You can read the descriptions for each component below, which are listed in alphabetical order for ease of reference.
2.5 Inch and 2 Inch Rule
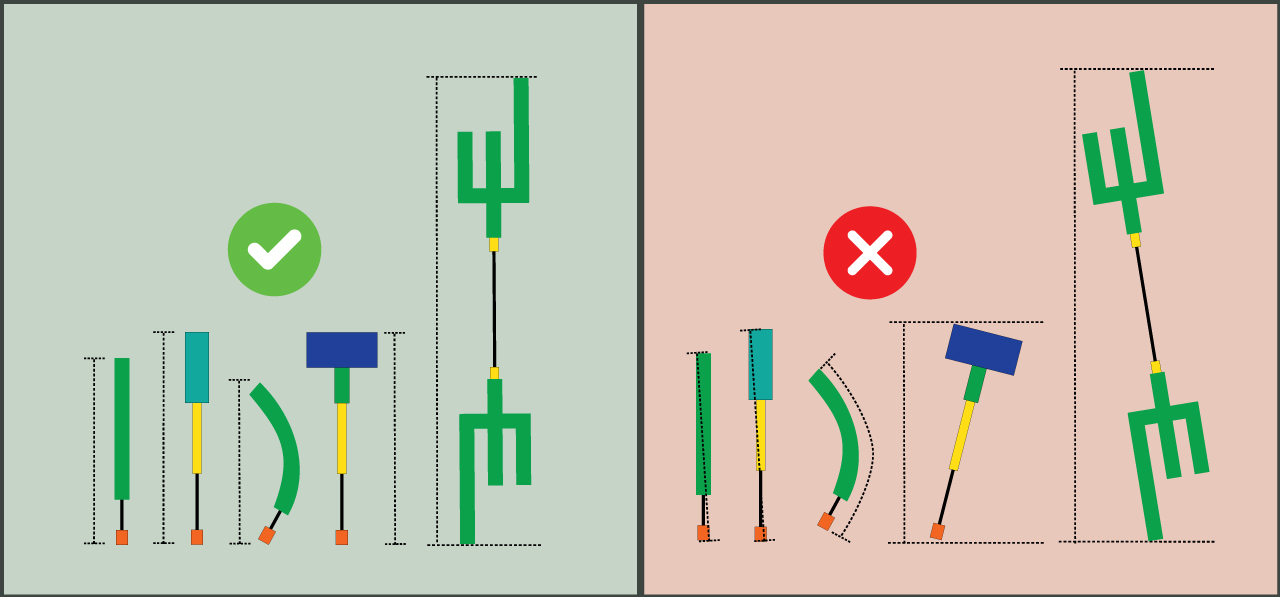
- No part of a weapon's striking surface, whether the tip, the edge, the face or any other part, may protrude more than 1.5" through a two-and-a-half inch (2.5") ring when uncompressed.
- No part of a weapon or shield's non-striking surface such as the ends of crossguards or pommels may protrude more than 1.5" through a two-inch (2") ring when uncompressed.
Core
This refers to the structural base of the weapon to which padding is affixed.
- Rigid Cores
Melee Weapons require a rigid core to provide structural stability. Short weapon segments and small protrusions from a central core that are stable on their own do not require a rigid core within them. These segments and protrusions must not deform or fold over excessively during combat and must always return to their original position.- The best materials to use are carbon/graphite rods (such as from non-metallic golf clubs), kite spar, bamboo, PVC tubing, or fiberglass. Other materials will be assessed for safety on a case-by-case basis.
- Metal and wooden cores are prohibited. Metal may be used to counter-weight weapons provided it is permanently attached and not in a place that may inadvertently strike another player.
- The ends of any rigid cores should have a flat face and be securely capped with a layer of foam and tape at minimum to prevent the core from pushing through.
- Hollow cores should be sealed at the ends.
- Sharp edges should be blunted so as to not dig into the padding.
- Non-Rigid Cores
Contact Projectiles require a non-rigid, non-granunlar core.- The best materials to use are foam (any), denim, sweatshirt material, loose rubber bands, etc.
- Unacceptable cores include: Solid rubber, tightly-wrapped rubber bands, tennis balls, beanbags, seed packets, etc.
Covers
All striking surfaces must be covered in a durable, opaque cloth and be visually distinct from any non-striking surfaces. Incidental padding within 0.5" of a striking surface must also be covered in this manner. Non-abrasive cloth tape (not duct tape) may be used for Contact Projectiles but it is not an acceptable cover material for melee weapons or arrows.
Flex
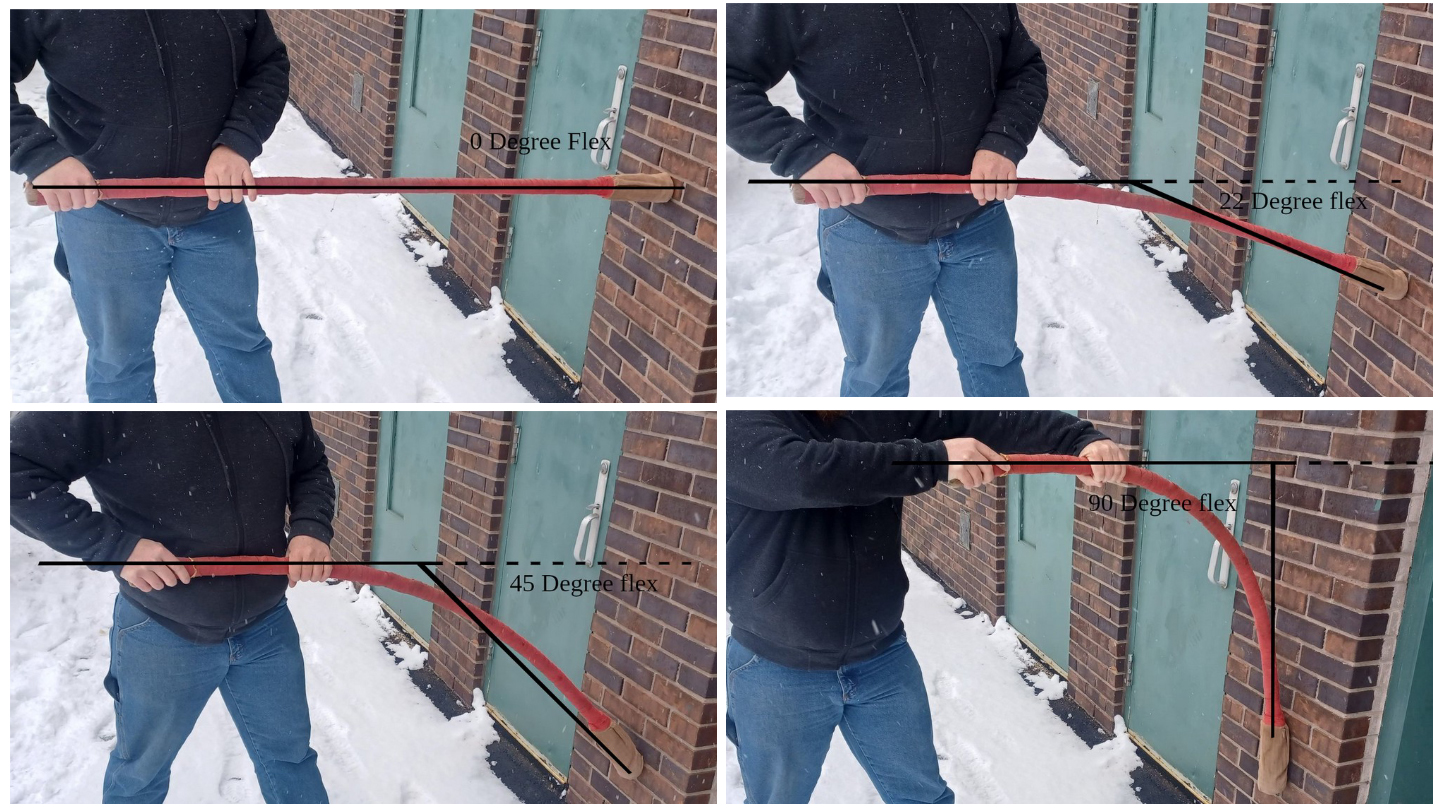
This refers to how much a melee weapon can bend safely during normal use. Flex is measured by holding the weapon low on the handle for maximum length and striking a shield or padded surface. A second person can then estimate the flex.
- The maximum allowed flex for any weapon is 45 degrees.
Handle / Unpadded Segment
Refers to any completely unpadded part of a weapon.
- Unpadded segments cannot total more than 50% of the weapon.
- Surfaces that are likely to come into contact with other players during regular use cannot be left unpadded.
Incidental Padding
Incidental Padding, also known as 'Courtesy Padding', is a padded non-striking surface intended to limit injuries from incidental contact with parts that are not strike-legal.
- Must have at least 0.5" of safety-grade foam and provide enough cushioning to prevent any core from being felt during a typical strike, but it does not need to be as comfortable as strike-legal padding.
- Any portions of Incidental Padding that lies within 0.5" of a striking surface must be covered in the same manner as the adjacent strike-legal surface.
- Incidental Padding that is not within 0.5" of a striking surface may have a non-abrasive rubber coating (or non-vinyl equivalent) applied so long as it does not compromise the purpose of the padding by making it too firm.
Multi-Ended Weapons
Any melee weapon may have multiple segments and striking tips.
- Each segment that is intended to slash and stab must be Strike-Legal for at least 1/3 of the weapon's total length or 18", whichever is less, starting from the striking tip and moving continuously inwards. If the segment merges before the required amount is reached, the merged section that continues toward the handle counts for this total.
- Madu segments intended to stab and slash only require Strike-Legal padding for 1/3 of the weapon's total length or 12", whichever is less.
- Segments intended to be Stab-Only only require 6" of Strike-Legal padding.
- Segments must not be arranged in such a way that could create a high risk of a non-striking surface contacting a player when the weapon is used to strike normally. Any non-striking segments that are out of the way but could still reasonably come into contact with another player, such as crossguards, must be covered with Incidental Padding.
- If a weapon has both regular and stab-only segments, they must not be arranged in such a way that could risk a player being struck with the side of a stab-only segment when the weapon is used to slash.
- Multi-ended weapons must meet all other requirements for its weapon type.
Non-Striking Tip
This refers to the end of a non-striking weapon segment, such as a pommel or the end of crossguard. Weapon Segments with any amount of Strike-Legal padding cannot have a Non-Striking Tip.
- Must be securely capped with Incidental Padding.
- No part may protrude more than 1.5" through a 2" ring when uncompressed.
Ownership Label
All projectiles must be clearly labelled with their owner’s name. It does not need to be large or visible during combat but should be easy to find and reference when necessary, such as when a Reeve is trying to return a projectile that flew into a bush, or in the instance where that projectile causes injury to another player.
- Projectiles without ownership labels may not be used in combat.
- Weapons designed explicitly to be shared, such as park loaner weapons, should be labelled with the park’s name.
Padding and Foam
All Amtgard weapons and shields require some amount of padding to prevent player injuries. In this context, padding refers to either Strike-Legal Padding or Incidental Padding. The type required will determine which materials are acceptable to use for this purpose. If a piece of equipment simply requires "padding", "foam" or "cushioning" with no other description, then you can meet that padding requirement with either Strike-Legal or Incidental Padding.
Foam Grades
Foams can vary widely in terms of how they will act when used as padding so it is important to choose one that helps ensure your equipment will meet the universal equipment requirements - notably safety and durability. When in doubt, take the time to learn from an experienced player or study an online construction tutorial.
This rulebook may refer to two amtgard-defined categories of foam: Safety-grade and Comfort-grade.
Safety-Grade Foam
Safety-Grade Foams are sturdy and provide firm resistance to compression when tested with the pads of fingers, but are not rigid. The goal of Safety-Grade Foams is to provide the primary padding for weapons. Safety-Grade Foams should, when used in the specified thicknesses, prevent injuries and limit discomfort experienced by other players when they are struck with weapons during combat.
- Typical foams in this category include "blue camp pad", "pool noodle", and microcell foam.
Note: Safety-Grade foams sometimes come in multiple densities or stiffnesses and not all of them are safe for use on their own. Higher stiffness or density Safety-Grade Foams may not be suitable for use as the sole padding on a weapon but may improve the durability and striking comfort of a weapon when used as a base layer of foam closest to the core, with less stiff or dense Safety-Grade foam on top. Padding a weapon using multiple Safety-Grade Foams with different properties is referred to as building with "progressive resistance" or "progressive density".
Comfort-Grade Foam
Comfort-Grade Foams are squishy and less firm than Safety-Grade Foams while still being dense enough to provide some resistance to typical Amtgard weapon impacts. The goal of Comfort-Grade Foams is to provide greater shock absorption and further reduce discomfort from weapon impacts which may not be sufficiently mitigated by Safety-Grade Foams alone.
- Typical uses for Comfort-Grade Foams include additional padding on stabbing tips, arrows, and javelins.
- Comfort-Grade Foams should not be used on their own to pad a core.
- Typical foams in this category include "marine foam" and "high-density charcoal foam".
Extra Notes
- Very dense or rigid foam can be used as part of a structural core but it will not count towards any mandatory padding requirements. Polystyrene (hard TV packaging) is an example of a foam that is too rigid.
- Very soft and light foam can be used to add shape or extra comfort but will not count towards any mandatory padding requirements.
Stab-Only
Any segment of a weapon may be built to be Stab-Only.
- As the name implies, weapon segments built to be Stab-only can only be used to stab.
- A Stab-Only segment requires 6" of Strike-Legal Padding. This padding must begin at the Striking Tip and extend down the length of the weapon on all sides of the core (A stab-only segment must be Omni.)
- This padding cannot be reduced by Heavy Padding or Super Heavy Padding.
- A weapon that is composed entirely of Stab-Only segments can replace all other Strike-Legal Padding required by its type with Incidental Padding.
- A weapon with both regular and stab-only segments must still meet the full padding requirements for its type.
- If a weapon has both regular and stab-only segments, they must not be arranged in such a way that could risk a player being struck with the side of a stab-only segment when the weapon is used to slash.
Strike-Legal Padding
Strike-Legal Padding is padding that is used to create striking surfaces that are safe to strike another player with.
- Weapons that require Strike-Legal Padding must be sufficiently padded to prevent injury if used to strike an opponent with the most force that could reasonably be expected in Amtgard combat. Combat contact with the strike-legal portions of a weapon must not be unreasonably painful, nor should it leave bruises or have the potential to break bones and teeth when used by an average player as well as its intended user.
- Regardless of the requirements listed below, Hit Testing will always be required to assess the more subjective aspects of Strike-Legal padding, such as impact force and player comfort.
- Since combat is chaotic and every participant has different pain tolerances and sensitive areas, occasional instances of uncomfortable contact should be expected, however repeated or egregious offenses from the same weapon should result in the weapon and/or the user being removed from play.
- No part of the weapon’s striking surface, whether the tip, the edge, the face or any other part, may protrude more than 1.5" through a two-and-a-half inch (2.5") ring when uncompressed.
- All Strike-Legal surfaces must have an opaque cover and be visually distinct from Non-Striking Surfaces on the same weapon.
Melee Strike Legal
In addition to the above, Strike-Legal padding on melee weapons must follow these additional rules:
- Strike-Legal Padding must begin at each Striking Tip and move inward along the core toward the handle. It must be continuous for the entire required length. Any forked segments that split from a Strike-Legal point must also be entirely Strike-Legal.
- Must have at least 1" of safety-grade foam over the weapon core.
- Must have a continuous cross-section of at least 2.5" from edge to edge.
- The entire circumference of the core does not need to be strike-legal, however any part of this circumference that is not strike-legal must be covered with Incidental Padding and cannot be used to strike.
- Striking Tips must be sufficiently capped to resist stab impact and prevent the core from pushing through. The foam should not deflect or fold over excessively when stabbing and always return to its original position.
- It is strongly recommended that weapons intended to regularly strike with a thrusting motion also include comfort-grade foam on the tip to further cushion the blow. Weapons designed for two-handed stabs, such as large pikes, may need even more padding than smaller, single-handed weapons. Hit Testing will help determine what is the ideal amount of extra padding for player safety and comfort.
Heavy Padding
A segment of a melee weapon is considered to have Heavy Padding if it meets the requirements for Strike-Legal padding and also has an edge-to-edge, cross-section of 4" or greater (instead of 2.5"). This extra padding must begin within 3" of the Striking Tip and proceed continuously towards the handle.
- Heavy Padding can apply to flat-blade weapons. The 4" cross-section does not need to be around the entire core.
Heavy Padding Substitution
For each inch of Heavy Padding added along the core, you may replace one (1) inch of required Strike-Legal Padding with Incidental Padding.
- Incidental Padding added in this manner must begin by replacing the padding closest to the handle and then proceed continuously towards the Striking Tip.
- A weapon cannot substitute more than 50% of its required Strike-Legal padding this way.
Super Heavy Padding
Super Heavy Padding follows the same rules as Heavy Padding except it requires a cross-section of 8" or greater. If both Heavy and Super Heavy padding are used together, the Super Heavy Padding must be closest to the tip.
Super Heavy Padding Substitution
This follows the same rules as Heavy Padding Substitution except for each inch of Super Heavy Padding added along the core, you may replace two (2) inches of required Strike-Legal Padding with Incidental Padding.
Striking Tip
The tip of any weapon segment that will be used to strike other players. All Striking Tips must have Strike-Legal padding.
- Must not protrude more than 1.5" through a two-and-a-half inch (2.5") ring when uncompressed.
- Must not end in an angle less than 90 degrees.
Total Length
The measurement used to determine weapon type.
- Straight weapons are measured in a straight line parallel to the core, from the furthest edge on one end to the furthest edge on the other end.
- All other weapons are measured by the largest straight distance between any two ends or edges.
Weapon Segments
A weapon segment is a portion of a melee weapon. Segments begin at the handle (or the shield, for Madus) and end at a striking or non-striking tip.
- Striking segments are segments that end with a Striking Tip.
- Non-Striking segments are segments that ends with a Non-Striking Tip.
- Segments may also branch or split to create new segments (like a trident or crossguard). These branching segments must meet or exceed the padding requirements of the point they branched out from. For example, if a segment branches out from a point that requires Strike-Legal padding then the entirety of that branched segment must also be Strike-Legal.
Identifying weapons segments is most relevant when dealing with Madus, Multi-Ended Weapons, and Stab-Only weapons.
Melee Weapons
General Rules
Melee weapons represent swords, axes, spears, flails, pole-arms and anything else that can be used to directly slash or stab an opponent in close combat.
- All melee weapons require a rigid core.
- Approved melee weapons may be used to strike with their Strike-Legal surfaces and block or parry with any portion of the weapon.
- Melee weapons can never be launched or thrown as a form of attack. Javelins are the only exception to this rule due to their ability to act as both as melee weapon and a projectile.
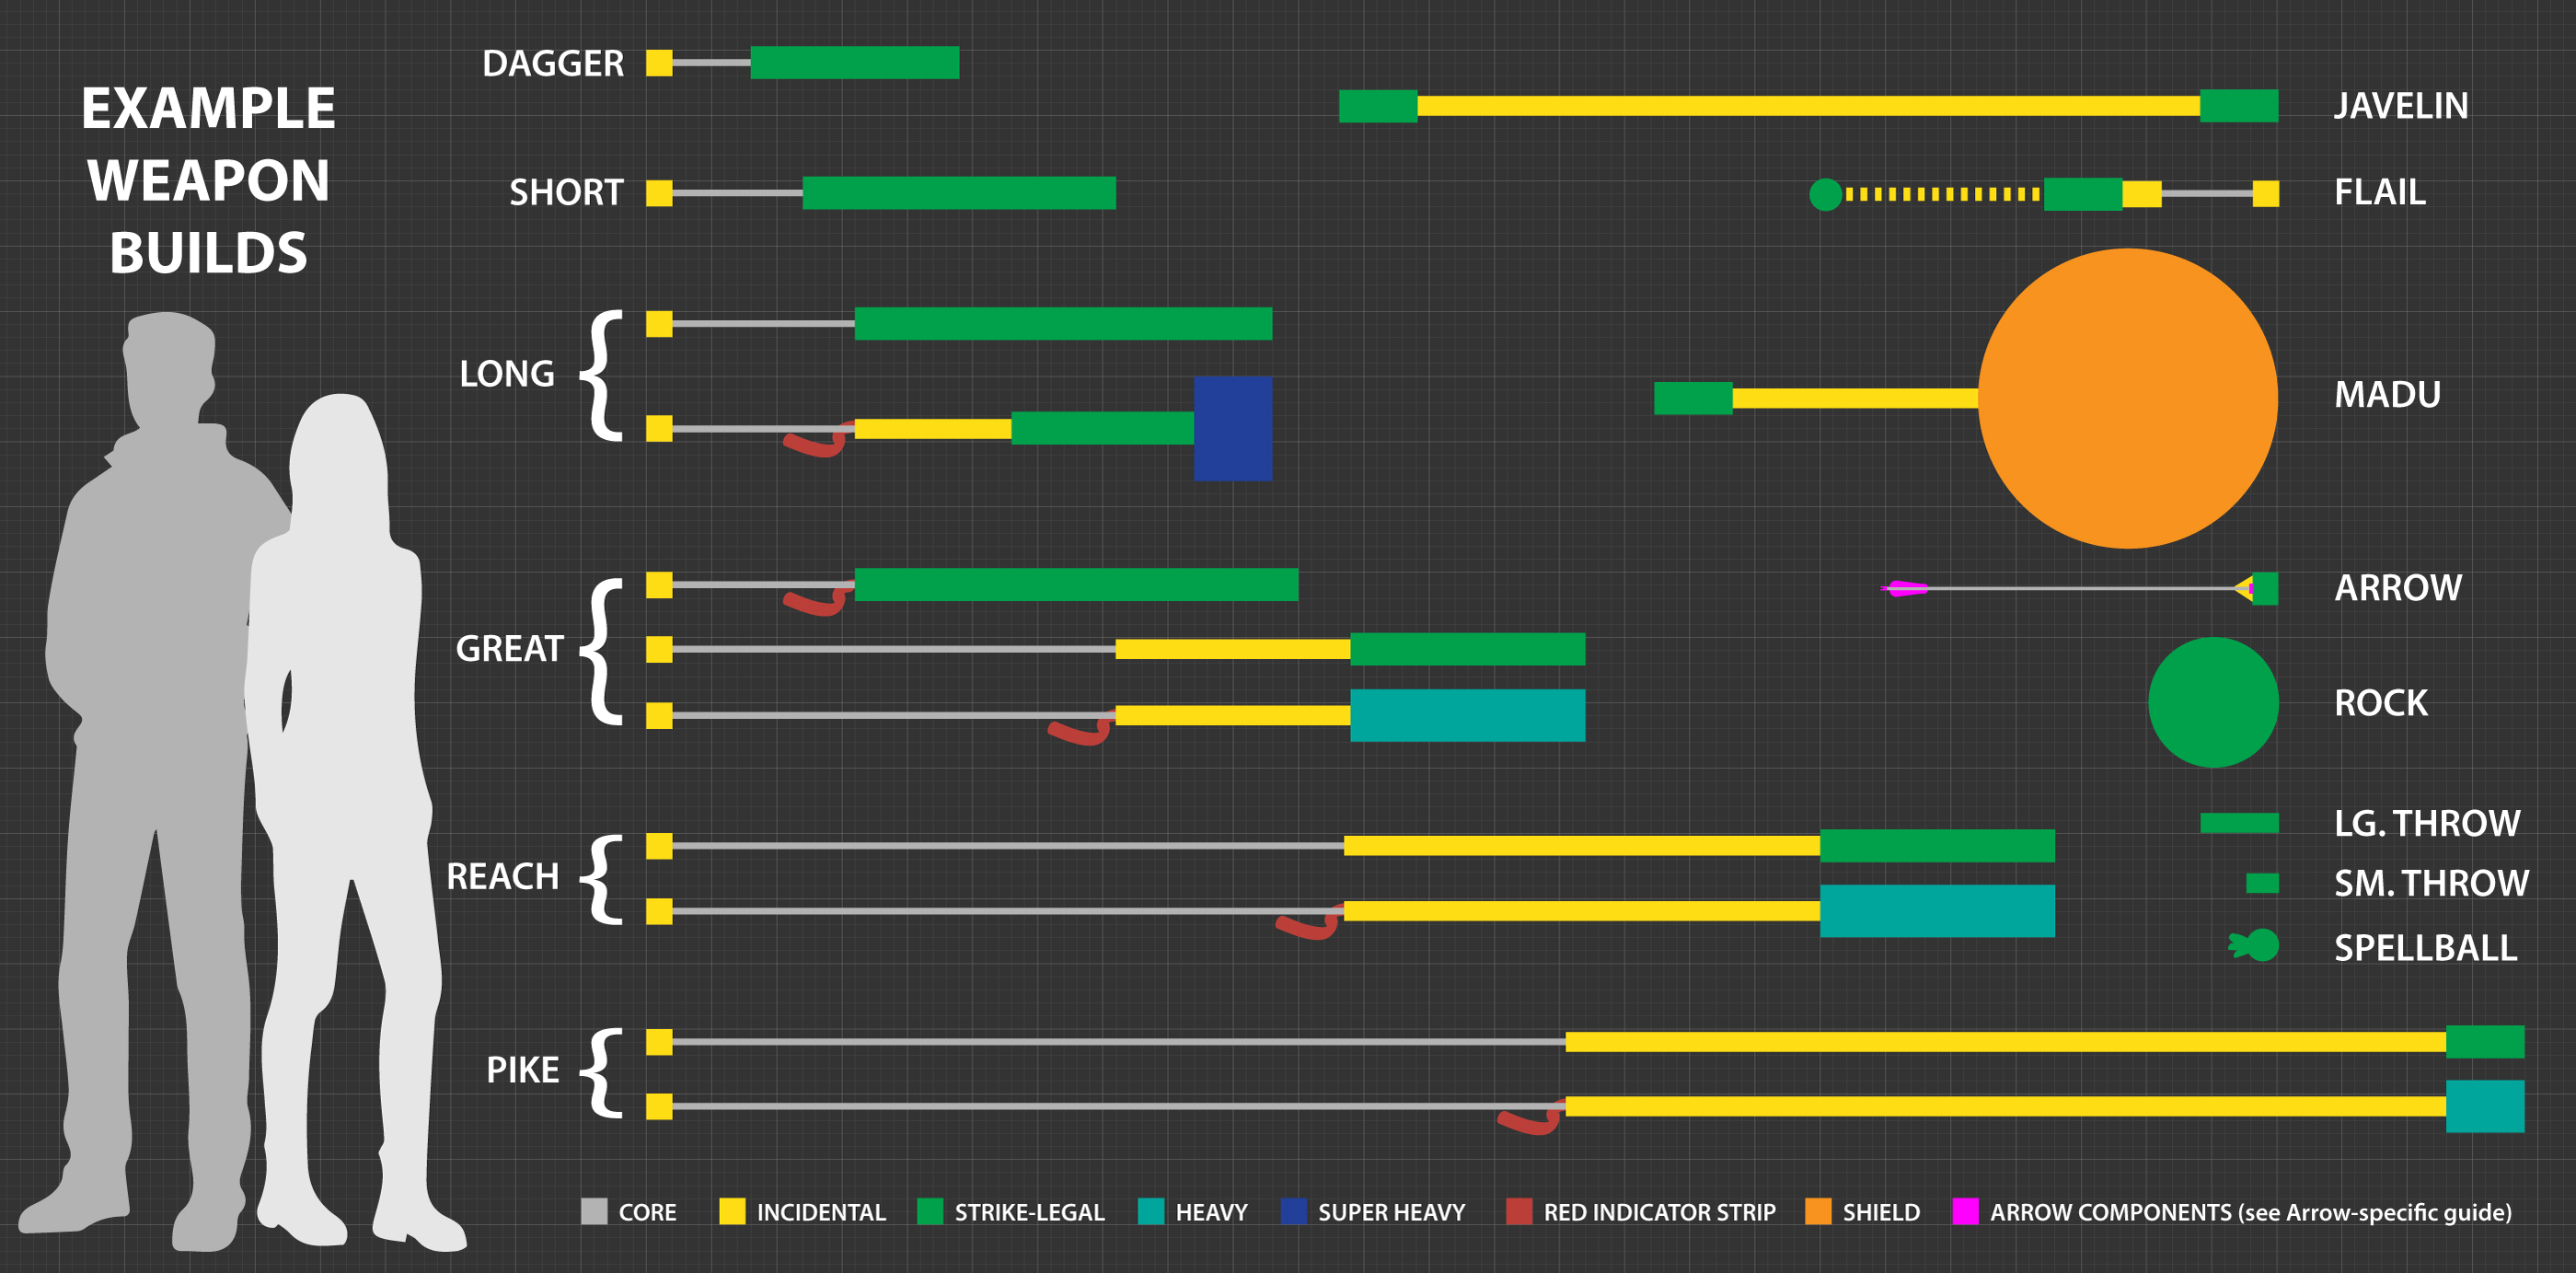
Dagger
- Must meet the Universal Equipment Requirements.
- Total length must be at least 12" (1ft), up to 24" (2ft).
- At least 2/3 of the weapon must be Strike-Legal.
Short
- Must meet the Universal Equipment Requirements.
- Total length must be greater than 24" (2ft), up to 36" (3ft).
- At least 2/3 of the weapon must be Strike-Legal.
Long
- Must meet the Universal Equipment Requirements.
- Total length must be greater than 36" (3ft), up to 48" (4ft).
- At least 2/3 of the weapon must be Strike-Legal.
Two-Hand Armor-Breaking Variant
- Any weapon segment that has at least 6" of Super Heavy Padding gains Armor Breaking when the weapon is wielded with two hands.
Great
- Must meet the Universal Equipment Requirements.
- Total length must be greater than 48" (4ft), up to 72" (6ft).
- Must be 50% padded and have at least 18" Strike-Legal.
Two-Hand Shield-Crushing Armor-Breaking (SCAB) Variant
- Any weapon segment that is Strike-Legal for at least 2/3 of the weapon's full length; or has at least 18" of Heavy Padding gains Armor Breaking and Shield Crushing when the weapon is wielded with two hands.
- Stab-Only segments require just 6" of Heavy Padding to gain this benefit. (Reminder: You cannot Shield Crush with a stab.)
Reach
- Must meet the Universal Equipment Requirements.
- Total length must be greater than 72" (6ft), up to 108" (9ft).
- Must be 50% padded and have at least 18" Strike-Legal.
Two-Hand Armor-Breaking Variant
- Any weapon segment that has at least 18" of Heavy Padding gains Armor Breaking when the weapon is wielded with two hands.
- Stab-Only segments require just 6" of Heavy Padding to gain this benefit.
Pike
- Must meet the Universal Equipment Requirements.
- Pikes are Stab-Only. They cannot be used to slash.
- Total length must be greater than 108" (9ft), up to 144" (12ft).
- Must be 50% padded and have at least 6" Strike-Legal as per Stab-Only.
Two-Hand Armor-Breaking Variant
- Any weapon segment that has at least 6" of Heavy Padding gains Armor Breaking when the weapon is wielded with two hands.
Flail
- Must meet the Universal Equipment Requirements.
- Is composed of a handle with a single chain and articulating head. It cannot be multi-ended.
- The total length of all three components cannot exceed 36" when gently pulled taut.
Flail Head
- Must be equal or larger than a 2.5" sphere.
- Must be entirely Strike-Legal.
- Cannot contain a rigid core.
- The combined chain-and-head portion may not exceed 18" in length when gently pulled taut.
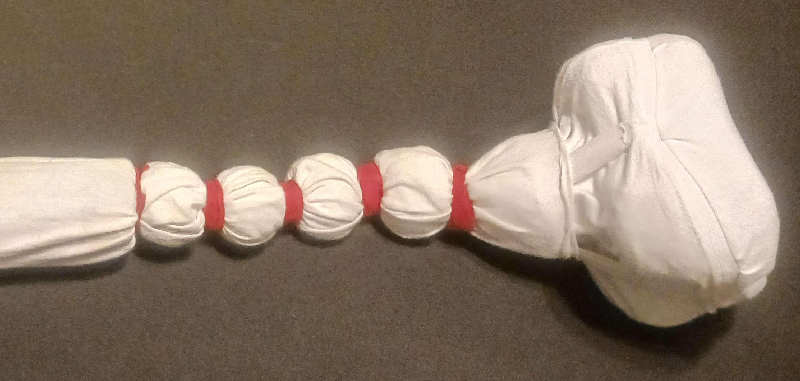
- Must be constructed using soft, durable, non-abrasive materials, such as a cotton rope. Actual chains are prohibited. A rope-like core is not required as long as this section behaves like a chain and is not at risk of tearing apart under the stress of the flailing motion.
- If the chain portion is longer than 0.5", it must include small foam rings (or equivalent design) spaced no further than 0.5" apart along the entire length.
Flail Handle
- Must be at least 12".
- 50% of the flail handle must be padded.
- The top 1/3 closest to the chain must also be Strike-Legal.
- This padding must begin at point where the chain connects to the handle and extend down the length of the weapon on all sides of the core (i.e. it must be Omni).
- The amount of Strike Legal required cannot be reduced by Heavy Padding or Super Heavy Padding.
Flail Combat Rules
Only the head of a flail can inflict valid strikes, even though the handle segment also has strike-legal padding. This extra padding is intended to allow a player to strike the handle safely against other equipment so the flail can wrap around without damaging the struck equipment.
Madu
- Must meet the Universal Equipment Requirements.
- Total length must be between 18" up to 108" (9ft).
- Is a hybrid Melee Weapon and Shield.
- Any shield with weapons permanently affixed to it will be considered a Madu and must conform to these rules.
- Any weapon segments must be easily recognizable as weapons, and the shield portion must be easily recognizable as a shield.
- The division between weapon and shield segments must be visually distinct.
Madu Shield Portion
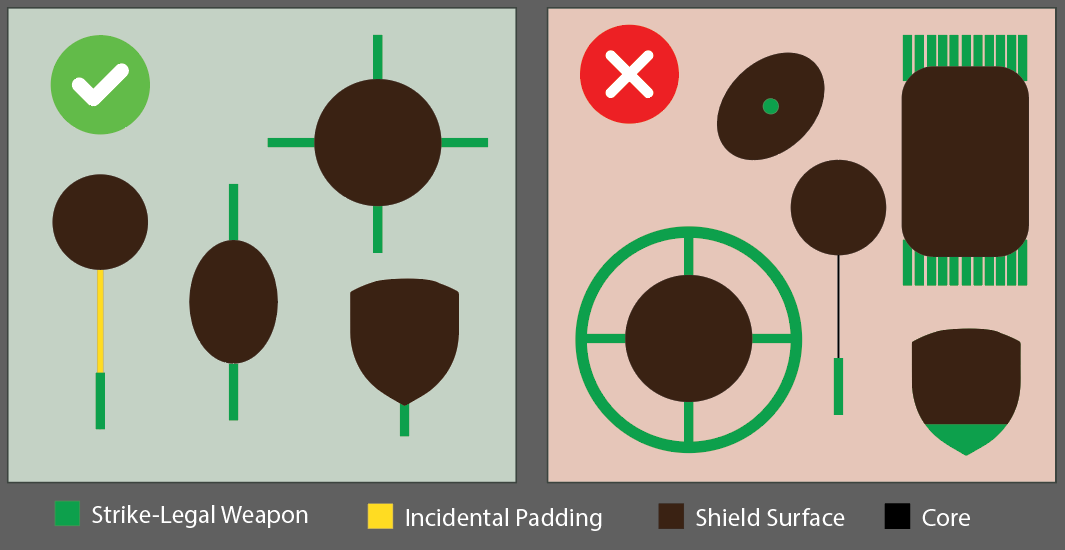
The shield portion must be a legal shield.
Madu Weapon Segments
Madu weapon segments are measured from the point where they extend beyond the shield.
- Must not extend outward from the face of the shield.
- Must not articulate or have a chain like a Flail.
- Must not mimic or offer similar protective coverage to that of a shield. If this is a case, the offending segments will count as part of the shield, not a weapon, and be forced to adhere to shield construction rules.
- Segments intended to be Stab-Only must be at least 6" long.
- Segments intended to both slash and stab must be at least 12" long.
- Segments that measure 18" or less must be entirely Strike-Legal.
- Segments that measure greater than 18" must have at least 18" of Strike-Legal Padding and have Incidental Padding for the remainder.
- Padding Substitution can only be used on segments greater than 18" and cannot reduce the amount of Strike-Legal to less than 18".
Two-Hand 'Great' Madu Variant
If the total length of the Madu is 72" (6ft) or less, the following variation can be used:
- Any weapon segment that is greater than 48" (4ft) and is at least 2/3 Strike-Legal or has at least 18" of Heavy Padding gains Armor Breaking and Shield Crushing when the weapon is wielded with two hands.
- Stab-Only segments require just 6" of Heavy Padding to gain this benefit.
Two-Hand 'Reach' Madu Variant
- Any weapon segment that is greater than 72" (6ft) and has at least 18" of Heavy Padding gains Armor Breaking when the weapon is wielded with two hands.
- Stab-Only segments require just 6" of Heavy Padding to gain this benefit.
Madu-Specific Combat Rules
- Madus do not have access to the variant options or gameplay rules of other weapon or shield categories, even if parts of the Madu are constructed to mimic those weapons or shields.
- Example 1: A Madu constructed with a small-size shield will still take up a free hand and cannot be strapped to the arm without a handle.
- Example 2: A super-heavy padded Madu that is between 36" and 48" will not gain Armor Breaking when wielded 2-handed because that variant is only available to Long weapons.
- A Madu can only be wielded if the player can wield both a non-staff weapon of the Madu’s total length (weapon portions + shield portions) and a shield equal to or greater than the Madu’s shield's size.
- The weapon segments can be struck and affected by weapon-specific effects such as Weapon Destroying, and the Shield portion can be struck and affected by shield-specific effects such as Shield Crushing and Shield Destroying. Once affected this way, the entire Madu is affected, for better or worse. If the weapon or shield portion is destroyed, the entire Madu is destroyed. If one part of the Madu is restored, the entire Madu is restored.
Javelin
- Is a hybrid Stab-Only Melee Weapon and Stabbing Projectile.
- Must meet the Universal Equipment Requirements.
- Total length must be between 36" (3ft), up to 72" (6ft).
- Must have a straight core with at most one Striking Tip per end.
- Each striking tip must have at least 6" Strike-Legal as per Stab-Only.
- All other Non-Striking Surfaces must be covered with Incidental Padding.
- Must have an ownership label as per projectiles.
Javelin Hybrid Combat Rules
- By default, a Javelin is a Stab-Only Melee Weapon. It cannot be used to slash.
- When thrown, it becomes a Stabbing Projectile and does not count as a melee weapon again until it becomes Unattended or Carried.
- Javelins become Armor Breaking and Shield Crushing once they have travelled their length through the air.
- Destroyed Javelins cannot be thrown.
Magic Staff
- Is a non-striking Melee Weapon (see combat rules below).
- Must meet the Universal Equipment Requirements.
- Total length must be at least 48" (4ft), up to 72" (6ft).
- Must have a straight core with exactly two non-striking ends.
- All core must be covered with Incidental Padding.
Magic Staff Combat Rules
- Cannot be used to strike. It can only block.
- Is a weapon. Can be destroyed like any other weapon.
- Does not take up a Free Hand when casting abilities.
- Players can only wield a single magic staff at a time.
Projectile Weapons
General Rules
Projectile Weapons represent anything that is launched or thrown to inflict damage or effects, such as arrows, kunai, chakrams, and tomahawks as well as magical blasts like fireballs and lightning. The following general rules apply to all forms of projectile weapons:
- May not be used to strike in melee.
- May not be used to parry or block.
- Cannot become destroyed by any means.
- May be carried in any number unless otherwise restricted, such as by class customization.
- All projectiles except Arrows and Bolts must be thrown by hand, one at a time, per hand.
- A player may hold a throwing weapon in each hand and throw both of them simultaneously, but cannot throw them together from the same hand.
- Arrows and Bolts must be fired from a bow or crossbow as appropriate.
- Each projectile can affect multiple targets in a single flight as long as each contact meets the criteria for a valid strike. Projectiles become harmless after their movement is completely halted.
- Batting, kicking, or otherwise applying significant force to a projectile in motion is prohibited.
- Arrows in flight must be blocked passively by placing an object in their flight path.
- Other non-arrow projectiles may be blocked, parried, or lightly struck out of the air.
- Players may not catch or grab projectile weapons in flight.
- Projectiles may be shared among players that are given explicit permission from the owner of said projectiles.
- The owner may retract their permission at any time for any reason.
- The owner is responsible for ensuring the safe use of their projectiles when shared with or used by another player.
- Players using shared projectiles should be respectful and treat the borrowed equipment with care.
- When sharing Spellballs, Specialty Arrows, or any other similarly restricted projectile, players must still adhere to the associated frequency rules and carrying limits.
- Players using shared projectiles must not hoard them or otherwise try to gain a gameplay advantage by deliberately obstructing the amount of projectiles that other sharing player(s) have access to. This is especially relevant when sharing Spellballs and Specialty Arrows.
- There are two sub-types of projectile weapon: Contact Projectiles and Stabbing Projectiles.
- Contact Projectiles can strike with any part of their surface.
- Stabbing Projectiles can only strike with their tip.
Contact Projectiles
Small Thrown
- Must meet the Universal Equipment Requirements.
- Must have a non-rigid core.
- Must be between 2.5" and 6" in total length.
- Must be entirely Strike-Legal. There is no minimum thickness, however extremely thin projectiles may struggle to make valid contact so craft accordingly.
- Must not be constructed in a way that could be reasonably confused with a Spellball.
Large Thrown
- Must meet the Universal Equipment Requirements.
- Must have a non-rigid core.
- Must be greater than 6", up to 18" in total length.
- Must be entirely Strike-Legal. There is no minimum thickness, however extremely thin projectiles may struggle to make valid contact so craft accordingly.
- Must not be constructed in a way that could be reasonably confused with a Spellball or Rock.
Spellball
- Must meet the Universal Equipment Requirements.
- Must have a non-rigid core.
- Must be spherical, between 2.5" and 6" in diameter.
- Must be entirely Strike-Legal.
- Must have a visible tail or streamer between 1" and 6" in length.
- Every Spellball is associated with an ability and must be covered with the appropriate Color Code.
Ability-Linked
- Players can only use a Spellball projectile if they have a Spellball ability that allows it.
Rocks
- Must meet the Universal Equipment Requirements.
- Must have a non-rigid core.
- Must be equal or larger than a 10" diameter sphere.
- Must be entirely Strike-Legal.
Rock Gameplay Rules
- Rocks are Shield Crushing, Armor Breaking, and Weapon Destroying.
Stabbing Projectiles
Javelins
See Javelins under Melee Weapons.
Bows & Crossbows
Bows and Crossbows are used to fire arrows or bolts respectively. Only actual bows and crossbows may be used for this purpose. Other forms of projectile launchers cannot be used to represent a bow or crossbow.
- Compound bows are prohibited.
- Regular Bows must have a draw weight of 35lbs or less at a 28" draw.
- Crossbows are limited to no more than 450 inch-pounds.
Bow & Crossbow Gameplay Rules
- Bows and Crossbows cannot be destroyed.
- The physical bow or crossbow cannot be used to strike another player. They must be exclusively used to launch Arrows & Bolts.
- Cannot be intentionally struck nor used to block, deflect or otherwise defend against incoming strikes. A certain amount of incidental contact during the chaos of live combat should be expected, however repeated or egregious disregard for this rule can result in suspension from play or loss of archery privileges.
- If accidentally struck, it is treated as an Invalid Obstruction.
- Bows and Crossbows cannot be wielded with any other equipment in the same hand (besides arrows). Likewise, other equipment cannot be wielded while in the same hand as a bow or crossbow. A buckler or small shield may still be wielded on the arm so long as there is no risk of it interfering with the safe use of the bow.
- For gameplay purposes, reloading a crossbow does not count as wielding it.
- Bows may not be drawn beyond 28" at any time and must be half-drawn at ranges closer than 20ft. Crossbows are not required to half draw.
Arrows & Bolts
All forms of arrows and bolts follow the same rules.
- Must meet the Universal Equipment Requirements.
- Must be built to be fired from a bow or crossbow, as appropriate.
- Must be safe to strike other players with the tip (see construction guide below).
Developer Note: For accessibility purposes, playtesters may continue to use Amtgard V8-Legal arrows during V9 playtest games until such a time that we can guarantee the investment in reconstruction will not be wasted effort. That said, we are deeply thankful and appreciative of everyone who chooses to invest their time and resources to build and playtest the construction rules below.
Arrow Gameplay Rules
- All Arrows and Bolts are Armor Breaking and Weapon Destroying.
- Specialty Arrows (or Bolts) will impart additional effects based on their Color-Code.
- Players can only use a Specialty Arrow if they have an ability that allows it.
- Players may fire multiple regular arrows at once however Specialty Arrows must be fired alone.
- Multiple arrows fired simultaneously will count as separate strikes, even if they hit the same Hit Location.
Arrow Construction Guide
Before building your first arrows or bolts, take the time to learn from an experienced player or study an online construction tutorial. Poorly constructed, poorly repaired, or outright broken arrows/bolts can pose a serious safety hazard and may never be used for Amtgard combat.
Arrow Shaft Construction Rules
The shaft of the arrow or bolt is the stick portion to which the head is affixed.
- Must be carbon, aluminum, or fiberglass.
- Any real arrowheads or hunting tips must be removed.
- Shafts longer than 28" must have a drawstop around the shaft to physically prevent drawing the arrow past 28".
- The nock and any vanes/fletching present must be in good repair.
- The orientation of vanes/fletchings (or the lack thereof) must not cause chaotic or unpredictable flight.
Arrow Blunt Construction Rules
The blunt is the reinforced tip of the shaft upon which the striking portion, the arrow head, will be constructed.
- All blunts must be solidly built, stiff enough to carry anticipated loads without excessive deformation, and able to support typical Amtgard archery impacts repeatedly without failure or degradation.
- The end of the shaft must be securely capped with a circular, impact-resistant disc at least 1" in diameter.
- The disc must be centered over the end of the shaft.
- If a metal disc is used, it must be at least 1/16" steel or equivalent.
- Discs of any other material must be durable, impact-resistant, and at least 1/4" thick.
- The blunt must then be further built up to at least 1.5" in diameter.
- The non-disc portion of the blunt can be constructed from any material, including foam, so long as it ensures that the foam arrowhead built upon it is not able to move easily in relation to the shaft. This includes but is not limited to: plunging up and down, wobbling from side to side, twisting-without-return, etc.
- The entire blunt can be a single unit (such as a 3D-printed piece) as long as the resulting structure is equivalent or safer than the above requirements.
Arrow Head Construction Rules
The arrow head is the Strike-Legal portion at the end of an arrow or bolt, after the blunt.
- Must be Strike-Legal on all sides with a foam depth of at least 2" in front of the blunt.
- Must have a circular cross-section of 2" or greater throughout the entire head.
- Must have at least 0.5" of impact-resistant safety-grade foam immediately after the blunt. This foam must not deform around the arrow shaft or blunt on impact.
- The physical striking surface of the arrowhead must include at least 1" comfort-grade foam with a circular diameter of 2.5".
- Domed arrowheads are allowed but must be no sharper than a 2.75" hemisphere. The narrow tip of the dome does not need to meet the 2.5" cross-section as long as the head meets the 2" depth rule (see diagram).
- Any additional foam used to meet the 2" depth requirement should be chosen with the goal of making the arrow as safe and comfortable to be struck by as possible, specifically in regards to accidental strikes to the face and eyes. When in doubt, use safety-grade foam.
Arrow Head Cover
- Arrow heads must be covered in a durable, opaque cloth. Cloth tape may not be used.
- Specialty Arrows must be covered with the appropriate Color Code.
- Properly colored fabric strips may affixed to the shaft in lieu of colored head covers. These strips must be clearly visible from at least 20ft away and not impact the safe use of the arrow.
- Covers for regular arrows must be a color or combination of colors that cannot be reasonably mistaken for a specialty arrow.
Eye damage from accidental face strikes is the most common form on arrow-based injury in LARP. A safe arrow design must not damage the orbital bones or be able to put pressure directly on the eyeball. As a rule of thumb, arrows should be built to the point that their owners are willing to receive a straight shot to the face under test conditions without fear of serious injury.
Siege Weapons
Siege Weapons are extremely powerful tools of destruction. Examples of this type of weapon include historical siege engines like ballistas, catapults, and trebuchets as well as the teeth, claws, and clubs of massive monsters like dragons and titans.
- Siege weapons are designed to be incredibly strong and can quickly break a game if their inclusion is not planned and executed ahead of time. As such, they are reserved exclusively for use by Game Organizers during special occasions and planned scenarios.
- The physical representation of a Siege weapon along with its method of use and distribution is determined by the Game Organizer on a case-by-case basis for the activity where it is being used. Regardless of implementation method, it must still meet the Universal Equipment Requirements.
- The actual Strike-Legal part of a Siege Weapon’s attack must always be represented by a normal Amtgard melee or projectile weapon, as appropriate, such as a catapult launching rocks or a Dragon using daggers as claws.
- Strikes from Siege Weapons will inflict the 'Siege' hits instead of their normal combat effects unless instructed otherwise by the Game Organizer.
Developer Note: See the Game Organizer Guide for more details and guidance about running an activity that includes Siege Weapons.
