Chainmail
A type of Armor
Contents
Rules
- See Armor for current rules regarding rating and construction.
Historically

Mail was invented some time in the mid 1st millennium BC, but it is unknown where and by whom it was first used. It may have been invented independently in East Asia and in Europe. The earliest finds are from a 4th century BC (Rusu, M., “Das Keltische Fürstengrab von Ciumeşti in Rumänien”, Germania 50, 1969, pp.267-269) Celtic chieftain's burial located in Ciumeşti, Romania. It is believed that the Roman Republic first came into contact with mail fighting the Gauls in Cisalpine Gaul, now Northern Italy. The Roman army adopted the technology for their troops in the form of the lorica hamata which was used as a primary form of armour through the Imperial period.
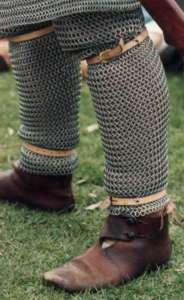
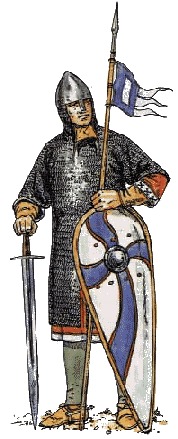
The use of mail was prominent throughout the Dark Ages, High Middle Ages and Renaissance, and reached its apex in Europe, in terms of coverage, during the 13th century, when mail covered the whole body.
In the 14th century, plate armour began to supplement mail. Eventually mail was supplanted by plate for the most part. However, mail was still widely used by many soldiers as well as brigandines and padded jacks. These three types of armour made up the bulk of the equipment used by soldiers with mail being the most expensive. It was quite often more expensive than plate armour.[2] A mail shirt interwoven between two layers of fabric is called jazzeraint, and can be worn as protective clothing.
The Japanese used mail (kusari) in a limited fashion in armour beginning during the Nambokucho period (1336-1392). Two primary weave methods were used: a square 4-in-1 pattern (so gusari) and a hexagonal 6-in-1 pattern (hana gusari). Kusari was typically made with rings that were much smaller than their European counterparts, and on a much smaller scale - rather than creating full garments of mail, small sections were used to link together plates and to drape over vulnerable areas such as the underarm. The rings were not welded shut, though some pieces were constructed of rings that consisted of two or more turns, similar to the modern split ring commonly used on keychains. The rings were lacquered to prevent rusting, and was always stitched onto a backing of cloth or leather. The kusari was sometimes concealed entirely between layers of cloth or leather.
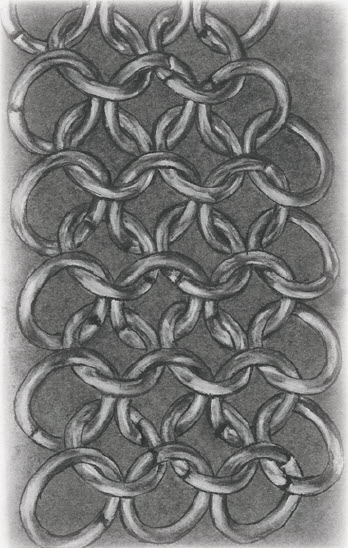
Several patterns of linking the rings together have been known since ancient times, with the most common being the 4-to-1 pattern (where each ring is linked with four others). In Europe, the 4-to-1 pattern was completely dominant. Mail was also common in East Asia, primarily Japan, with several more patterns being utilised and an entire nomenclature developing around them. Historically, in Europe, from the pre-Roman period on, the rings composing a piece of mail would be riveted closed to reduce the chance of the rings splitting open when subjected to a thrusting attack or a hit by an arrow.
Up until the 14th century European mail was made of alternating rows of both riveted rings and solid rings. After that it was almost all made from riveted rings only. Both would have been made using wrought iron. Some later pieces were made of wrought steel with an appreciable carbon content that allowed the piece to be heat treated. Wire for the riveted rings was formed by either of two methods. One was to hammer out wrought iron into plates and cut or slit the plates. These thin pieces were then pulled through a draw-plate repeatedly until the desired diameter was achieved. Waterwheel powered drawing mills are pictured in several period manuscripts. Another method was to simply forge down an iron billet into a rod and then proceed to draw it out into wire. The solid links would have been made by punching from a sheet. Forge welding was also used to create solid links, but the only known example from Europe is that of the 7th century Coppergate mail drape. Outside of Europe this practice was more common such as the well known "theta" links from India.
Metals
- Aluminum
- Bright Shiny surface finish, light and very bendable.
- Acid Etched Pros: Aluminum oxide is black, and will get on your skin and clothing. Acid etching modifies the surface of the aluminium so it will not oxidise. Yay! Clean aluminium. Cons: Aluminium loses its uniform color and becomes a mottled white and grey with a matte finish.
- Anodized typically used in inlays and jewellery. The anodization nicks with sharp pliers.
- Brass A yellowish alloy of mostly copper and tin.
- Bronze Harder than brass, copper tin alloy. Develops a greenish patina over time. Can be Rose or Brownish yellow.
- CopperCopper is very soft, can be easily nicked. Leaves a very greenish black oxidation on clothing and especially skin.
- Enamelled Copper Copper covered with an enamel that is clear to prevent oxidation, or colored for extra flavor. The enamel on copper tend to be tinged with the colour of the metal.
- Gold: Very very soft in pure forms.
- Gold Plated: Usually plated over brass, stronger with the look of gold. But it tends to wear off over time, causing the chain to be mottled.
- Inconel:Inconel, known as a "Super Alloy", is one of the most corrosion resistant metals short of gold or platinum. Remains "stainless" even in environments that corrode surgical stainless.
- Neoprene O-Rings made of black, or colored neoprene rubber that can be added to some weaves to give them elasticity.
- Silver
- Fine Silver: made from 99.9% silver. Fine silver has more corrosion resistance than sterling silver. It fuses well and has no fire scale when heated. It is slightly heavier than sterling (less than 1%).
- Sterling silver:Sterling Silver is made from 92.5% silver. A beautiful material but it does tarnish with age. It is easily restored with a chemical silver polish.
- Steel
- Galvanized Steel: Steel plated with zinc to prevent rust, the galvanization has a smell to it and flakes off, leaving a grey dust. It can be purchased very cheaply.
- Stainless Steel: No fuss, no muss, no rust. It will stay shiny as long as it is not submerged in a liquid. (Stainless requires an oxygen atmosphere to keep itself stainless. Can also be Blackened.
- Titanium: Titanium is a very light, strong and very corrosion resistent metal with a matte light gray finish. It work hardens very easily and will snap if bent too many times or if over bent. You get 1.7 times as many rings per lb than with steel and strength similar to steel.
- Anodized Titanium: Titanium can be heat anodized before or after you make your project. You can get blue, purple and gold with a small torch and a steady hand. It comes out tie-dyed, mottled and beautiful.
- Niobium: Niobium is strong, corrosion resistant and hypo-allergenic; same strength as 1/2 hard sterling silver. Niobium weighs about the same as most common chainmail materials - its 6% heavier than steel and 22% lighter than sterling silver.
- Anodized Niobium: The anodization comes out very vibrant.
How to
By JJ Palmer
CHOOSING THE MATERIALS
There are two main options available to the apprentice armorer for making mail. The first is to buy rings that are already formed, the second is to form the rings from wire. A mail shirt requires 5000 to 9000 rings, depending on ring size and shirt size. Making rings from steel wire is the cheapest means of producing mail, but involves considerably more work than buying pre-formed rings. Spools of steel wire are available from hardware stores in either galvanized (zinc) or unplated varieties. 300 series stainless steel (wire or rings) is also a good choice. It is more expensive and may be hard to find, but is softer to work with and easier to maintain. Another metal option available to today's Armorer is titanium. Titanium is desirable for its high strength to weight ratio. Both stainless steel and titanium alloys are available from welding supply houses as spooled wire. The spools are usually sold by the blah blah blahblahblah. Check the Yellow Pages under Welding.
MAKING RINGS FROM WIRE
Making rings from a spool of steel wire is not really difficult, but must be done well to achieve the desired results. 10-20 lbs of (mild steel) wire will be needed to make a full sized shirt. Stainless steel wire will weigh more, titanium wire about half as much. Titanium wire can be difficult to work with as it work-hardens readily. (Work-hardening is the metallurgical process that allows you to bend a paper clip back-and-forth until it breaks.)
Coiling the wire to make the rings can be done several ways. A basic wire-winding apparatus can be built from materials readily obtainable at a hardware store. Figure 1 shows a basic fixture and Figure 2 depicts the operation. The idea is to wind the wire onto a rod in a controlled manner to produce uniform rings. A threaded steel rod of 3/8 or 1/2 inch diameter is the basic component. Assemble the winding apparatus in the following way:
Figure 1: Front View of Wire Winding Apparatus. Approximate dimensions are shown. 1"x4" and a 2"x4" can be used for the frame. Angle brackets are recommended for rigidity. Also recommended is to press-fit short pieces of steel or copper tubing into the holes drilled for the rod, which will allow easier turning of the rod. The apparatus will need to be firmly attached/clamped to a work bench or other surface so it won't tip during winding.
Figure 2: Top View of Wire Winding apparatus. WEARING GLOVES, Insert the end of the wire into the hole drilled thru the rod. Line up the wire with the threads and begin turning the rod. A simple handle is shown here, but other methods could also be used. It is important to keep an even tension on the wire as you turn the rod.
The wooden frame can be made from one 18" piece of 2"x4" and two 6" pieces of 1"x4". Brace the corners with angle brackets to make the wooden frame rigid. Drill a holes in each 1"x4" to pass the rod through. See Figure 1. The holes should be large enough to allow free rotation of the rod. In addition, inserting pieces of steel or copper tubing into the holes to act as a sleeve for the rod is recommended. Drill the hole such that the tubing will fit snugly. (For example: For a 3/8" dia. rod, drill a 1/2" hole in the frame and insert 1/2"dia. tubing.) Drill an 1/8" hole through the rod about 6" from one end. Use a bit-type made for drilling through mild steel. Remove any burrs from the edge of the hole so that the coil will not catch on it when it's time to remove the rod. Attach a handle or crank to the other end of the rod to wind the wire. Since the required effort will vary with the wire thickness, heavier gauge wires may require using a better means of turning the rod, perhaps a longer crank for more torque. Firmly attach the apparatus with clamps or bolts to a work bench or other surface so that it will not move around during the winding operation. Attaching it to the kitchen countertop is recommended only for bachelors. During the winding operation, gloves should be worn to protect the hands and to improve the feed of the wire onto the rod. Unroll a length of wire from the spool (~6 ft of 16 gage (.0625 dia) wire will make an ~8 inch coil). Insert an end of the wire into the hole in the rod. For best results, coil the wire onto the rod the same way it came off the spool. Turn the rod evenly, checking the coil for uniformity.
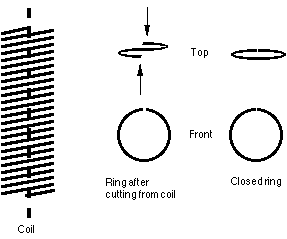
When the coil is finished, cut the end of the coil from the starting hole. Holding the coil in one hand, unthread the rod from the coil. Take care not to distort the coil. Using heavy duty wire cutters or needle-nosed tin snips (to ensure a clean cut), clip a straight line up the coil. Cut slowly to maintain a straight line. See Figure 3. The rings should be uniform with a minimal gap, but no overlap of the ends.
Screen the results and remove the rings that have too great a gap or are distorted. The ring ends should move together to form a minimal gap without overlap. ON TO ASSEMBLY!...
ASSEMBLE THE MAIL
This handbook identifies three main steps to assembling mail. The first step is to make ring assemblies from the basic rings. The second step is to make chains from the ring assemblies. The third step is to join the chains to make basic sections of mail. With the basic sections of mail, most any item can be made by attaching enough sections and subtracting the extra; kind of like laying a tile floor. The purpose of organizing the assembly steps into three parts is to simplify and speed up an otherwise tedious process. This system will allow the apprentice armourer to mass produce the component assemblies and avoid eye strain.
To further reduce the fatigue of the apprentice armourer, it is recommended that soft drinks, popcorn, and a TV be available. The TV program should be something entertaining, but not distracting. For this reason, top rated prime-time shows (ex. Cheers, Simpsons) are not recommended for the apprentice. As the apprentice becomes more experienced, reruns of Cheers will become acceptable. Mystery Science Theatre 3000 is always a good choice.
The first pattern presented for the aspiring apprentice is the four-in-one pattern. Logically, four rings pass through each ring in a symmetrical interlocking pattern. The apprentice is advised to master this pattern before moving on to the more intricate six-in-one pattern. Mastering the basics will enable the apprentice to spot mistakes more readily and increase the apprentice's appreciation of the art.
The six-in-one pattern uses almost twice as many rings to make the same size area as the four-in-one, and is more time consuming to assemble. When this is factored into the economics of producing an article of mail, it is easy to understand the popularity of the four-in-one pattern. The six-in-one pattern can be incorporated into the four-in-one pattern with out much trouble along the shoulders for a nice effect.
The following pages illustrate how to attach the rings to form mail. Depending on the type of rings used, some tools will be needed to help. If double split rings are being used, a sharpened wooden dowel (see Figure 4) is recommended to hold the ring apart while interlinking other rings or ring assemblies. If the rings are made from wire using the procedure previously decribed, a simple pair of pliers is recommended for closing the rings.
Links
- The Ring Lord. Chain mail rings and supplies.
- Japanese Weave
- Butted mail tutorial
- Weave tutorials
- how to make a chainmail Coif
- Study on Viking chain mail extant examples


