Difference between revisions of "Footwear"
| Line 1: | Line 1: | ||
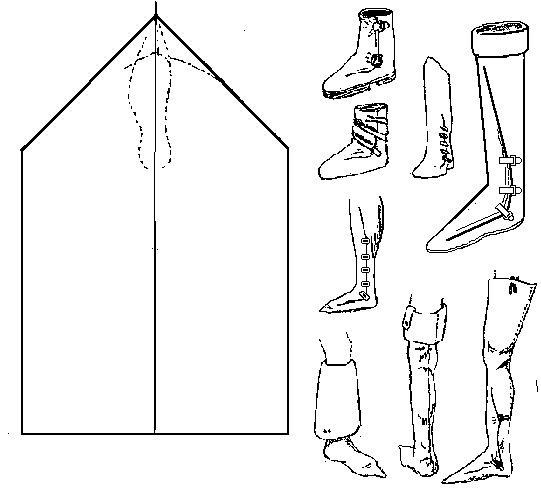
[[Image:SHOE27.GIF|thumb|According to the Dictionary of Costume, this style of footwear, called the Gamashe in the 17th century, is the ancestor of the military legging of later centuries. Such linen leggings are distinguishing marks of peasants and farmers for centuries. In any case, I have no evidence that it appears any earlier than the 14th century. It is a lined turned shoe, made with a rand or a full welt. The method of securing the boot appears to vary, from straps and buckles, to lacing a stretch from 10 to 12 inches along the side of the leg, even all the way up from the ankle to the knee.]] | [[Image:SHOE27.GIF|thumb|According to the Dictionary of Costume, this style of footwear, called the Gamashe in the 17th century, is the ancestor of the military legging of later centuries. Such linen leggings are distinguishing marks of peasants and farmers for centuries. In any case, I have no evidence that it appears any earlier than the 14th century. It is a lined turned shoe, made with a rand or a full welt. The method of securing the boot appears to vary, from straps and buckles, to lacing a stretch from 10 to 12 inches along the side of the leg, even all the way up from the ankle to the knee.]] | ||
| + | ====Glossary of terms==== | ||
| + | '''Last:''' Foot shaped wooden form on which shoes are stretched and sewn. | ||
| + | '''Turn- Shoe:''' Shoe manufactured by stitching leather inside out in the early stages of construction. | ||
| + | |||
| + | '''Pattens:''' Wooden hinged sandals worn over shoes. Their purpose is to protect your shoes (and not incidentally your feet) from mud and abrasive surfaces. | ||
| + | |||
| + | '''Tunnel stitch:''' A stitch that does not completely penetrate the leather. Generally used for sewing on reinforcing cords and heel stiffener. | ||
| + | |||
| + | '''Reinforcing cord:''' A piece of linen cord that is tunnel stitched to leather to add strength. Often used across seams to strengthen them and prevent gapping. Also used around large, high stress openings to prevent the leather from stretching. | ||
| + | |||
| + | '''Heel stiffener:''' A piece of leather tunnel stitched over the heel to prevent undue stretching of the leather at this spot. | ||
| + | |||
| + | ====Turn Shoes how to=== | ||
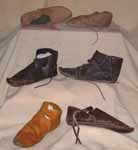
[[Image:Shoe1th.jpg|left]]Left, shoes made by Matthew Amt. At top are two made from the pattern below, using garment leather and sewn by machine. Middle left is a 10th century style copying an example from Durham, and next to it is a very similar 12th century type. Both have chrome-tanned leather uppers, but are hand-stitched with proper turn-shoe construction. Bottom left is a 13th century shoe fastened by two overlapping tabs with little "toggles" (short knotted thongs in this case). Bottom right is an approximation of a 14th or 15th century shoe fastened with a forked strap that passes through a pair of holes and ties. The leather and construction are not quite right, but the overall effect is decent, and it has very correct repair soles sewn on with tunnel stitches. (All of these are for the right foot.) | [[Image:Shoe1th.jpg|left]]Left, shoes made by Matthew Amt. At top are two made from the pattern below, using garment leather and sewn by machine. Middle left is a 10th century style copying an example from Durham, and next to it is a very similar 12th century type. Both have chrome-tanned leather uppers, but are hand-stitched with proper turn-shoe construction. Bottom left is a 13th century shoe fastened by two overlapping tabs with little "toggles" (short knotted thongs in this case). Bottom right is an approximation of a 14th or 15th century shoe fastened with a forked strap that passes through a pair of holes and ties. The leather and construction are not quite right, but the overall effect is decent, and it has very correct repair soles sewn on with tunnel stitches. (All of these are for the right foot.) | ||
| + | |||
| + | Most medieval shoes were "turn shoes", sewn together inside out and then turned rightside out, to keep the stitching protected from wear. The sole is sewn to the upper with an edge/flesh seam: the stitch passes straight through the upper, then into the edge of the sole and out through the flesh (rough) side (fig 1). The edges of the uppers can be butted together and sewn with an edge/flesh seam, or simply overlapped and stitched straight through. | ||
| + | |||
| + | [[Image:Mbcsshoedet.gif]] | ||
| + | |||
| + | Like almost all shoes of the period, this pattern has an upper of one main piece with the seam on the inside of the foot; small inserts are added to close any gaps. The toe is pointed, and there can be an embroidered stripe running from the toe to the throat. Shoes were made with a right and left, and could be slip-ons or fastened with a drawstring. | ||
| + | |||
| + | Most surviving medieval shoes are made from very thin leather. Most reproductions are "over-engineered" and made from thicker leather (including my own), up to about 4 to 6-ounce for the uppers and 7 to 8-ounce for the soles. Be sure to use topgrain vegetable-tanned leather, not suede or chrome-tanned. (Click here for a page of leather tips: www.larp.com/legioxx/leather.html) Before doing any cutting, make a good working pattern out of scrap cloth and cardboard that fits your foot. The "seam allowance" around the bottom edge of the upper will be 1/4" to 3/8", but the sole should have NO seam allowance, since the upper is sewn against its edge. It will look very narrow. | ||
| + | |||
| + | When sewing the upper and sole together, start at the toe and sew the outside, then start again at the toe and sew the inside. Keep your stitches small and tight. A helpful trick is to glue the pieces together with leather glue or contact cement first, then stitch them. (Glue alone will NOT hold the pieces together without stitching!) Also, you may wish to turn the shoe before sewing the side seam or adding any inserts. The shoe must be soaked in water for several hours before it can be turned. When the shoe has been turned and has dried completely, coat it well with neatsfoot oil to make it waterproof and supple. | ||
| + | |||
| + | The thin soles of medieval shoes are not as protective as modern soles, of course, so you may want to insert padded or heavier leather insoles for more comfort. On the other hand, smooth leather soles can be slippery on wet grass, but a thin sole allows the toes to dig in more for better traction. | ||
===Links=== | ===Links=== | ||
| − | *[http://www.personal.utulsa.edu/~marc-carlson/shoe/SHOEHOME.HTM | + | *[http://www.personal.utulsa.edu/~marc-carlson/shoe/SHOEHOME.HTM Historical] footwear by Marc Carlson |
| − | + | *[http://www.forth-armoury.com/photo_gallery/Shoes/shoes.htm Gallery of] Turn Shoes | |
| + | *[http://www.turnshoes.co.uk/ purchase] turn shoes | ||
[[Category:Garb]] [[Category:Amtgard Things]] | [[Category:Garb]] [[Category:Amtgard Things]] | ||
Revision as of 23:34, 4 November 2008

Glossary of terms
Last: Foot shaped wooden form on which shoes are stretched and sewn.
Turn- Shoe: Shoe manufactured by stitching leather inside out in the early stages of construction.
Pattens: Wooden hinged sandals worn over shoes. Their purpose is to protect your shoes (and not incidentally your feet) from mud and abrasive surfaces.
Tunnel stitch: A stitch that does not completely penetrate the leather. Generally used for sewing on reinforcing cords and heel stiffener.
Reinforcing cord: A piece of linen cord that is tunnel stitched to leather to add strength. Often used across seams to strengthen them and prevent gapping. Also used around large, high stress openings to prevent the leather from stretching.
Heel stiffener: A piece of leather tunnel stitched over the heel to prevent undue stretching of the leather at this spot.
=Turn Shoes how to
Left, shoes made by Matthew Amt. At top are two made from the pattern below, using garment leather and sewn by machine. Middle left is a 10th century style copying an example from Durham, and next to it is a very similar 12th century type. Both have chrome-tanned leather uppers, but are hand-stitched with proper turn-shoe construction. Bottom left is a 13th century shoe fastened by two overlapping tabs with little "toggles" (short knotted thongs in this case). Bottom right is an approximation of a 14th or 15th century shoe fastened with a forked strap that passes through a pair of holes and ties. The leather and construction are not quite right, but the overall effect is decent, and it has very correct repair soles sewn on with tunnel stitches. (All of these are for the right foot.)
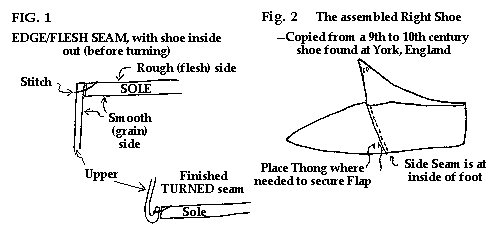
Most medieval shoes were "turn shoes", sewn together inside out and then turned rightside out, to keep the stitching protected from wear. The sole is sewn to the upper with an edge/flesh seam: the stitch passes straight through the upper, then into the edge of the sole and out through the flesh (rough) side (fig 1). The edges of the uppers can be butted together and sewn with an edge/flesh seam, or simply overlapped and stitched straight through.
Like almost all shoes of the period, this pattern has an upper of one main piece with the seam on the inside of the foot; small inserts are added to close any gaps. The toe is pointed, and there can be an embroidered stripe running from the toe to the throat. Shoes were made with a right and left, and could be slip-ons or fastened with a drawstring.
Most surviving medieval shoes are made from very thin leather. Most reproductions are "over-engineered" and made from thicker leather (including my own), up to about 4 to 6-ounce for the uppers and 7 to 8-ounce for the soles. Be sure to use topgrain vegetable-tanned leather, not suede or chrome-tanned. (Click here for a page of leather tips: www.larp.com/legioxx/leather.html) Before doing any cutting, make a good working pattern out of scrap cloth and cardboard that fits your foot. The "seam allowance" around the bottom edge of the upper will be 1/4" to 3/8", but the sole should have NO seam allowance, since the upper is sewn against its edge. It will look very narrow.
When sewing the upper and sole together, start at the toe and sew the outside, then start again at the toe and sew the inside. Keep your stitches small and tight. A helpful trick is to glue the pieces together with leather glue or contact cement first, then stitch them. (Glue alone will NOT hold the pieces together without stitching!) Also, you may wish to turn the shoe before sewing the side seam or adding any inserts. The shoe must be soaked in water for several hours before it can be turned. When the shoe has been turned and has dried completely, coat it well with neatsfoot oil to make it waterproof and supple.
The thin soles of medieval shoes are not as protective as modern soles, of course, so you may want to insert padded or heavier leather insoles for more comfort. On the other hand, smooth leather soles can be slippery on wet grass, but a thin sole allows the toes to dig in more for better traction.
Links
- Historical footwear by Marc Carlson
- Gallery of Turn Shoes
- purchase turn shoes

