Shirts
Shirts tended to be fairly close-fitting about the neck and wrists. To allow the head to go through the neck hole, there was a small slit at the front, which could be held closed by a brooch if desired. Shirt sleeves came down to the wrist and were often long enough to bunch up on the forearm.
The basic costume for men up to at least 1300AD was shirt, tunic and hose. The shirt and tunic would be based on the simple "T-tunic" pattern. The shirt would most likely be of linen and the tunic of wool. The length of both shirt and tunic varied with period. Knee-length was common. To allow free movement of the legs, the garment would either widen out below the waist to give a full "skirt", or would be slit to about hip level. Slits were usually at the sides, but were sometimes at front and back.
How to
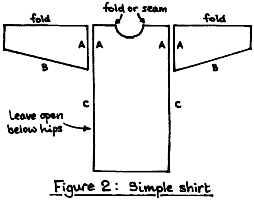
A basic T-tunic style shirt. The method of construction is to take a strip of material long enough to go over the head and hang down to the desired length front and back. Alternatively, join two pieces to form such a strip. The strip should be wide enough so that the finished garment can be pulled on over your head and shoulders - it's meant to be loose-fitting around the body. Cut out a circular hole for the neck. This hole should be offset toward the front of the garment, as you can see by looking at a modern shirt or jumper. Cut a slit down the front, just long enough to allow the shirt to go over your head. It's difficult to turn over the edges of a circular hole to make a hem, so I trim the edges of the neck opening with bias binding. (Use 1"/25mm binding folded in half.) Next, lay the fabric out, unfolded, and attach the sleeves to the body (A-A). Fold again, then sew along the sleeves and down to hip level (B & C). Finally, neatly hem the cuffs and the bottom of the tunic, or trim with bias binding. A wider binding (2"/50mm) looks nice round the bottom.
