Difference between revisions of "Tunic"
(→Links) |
(→Terms) |
||
| Line 58: | Line 58: | ||
'''Darts''' Triangles of cloth removed by tucking or sewing, used to fit a garment closely to a person's true shape. Might be used in a doublet or a cohardie. | '''Darts''' Triangles of cloth removed by tucking or sewing, used to fit a garment closely to a person's true shape. Might be used in a doublet or a cohardie. | ||
| − | '''Applique''' Decoration style, made by sewing a swatch of fabric on top of another in a specific design. | + | '''[[Applique]]''' Decoration style, made by sewing a swatch of fabric on top of another in a specific design. |
| − | '''Embroidery''' Decoration style, created by stitching colored threads in a pattern on a garment. When done in all one color it's is typically called 'black work'. | + | '''[[Embroidery]]''' Decoration style, created by stitching colored threads in a pattern on a garment. When done in all one color it's is typically called 'black work'. |
'''Joined Sleeves''' Sleeves that are added separately, not as you would see with a T-tunic. Joined Sleeves usually have a curved edge like that of a modern dress shirt. This allows them to lay naturally against the body. | '''Joined Sleeves''' Sleeves that are added separately, not as you would see with a T-tunic. Joined Sleeves usually have a curved edge like that of a modern dress shirt. This allows them to lay naturally against the body. | ||
Revision as of 19:06, 18 February 2009
A type of Garb
Contents
Description;
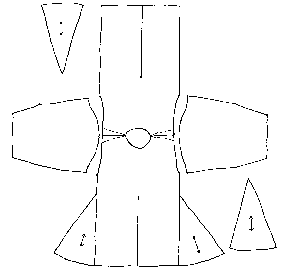
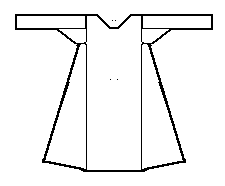
The tunic is "standard" torso garb. It will almost always have sleeves and closed sides, unlike a Tabard which has open sides. Tunics are sometimes called 'Bell Tunics'. The 'Bell' refers to the belled shape of the bottom of the Tunic, This is created using triangle shaped gores or cutting the body of the Tunic with sides that slope outward. The garment itself is pattered on a very large T-shirt.
A tunic is any of several types of clothing for the body, with or without sleeves, and of various lengths reaching from the hips to the ankles. The name derives from the Latin tunica commonly worn by both men and women in Ancient Rome, which in turn is based on earlier Greek garments. The Roman tunica was worn by citizens and non-citizens alike; citizens, though, would wear it under the toga, especially at formal occasions. The length of the garment, the presence or lack of stripes, as well as their width and ornamentation, would indicate the wearer's status in Roman society. Soldiers, slaves and manual workers generally had tunics to a little above the knee; those in more sedentary occupations to about the ankle (unless they were expecting to ride a horse, when a shorter one would be worn).
Historical Finds
The garments of the fifth-century jarl buried at Evebø, Norway, are too fragmentary to determine the way they were made. The remains are mainly useful for what they reveal about tunic length, decoration, and layering. The two wool garments were found in situ with one worn over the other. The red undertunic had elaborate tablet-woven wool trim at the neck, wrists, and hem, with bronze wrist clasps; it came down as far as the knee. The overtunic had a different type of tablet-woven wool trim at the neck, plus silver clasps in some undetermined location (Magnus 1982, 68-69). Given the existence of the silver clasps, as well as the striking appearance of the undertunic, the overgarment may well have been some sort of a coat designed to augment, rather than cover, the undertunic; the clasps might have held it together on the chest.
The excavations at Birka, Sweden, which cover the ninth and tenth centuries, did not include entire garments. However, the pieces of clothing that were found there yielded quite a bit of information on different types of tunic-type garments, including smocks, tunics, and coats. There is plenty of evidence for linen smocks, wool tunics, wool and linen coats, and even one possibly Byzantine-style linen long tunic. Construction details common to them all include front and back panels cut in one piece, rather than two-piece construction with shoulder seams, and small round or keyhole necklines. Triangular gores were added for additional width in the skirt area of many garments.
Some Construction Tips
(On historical tunics of the viking style)
Decide how each element of the tunic should be constructed before cutting out anything; then, if need be, make patterns out of paper for each piece that you will need. If you do make paper patterns, be careful to label each pattern piece with the name of the intended wearer of the tunic, the name of the pattern piece (e.g., "sleeve"), and the date. That way you will have a record of how you made the tunic; then you can repeat it if the tunic happens to come out perfect, or adjust the pattern pieces if the tunic isn't perfect.
The front and back panels of a tunic work fairly well if they are as wide as the measurement between the points of the shoulders, plus seam allowances on both sides. Gores can be as narrow or as wide as you like, but if they are too wide they will hang in deep folds rather than draping gracefully.
It is almost impossible to reconstruct the sleeve length and overall length of Viking garments from the pieces that remain. Since sleeves were designed to be close-fitting at the lower end, it is likely that they were wrist-length. Iconographic evidence suggests that tunics were worn at least to mid-thigh, probably down as far as the knee. Jackets seem to have been on the short side, while Birka riding coats were probably longer than the garments they were worn over, perhaps even calf-length. Women's gowns might in some cases have extended only to the lower calf or, as depicted in some figurines, drag behind with a miniature train effect, depending on what sort of work may have needed to be performed while wearing them. Ankle-length gowns and smocks suit the climate and activity level of Pennsic very well, while the train effect is very attractive in a Court setting.
Evidence for Viking garments frequently includes linings; in particular, the coat garment was often lined with silk or linen. Necklines were generally not faced, but enclosed by or edged with durable or decorative trimmings. This effect can be achieved in a variety of ways--by the use of bias tape, purchased trim, braided wool yarn, tablet-weaving, or silk edgings cut out of larger pieces of fabric.
How to
T- Tunic from Fransis
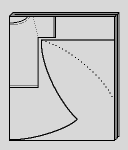
First, obtain your material. Most t-tunics go to just above the knees, but they can also go right to the floor. The length of the cloth should be just a bit more than twice the distance from your shoulder to where you want it to hang to. The width (ideally) will be at least the distance between your wrists when your arms are held out to your sides. Pick a material that's easy to work with. Wool is easiest to work with, since you don't have to treat the edges to keep it from fraying too badly. An old army blanket in olive drab or deep red (not orange!) is ideal. A grey blanket can be left as-is or dyed blue.
Alternatively, you can use broadcloth or whatever you find in the remnants bin. Strong, primary colours are best, with browns and tans less usual. The concept of "matching" was unheard of in the early Middle Ages, and it was common to wear red with green and yellow.
Second, fold the cloth in quarters, raw edges together first and selvedges together second. Note the corner that corresponds with the centre of the fabric.
Third, take a loose fitting sweatshirt or tee-shirt and fold it in half, lengthwise. Lay it on the folded fabric with the lengthwise folds together and the neck at the corner that corresponds with the centre of the cloth.
Mark the outline of the t-tunic using your shirt as a guide. Leave an inch or more for seam allowance and to allow a bit of looseness in the fit. Extend the sleeve line out to the edge of the fabric. Choose either a close fitting sleeve (solid line) or a wide, hanging sleeve (dashed line, usually for women). Extend the sides into a skirt and mark the bottom in an arc.
Fourth, take your shirt off the cloth and cut where you've marked.
Fifth, make the neck hole. Be careful! Most people don't know how tiny their neck really is... measure the thing, first.
Open the cloth out by one fold and make a "D" shape centered on the fold and as big as your neck. Your neck sort-of grows out of the front of your chest, not straight up between your shoulders. The neck hole must reflect this or your garb will ride against the front of your neck and be uncomfortable.
Flip the cloth over and mark a MUCH shallower "D" on the back. Cut this out.
To get it over your head, you need a hole bigger than your neck. Cut a slit down the front of the tunic from the neck hole just far enough so that you can get your head through. Cut this by degrees until it's just right. Since this makes the neck look a bit like a keyhole, it's called a keyhole neck.
Tunics in Amtgard
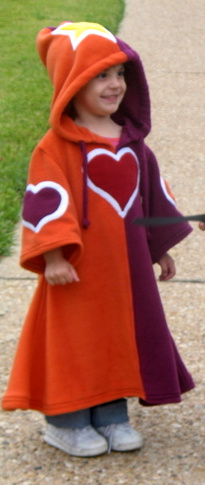
The tunic has been commonplace throughout history, and even up till today for some cultures in daily living and others in regards to religious ceremony. From the ancient Greeks through the Romans, and medieval times, tunics represented an easily made, highly comfortable, garment that could be worn by all sectors of society. Tunics were made in many different fabrics, colors, and levels of decoration depending on a person's position and wealth, and even the place they came from as with the ancient Greeks.
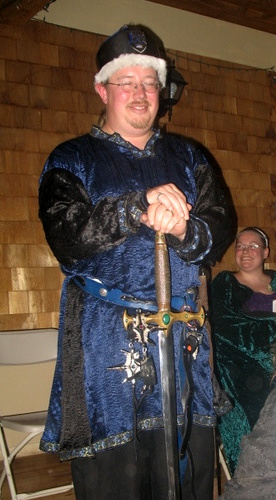
In our game Tunics might be called 'Bells', 'Horsemans', or 'Circle tunics. Each having a different connotation in different geographical areas. Most carry similar traits; a faced or turned neckline, joined sleeves, and side gores. Length can go from just below the hips to below the knees again with kingdom styles pervading.
A simple tunic might take an experienced craftsmen a little over two hours and three yards of fabric to make. Preferred materials include flat weave cottons like trigger, poplin, and in some cases high quality broadcloth. Twills in midweight cottons are also available. Natural fibers are recommend, not just for 'accuracy' of the look, but for their texture against the skin and breathability. Synthetics like polyester to hold their color and shape longer, but are very noticeable and tend to be itchy.
With very simple changes is is possible to transform this versatile garment from fighting to court garb. A minor shift in material from trigger to velvet, a lengthening or shortening of sleeves. A short sleeved tunic bearing personal heraldry might be worn over a puffy white shirt.
Terms
Gores Triangles of cloth inserted into seams to increase size. Usally used in the 'skirt' of a bel or circle tunic
Darts Triangles of cloth removed by tucking or sewing, used to fit a garment closely to a person's true shape. Might be used in a doublet or a cohardie.
Applique Decoration style, made by sewing a swatch of fabric on top of another in a specific design.
Embroidery Decoration style, created by stitching colored threads in a pattern on a garment. When done in all one color it's is typically called 'black work'.
Joined Sleeves Sleeves that are added separately, not as you would see with a T-tunic. Joined Sleeves usually have a curved edge like that of a modern dress shirt. This allows them to lay naturally against the body.
Hem A turned edge, typically rolled and sewn at least twice to reenforce and protect the raw edge.
Right Side
Links
- how to by Squeak! the mighty
- Video on tunics and garb by Forest
- How to by Lorenth
- Wikipedia link
- How to by Muireann ingen Eoghain ua Maoil Mheaghna
- How to from the beginners guide
- buy tunics at swords of honor
- buy tunics at 'by the sword'
- Buy tunics at Relm Collections
- buy tunics at Medieval Collectables
- buy tunics at Garb the world
- buy tunics at Medstock
- Tunics the period way
- Clothing of the middle ages, from archeological finds
