Difference between revisions of "Cloak"
| Line 14: | Line 14: | ||
'''Garment details -''' Do you want your cloak to have a hood or not? Or maybe just a stand-up collar? Will the cloak tie at the neck, button shut or fasten with a brooch? Do you want your cape to have any inside or outside pockets? Or maybe an inside secret pocket? The more details you can think about and make decisions on before you start making your cloak, the better you can control your project budget and the less likely it will be that you get stuck halfway and can't figure out how to finish it. | '''Garment details -''' Do you want your cloak to have a hood or not? Or maybe just a stand-up collar? Will the cloak tie at the neck, button shut or fasten with a brooch? Do you want your cape to have any inside or outside pockets? Or maybe an inside secret pocket? The more details you can think about and make decisions on before you start making your cloak, the better you can control your project budget and the less likely it will be that you get stuck halfway and can't figure out how to finish it. | ||
===Types of cloaks=== | ===Types of cloaks=== | ||
| − | Half Circle''' | + | '''Half Circle''' is literally a partial circle of fabric. This style does not close well in front. For warmth, chose one of the other styles, like a full circle cloak. The basic pattern calls for a large half-circle for the cloak. Instead of cutting a half-circle or oval in the center of the straight side the way you normally would for a cloak, come in 2-3 inches and then cut a full circle 6 or 7 inches in diameter (depending on the size of your head). Then just stick your head through the hole. That has the right drape. |
| − | + | ||
| − | + | The '''Rectangle Style''' has much fabric gathered into the neck. This is the type of cloak is just a rectangle (fingertip to fingertip, and down to the floor on both sides) with a split up the center and a hood. [http://www.folkwear.com/207.html Folkwear Kinsale Cloak] - for experienced sewers (this pattern has a number of advanced techniques). | |
====Directions==== | ====Directions==== | ||
This pattern is a little more complex that the basic rectangular pattern but it does produce a very nice cloak without too much effort. I have used it to make three cloaks so far and will probably make more in the future. | This pattern is a little more complex that the basic rectangular pattern but it does produce a very nice cloak without too much effort. I have used it to make three cloaks so far and will probably make more in the future. | ||
| Line 62: | Line 62: | ||
Finally attach the fastener just below where the hood joins the body of the cloak. | Finally attach the fastener just below where the hood joins the body of the cloak. | ||
| − | + | ||
| − | |||
Revision as of 02:17, 5 November 2008
The English word cloak derives from the medieval Latin cloca, meaning cape, and the Old French cloke, which was the same as the later cloche, meaning bell. The word was used because the most usual form of cloak in the early centuries AD, as well as in more ancient cultures, was a simple bellshaped design without fastening, made from a roughly circular piece of material with a hole cut for the head. The German medieval design Glocke was similarly named.
A loose type of outer covering for the body has remained in use in all parts of the world since man first wore animal skins. Throughout the centuries the piece of fabric, large or small, was utilised by the ordinary man or woman as a blanket or bed-covering at night and a garment by day, its size and material varying only according to the climate in which it was being worn. Examples of this double use of the cloak stem most often from societies where a person had to spend the night in cold weather or in the open and required protection from the rain and wind. Roman soldiers used their cloaks for this purpose, as did the Scots who wrapped themselves in their plaid at night and pleated and draped it round themselves by day. In the Middle East, the Arab burnous and hayk have traditionally served the same purpose as they were essential in the chill of the desert night. The earliest cloaks were simply fur skins held to the body by a leather thong or fastened by a thorn or a crude pin at the shoulder. Later, the cloak became an outer garment worn over a tunic and hose; while in the more sophisticated times of the sixteenth and seventeenth centuries in Europe, this outer garment, still necessary for travelling, riding and keeping out the cold, had become an item of fashion in its own right, with an elegance of line and beauty of fabric and lining.
Contents
Designing Your Cape
Before you get started, there are a few decisions that you need to make about your cape or cloak that will make the actual project a lot easier.
Costume or Real Garment? - Is this just a one-time garment or do you want this to work as a real outer garment that protects you from weather? You'll want better material and to spend more time on a real cloak versus a cape for a costume party.
Length? - Capes can be to the waist, to the knee or full-length (to the ankle) It's often best to make sure they don't drag on the ground as this can make them get wet/dirty or prone to being stepped on. Pinning some fabric and walking around the house can help you get a good idea of what works for you. Be sure to try things like going up and down stairs, going in and out of doors and at least just once try going to the bathroom with your practice cape pinned in place.
Material? - Costume capes tend to be satin, cotton or velvet, whereas historical garments are almost always a heavy wool or brocade that will actually shed rain and keep you warm. If you don't want the cape to flap behind you and hang down straight more readily, make sure the fabric is heavier. Also be sure to look at the "wrong" side of the fabric and decide if you want the inside of your cloak to look like that. If not, you'll want to pick out a fabric to line it with.
Garment details - Do you want your cloak to have a hood or not? Or maybe just a stand-up collar? Will the cloak tie at the neck, button shut or fasten with a brooch? Do you want your cape to have any inside or outside pockets? Or maybe an inside secret pocket? The more details you can think about and make decisions on before you start making your cloak, the better you can control your project budget and the less likely it will be that you get stuck halfway and can't figure out how to finish it.
Types of cloaks
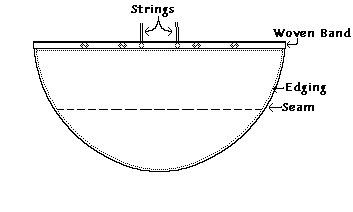
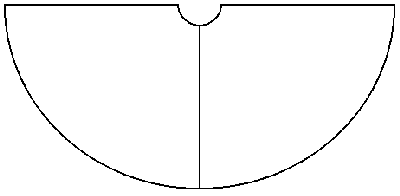
Half Circle is literally a partial circle of fabric. This style does not close well in front. For warmth, chose one of the other styles, like a full circle cloak. The basic pattern calls for a large half-circle for the cloak. Instead of cutting a half-circle or oval in the center of the straight side the way you normally would for a cloak, come in 2-3 inches and then cut a full circle 6 or 7 inches in diameter (depending on the size of your head). Then just stick your head through the hole. That has the right drape.
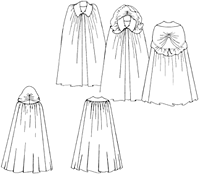
The Rectangle Style has much fabric gathered into the neck. This is the type of cloak is just a rectangle (fingertip to fingertip, and down to the floor on both sides) with a split up the center and a hood. Folkwear Kinsale Cloak - for experienced sewers (this pattern has a number of advanced techniques).
Directions
This pattern is a little more complex that the basic rectangular pattern but it does produce a very nice cloak without too much effort. I have used it to make three cloaks so far and will probably make more in the future.
My favourite for this one is crushed velvet. Other than that I would recommend either cotton or polycotton. You can use pretty much any material but really cheap fabrics tend not to hang very well.
Materials:-
- 4 yards of 60 inch wide fabric.
- Cotton.
- Some form of fastener.
Tools:-
- Chalk for marking out.
- A length of string (5 ft).
- Sharp scissors.
- Pins.
- Sewing machine. You can sew this pattern by hand if you don't have a sewing machine but it will take a long time.
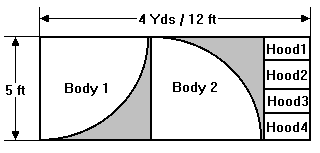
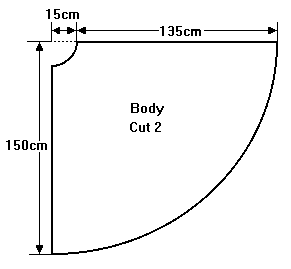
Take the fabric and cut out the pieces of the cloak as shown. It is possible to get all the pieces out of 4 Yds of fabric and have a small strip left at the end. To mark out the body sections use a length of string and a pin to act as a giant compass. (Make sure you don't get stretchy string though!)
This pattern produces a cloak with a lined hood. The instructions here assume that the hood will be lined with the same material that the cloak is made from so that it will appear the same from both sides. If you want to line the hood with a different material simply cut two sections for the hood from the main material and two from the lining material you wish to use.
Body Sections (Cut 2).
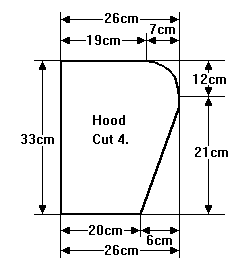
Hood Sections (Cut 4).
If you are using a fabric which has a right and wrong side such as velvet cut half the pieces so that they are mirror images of the other half. If you are using a plain material it doesn't matter as you can just turn the pieces over to obtain the mirror images.
Firstly take the two body sections and sew them together to form a semi-circle.
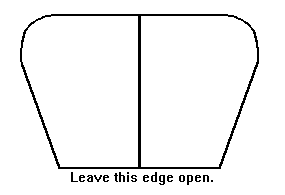
Next take the sections for the hood. Sew two of them together along the longer of the straight edges to form the shape shown below and repeat for the other pair (If you are lining the hood with a different material you should have one pair of the main material and one pair of the lining material). Now sew the two sections you have together with the back of the material towards the outside leaving it open along the edge indicated.
Now turn the hood the right way out. The next stage is to sew the hood onto the body of the cloak. Take your time lining the hood up so that the seam up the back of the hood lines up exactly with the seam along the back of the cloak or the cloak will look odd and the hood will tend to twist round while you are wearing it.
Once you have attached the hood hem up all the way down both sides and all the way along the bottom edge (this is where the sewing machine really comes in useful).
Finally attach the fastener just below where the hood joins the body of the cloak.
Cloak Patterns
- Moroccan burnoose This is a Moroccan burnoose laid flat from Max Tilke. The bottom hem is an exact half circle.
- The Roman sagum and paenula cloaks Vogue 7110 - View A is a full circle cape with hood, rated Very Easy.
- Simplicity 5794 - Full cape with variations.
- Simplicity's 9887 -(Has a wizard hat pattern.)
- McCall's 4378 - sheer cape with full hood - comes with an interesting dress pattern, too.
- McCall's 4698 - cloak with extremely full, gathered front hood - similar to Kinsale cloak but easier.
- Butterick 4030 - flowy cape with moderate hood- rated "fast & easy".
- Butterick 4050 - hooded robe/sleeved cloak (whichever way you want to look at it)
- [
 Butterick 4377 - hooded cloak w/gathered neckline
Quick pattern pieces
Basic Hoods You don't always have to use a pattern... we're starting to assemble some tips for making your own....
This is not for the long pointy hoods like those on the Lorien cloaks. It's a softer, draping hood. The big plus--it doesn't have a center seam. It's simply a half-circle. To judge how big to cut it, measure yourself from your eyebrows across the top of your head and down to the base of your neck. Add 2 or 3 inches to this, and use this as your radius (so that if your final measure is, for example, 23 inches, your half circle will be 46 inches on the straight side).
The straight edge is the one that will be framing your face, so turn that under an inch or two and hem it (or you can line the whole piece if you like). Gather up the curved edge and sew it to the neckline of your cloak.
